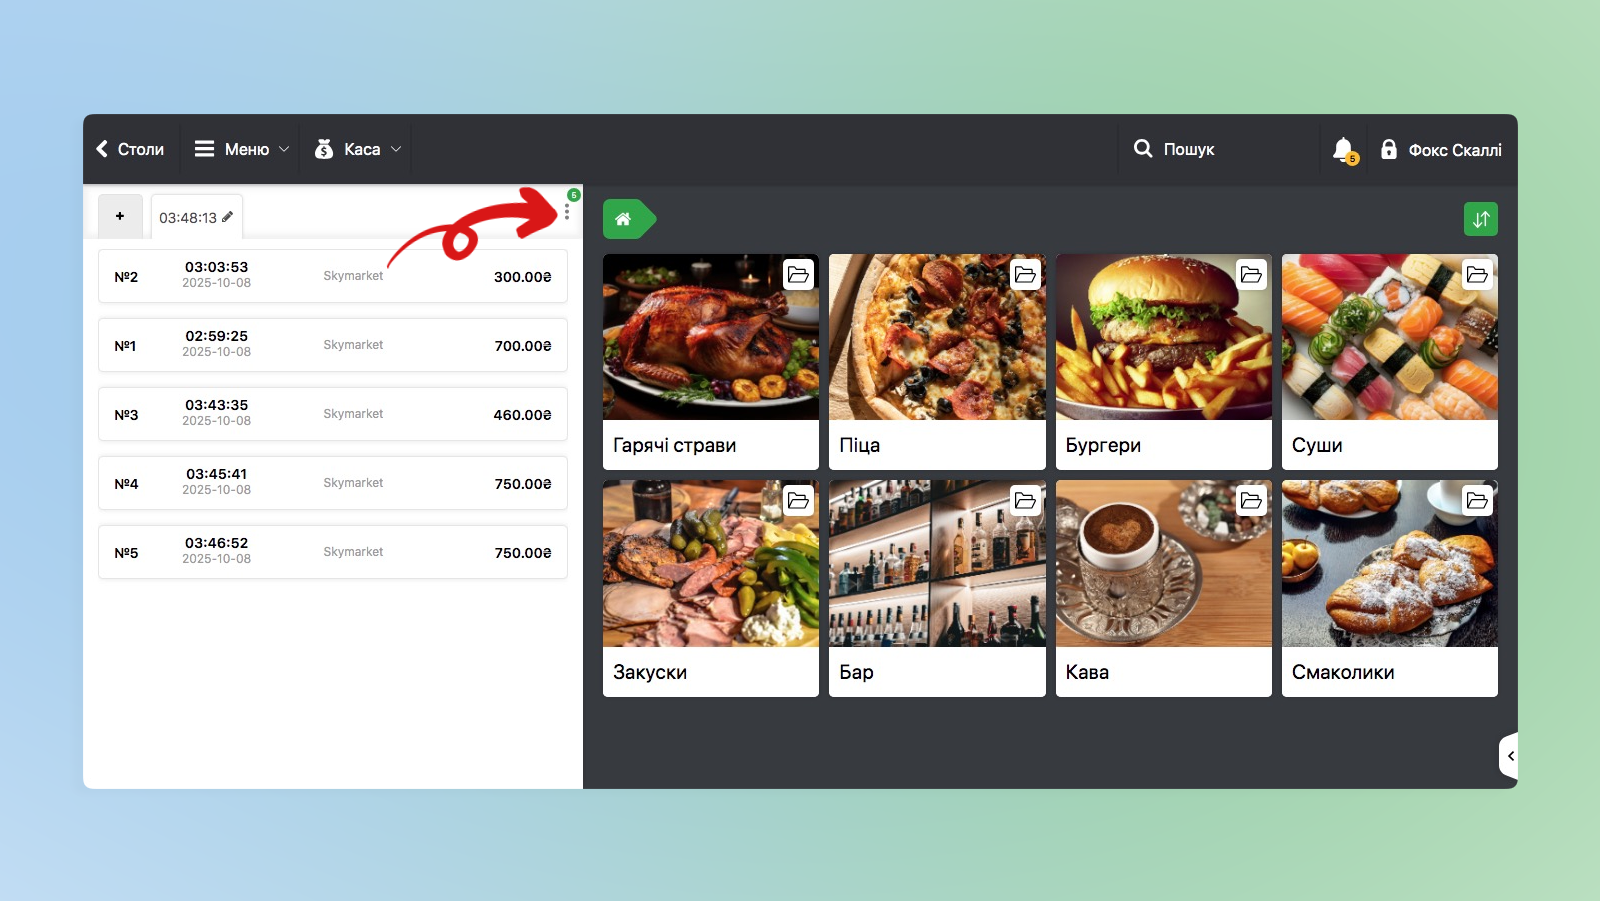
Activation
To activate and configure the store you need to:
- On Home click My apps → Apps → select from the list Sky Market
- In the next window you can see images of the app operation and read the description
- Click Open app
- Activate the switch Activate SkyMarket
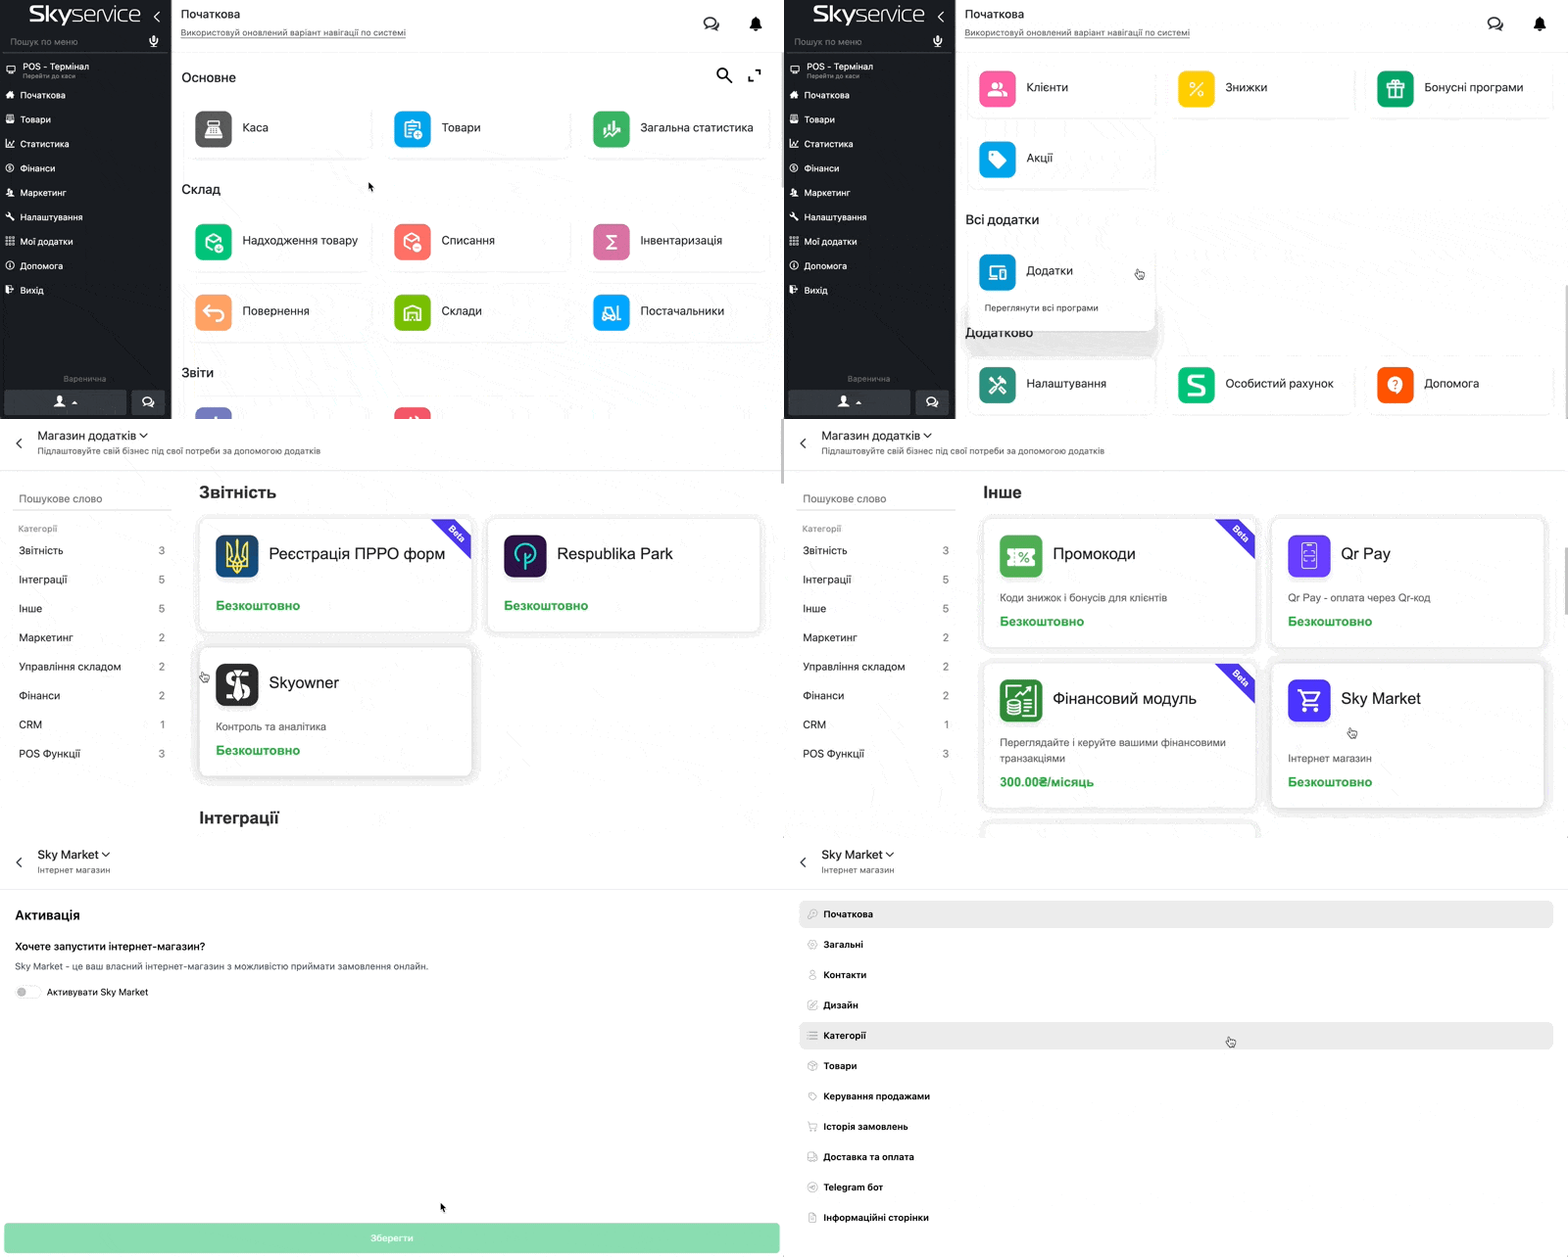
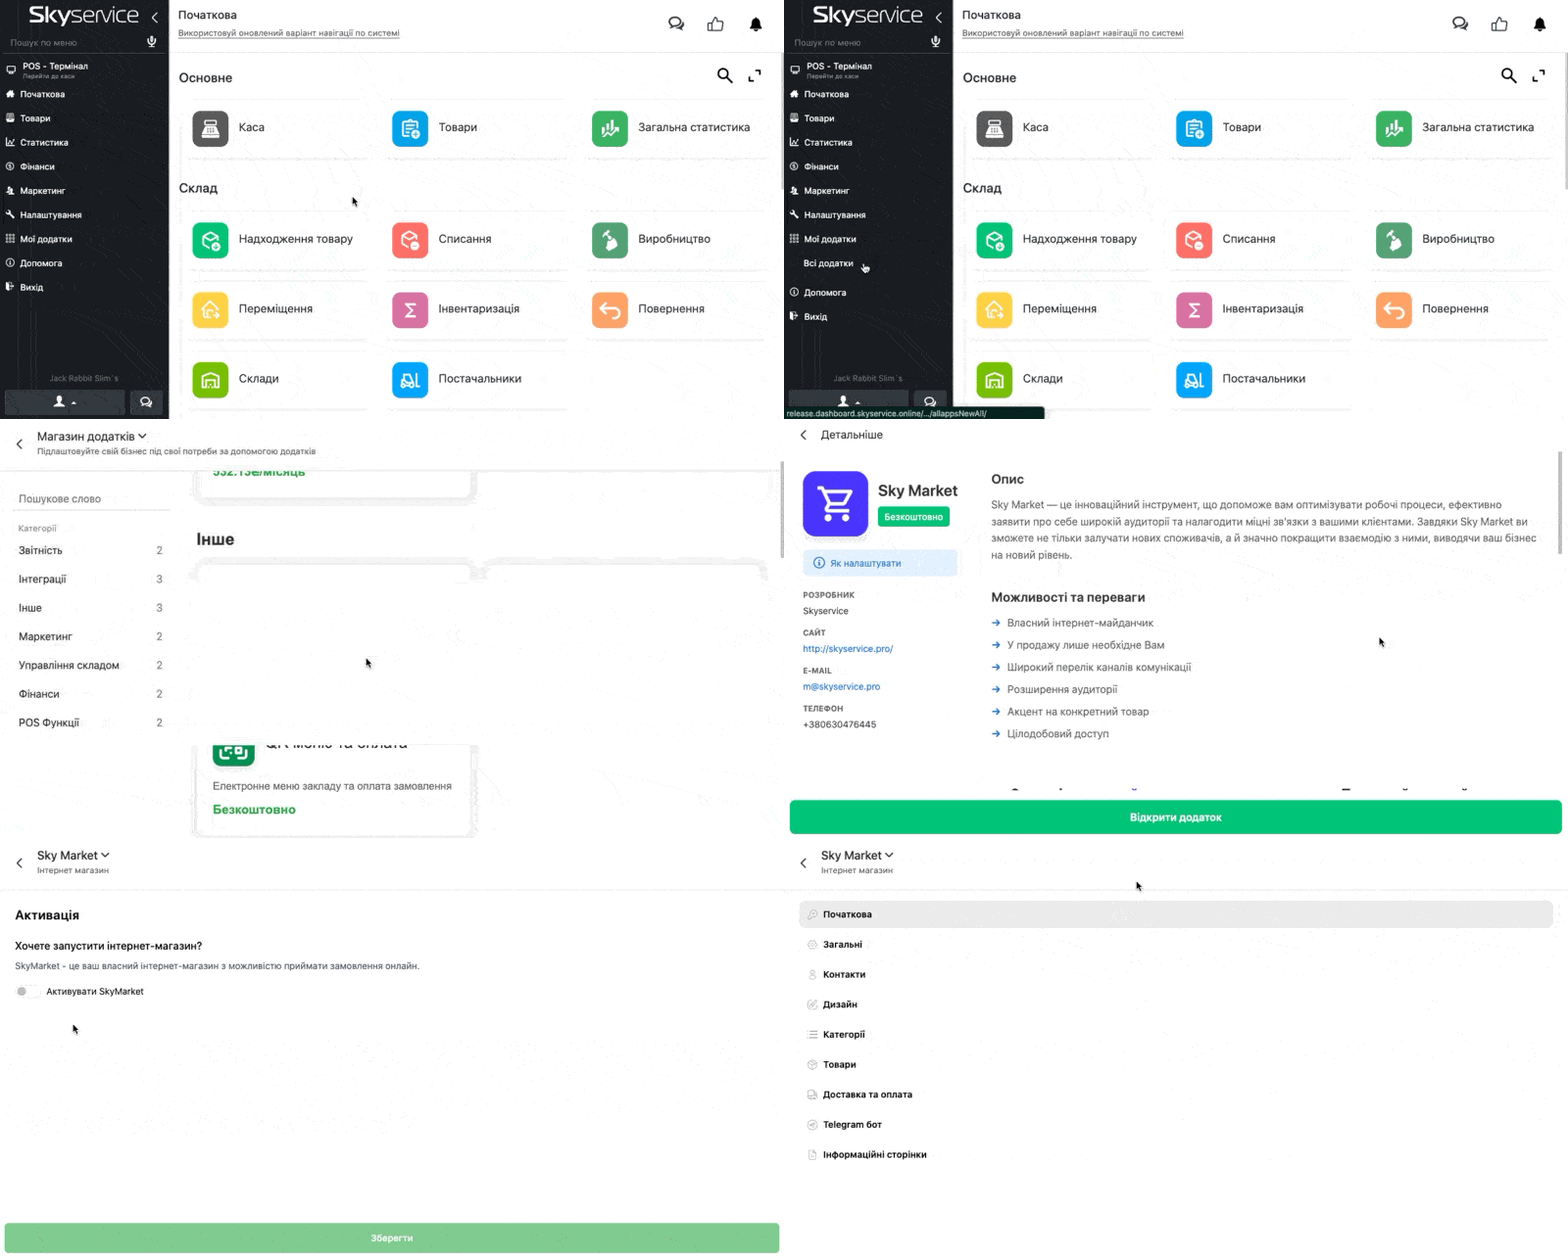
- Or in the side panel go to the section My apps → All apps → select from the list Sky Market
- In the next window you can see images of the app operation and its description
- Click Open app
- Activate the switch Activate SkyMarket
Creating a store
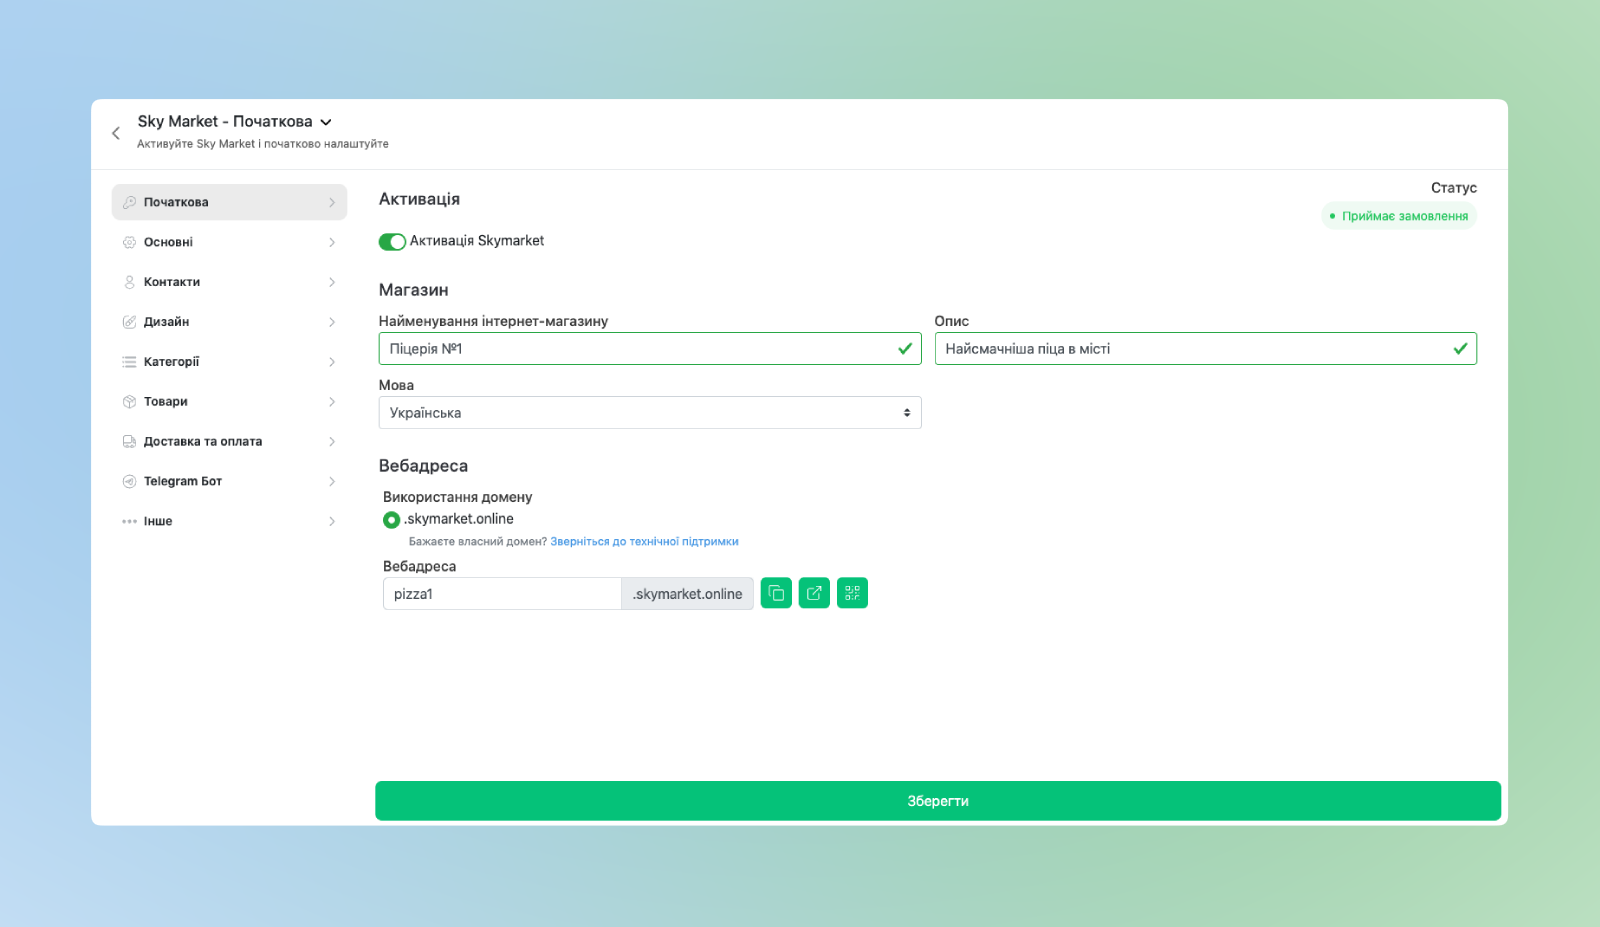
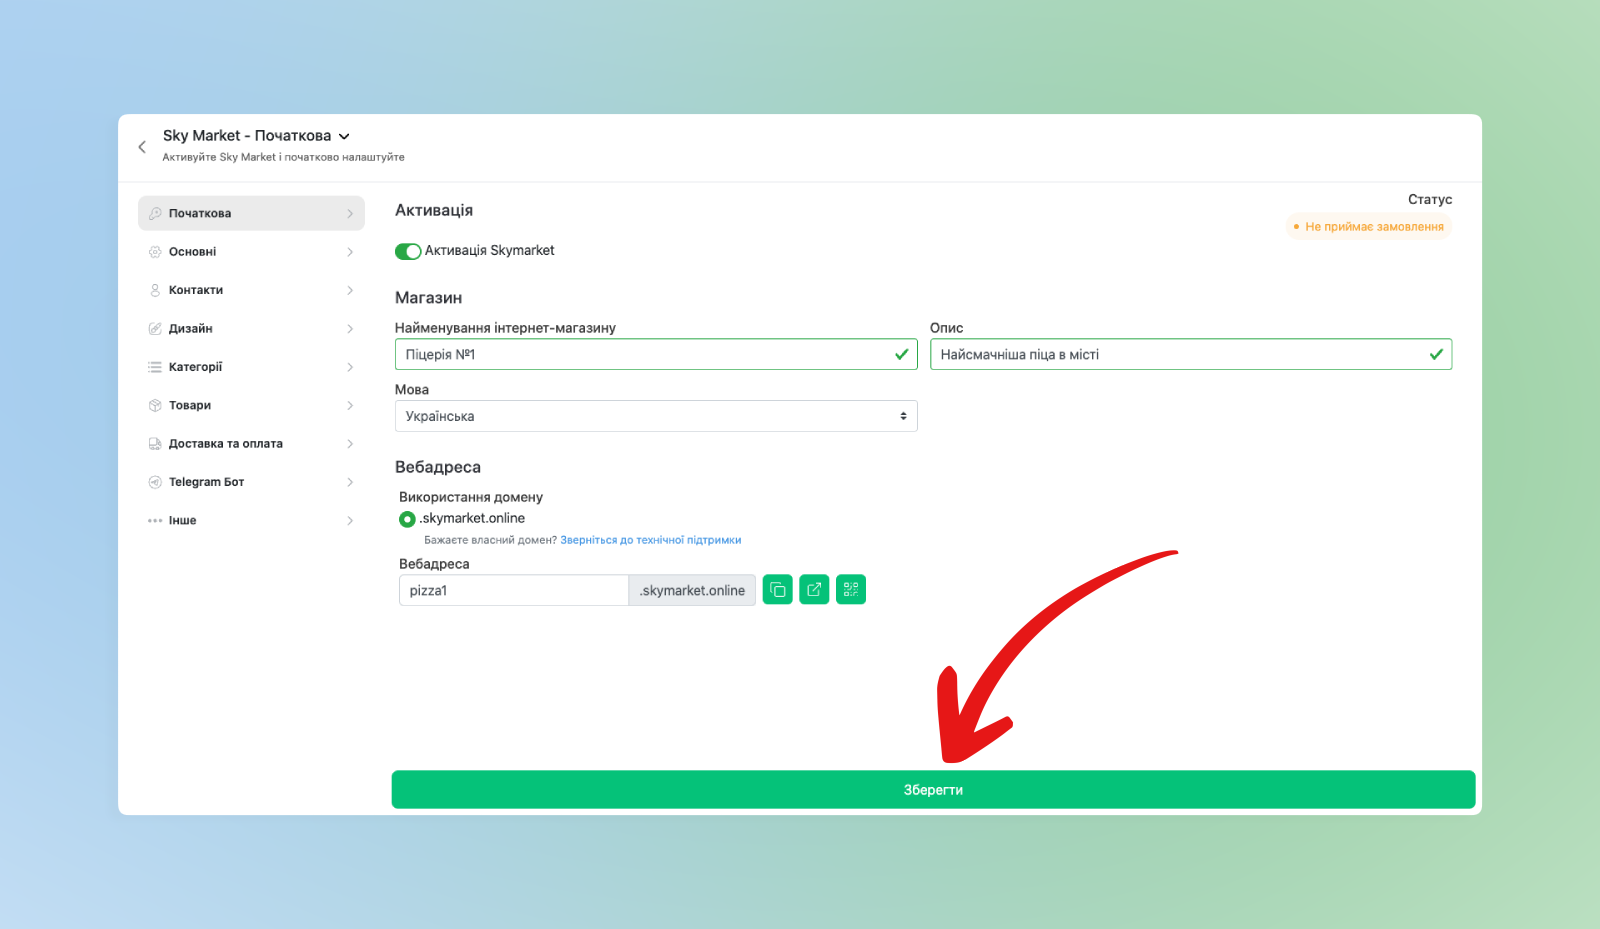
After activating the app fill in the data of your online store:
- Click Home
- Enter Name of your online store
- In the Description field you can enter the type of venue, a short definition or the venue’s motto. For example “The tastiest pizza in town 😉”
- Select language of the interface, for example if your venue works in Ukraine – set the language Ukrainian
- By default our subdomain is used .skymarket.online
- ℹ️ If you wish to use your own subdomain – we urgently ask you to write to the technical support chat. Processing the request usually takes 3-5 business days.
- In the Web address field the name of your store that you specified earlier will be displayed.
- If the automatic address does not suit you, change it to the one you wish
☝🏻 For convenience You can:
- Copy web address
- Follow it directly to the store site
- Generate QR code
The corresponding buttons will help you in these actions 
Basic settings
❗️Attention! All settings of goods and calculations and setting Categories of goods for them are performed only in the Skyservice Admin panel.
To go to the basic settings click in the section Basic.
- In the Points that accept orders field set the points at which the guest can place an order
☝🏻If you have not selected any of the available sales points and saved the settings, the store will be available for viewing by your clients, but not for placing an order
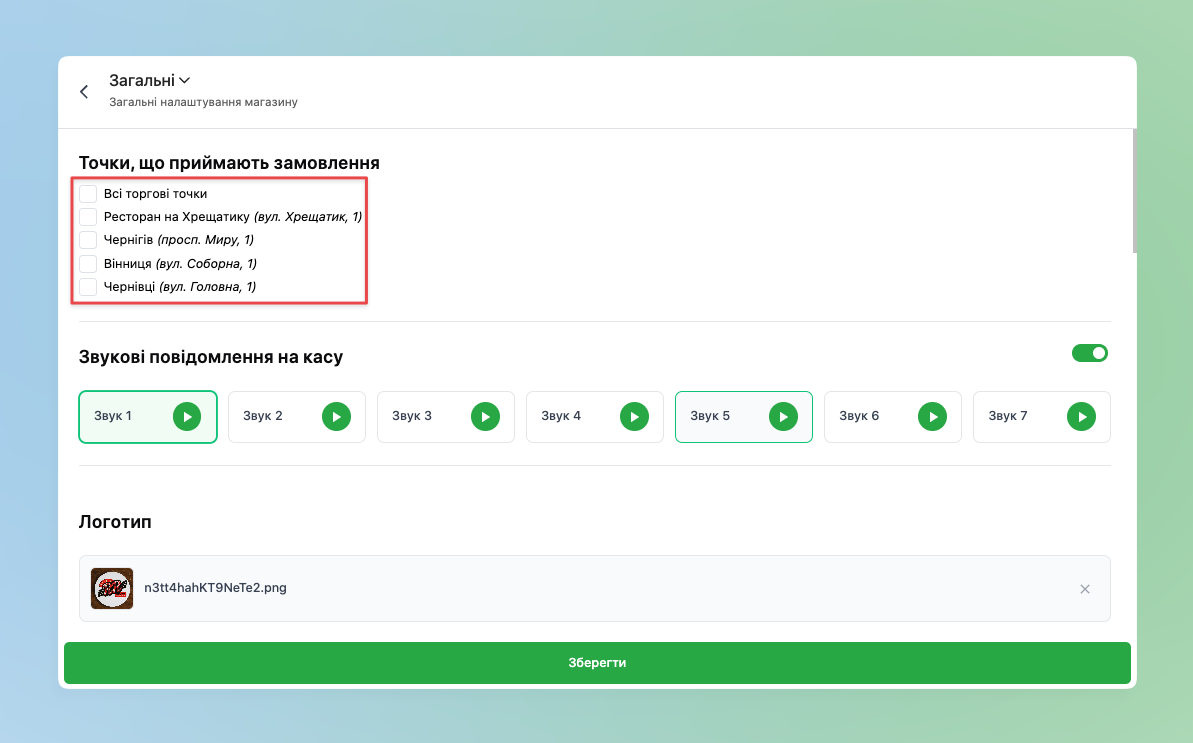
- Activate Sound notifications on the cash register, this will help to immediately see the order when it arrives at the terminal –
- Select the sound that best suits you and your employees
- The Logo field allows your consumer to remember you better. To do this you can click on the field Upload and select your logo
- In the settings section Work schedule specify the days and time when your venue or network works
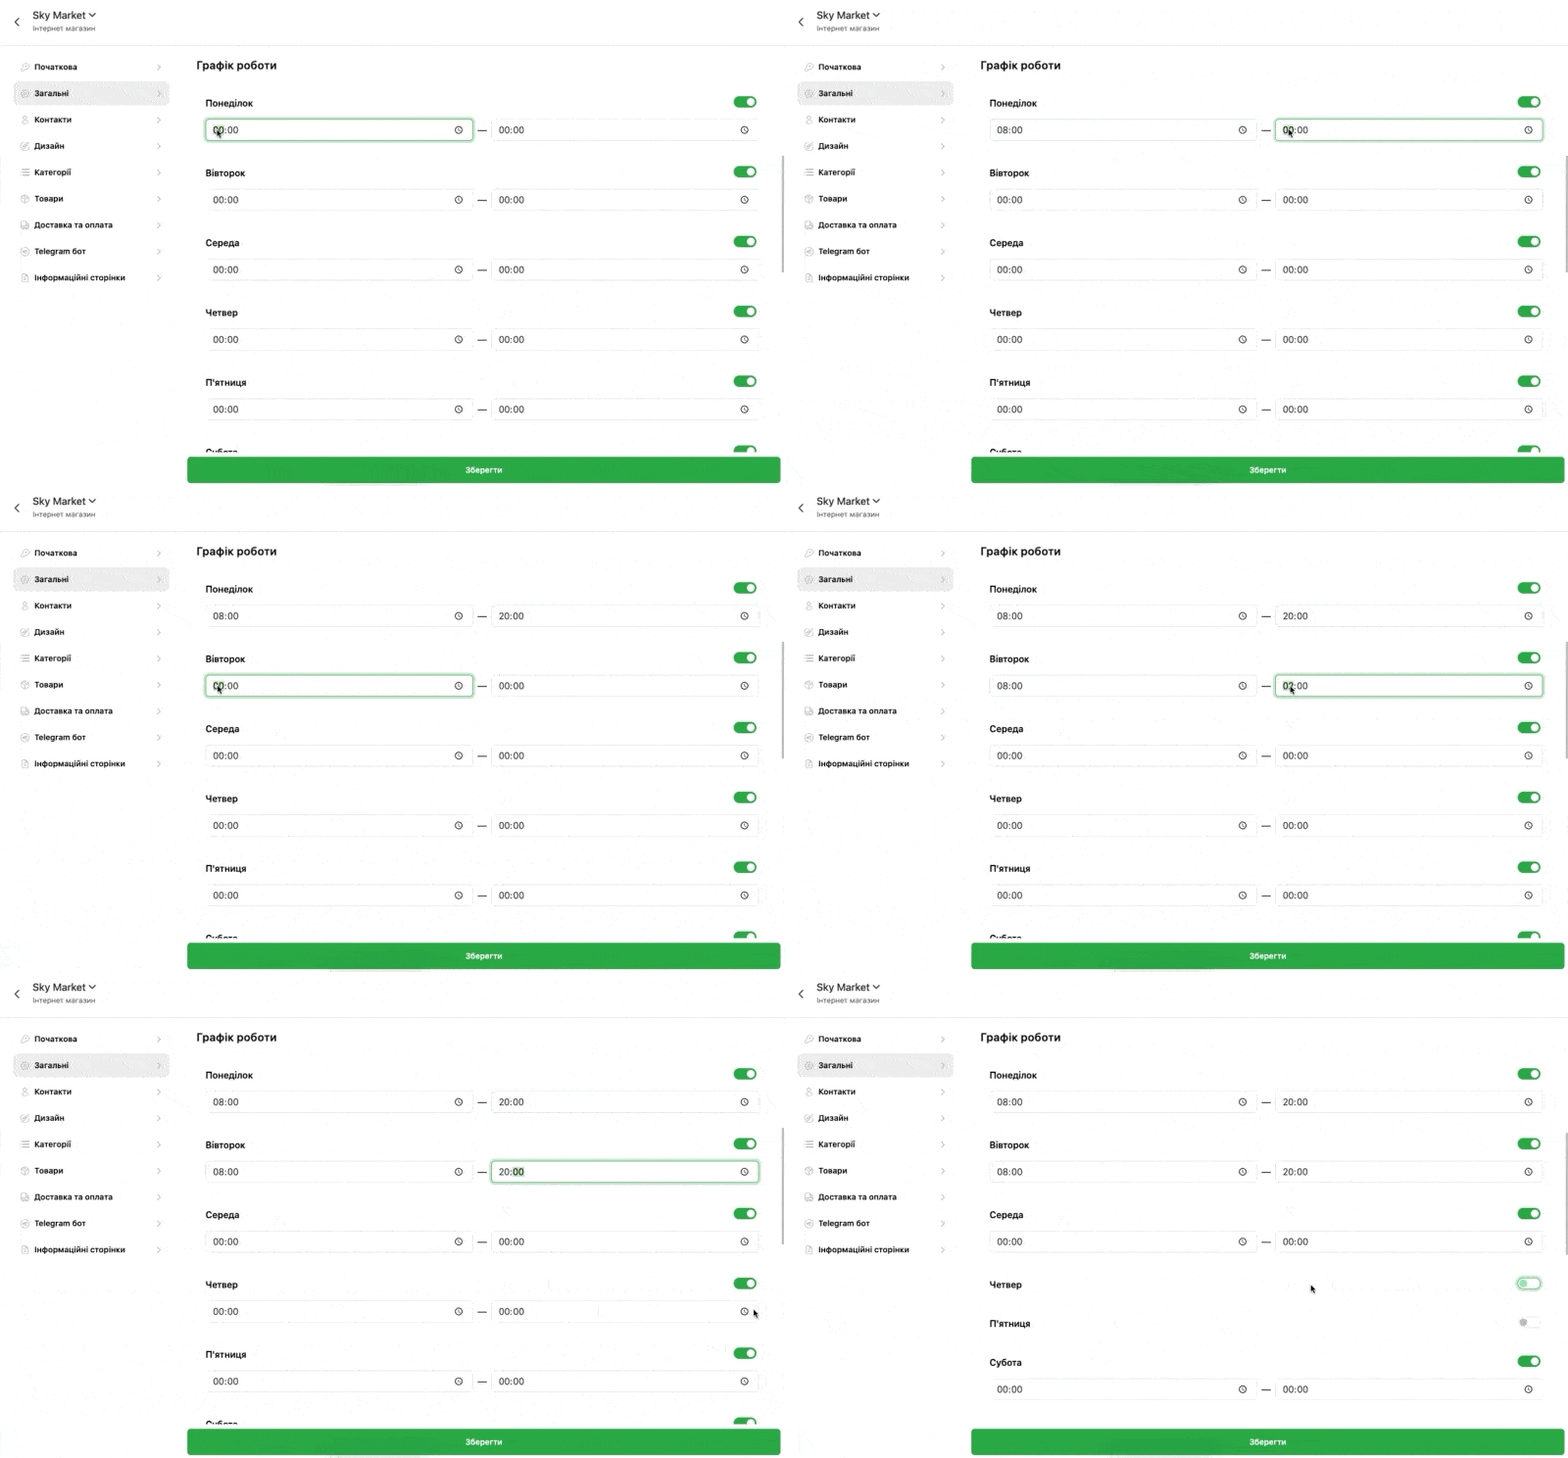
- The field Activate service message allows, in case of need or your wish, to inform the consumer of important news (for example, your schedule for accepting orders during holidays, changes in the price list of the venue and so on)
- In the settings section Additional offers select the necessary parameters for your site:
- Ask for the number of persons – will help you in case of sale of goods that provide for the presence of cutlery, napkins, etc.
- Use search on the site – if the number of goods on sale requires more careful viewing
- Show the “Order call” button – allows the buyer to order a call in the online store. The request itself will arrive to the cashier in the POS terminal in notifications.
- If you work with Google Analytics, Facebook Pixel and other, you can add analytics to the site, for this you need to –
- Activate the parameter Activate external scripts
- Add the script from your Google or Meta
- If there is a need to sell a specific item and you want to draw the buyer’s attention to this position – thanks to Sky Market you have the opportunity to add it to “Recommended goods“. For a better and more pleasant look of the store we recommend adding at least five recommended goods.
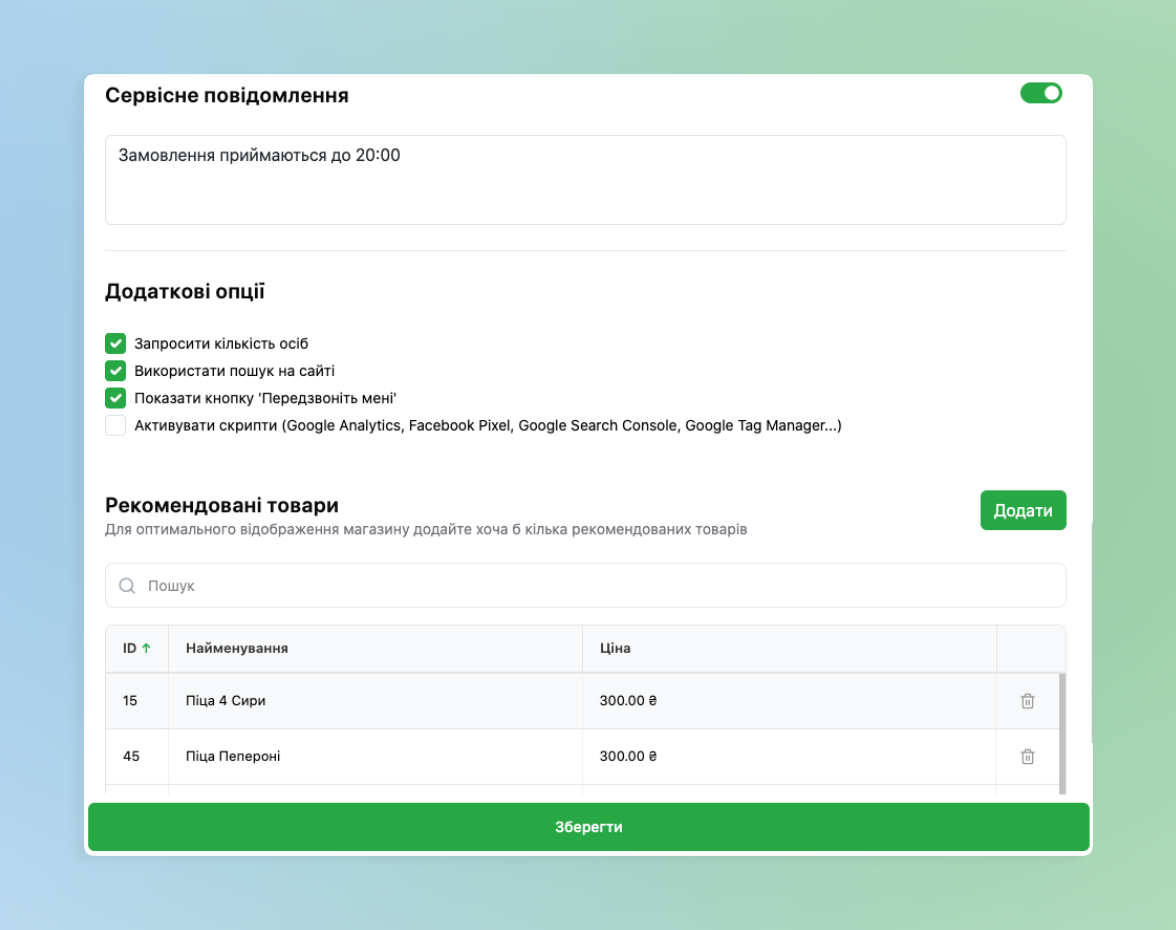
❗️ Important! After each new change in settings do not forget to click Save to fix the current settings.
Contacts
Taking into account trends and tendencies, we thought about your needs and included a list of social networks and messengers so that Your consumer can contact you.
To configure contacts additionally in the section Contacts you can specify additional contact details.
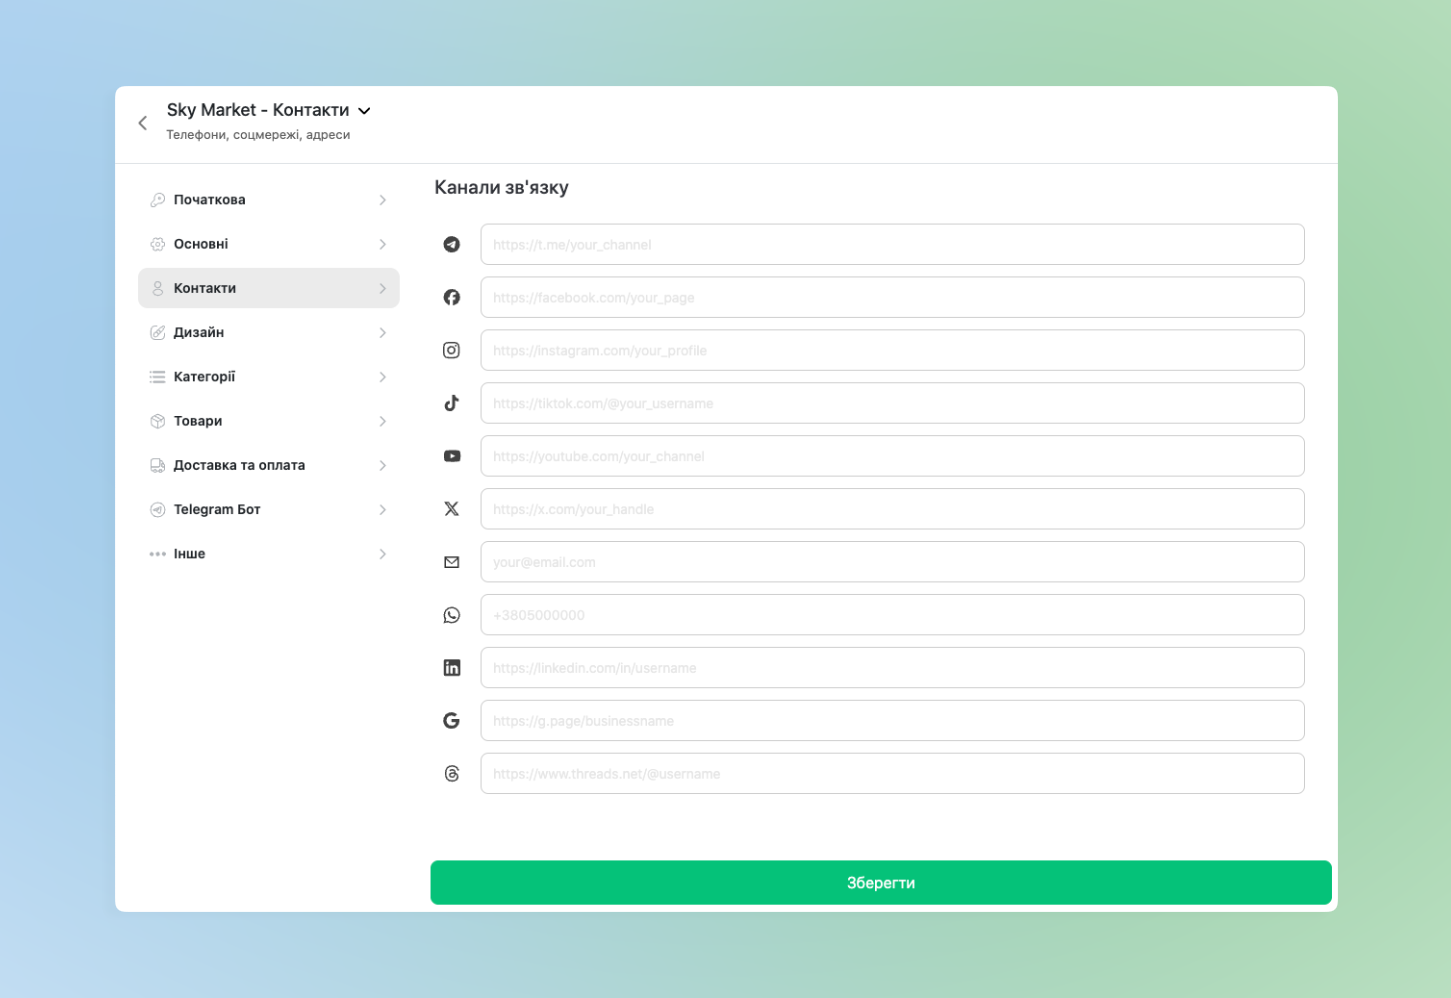
Add a phone number, links to your social networks opposite the corresponding logos.
Design settings
We at Skyservice took care of the visual identity of your venue and You can configure it yourself.
To configure the design click in the section Design.
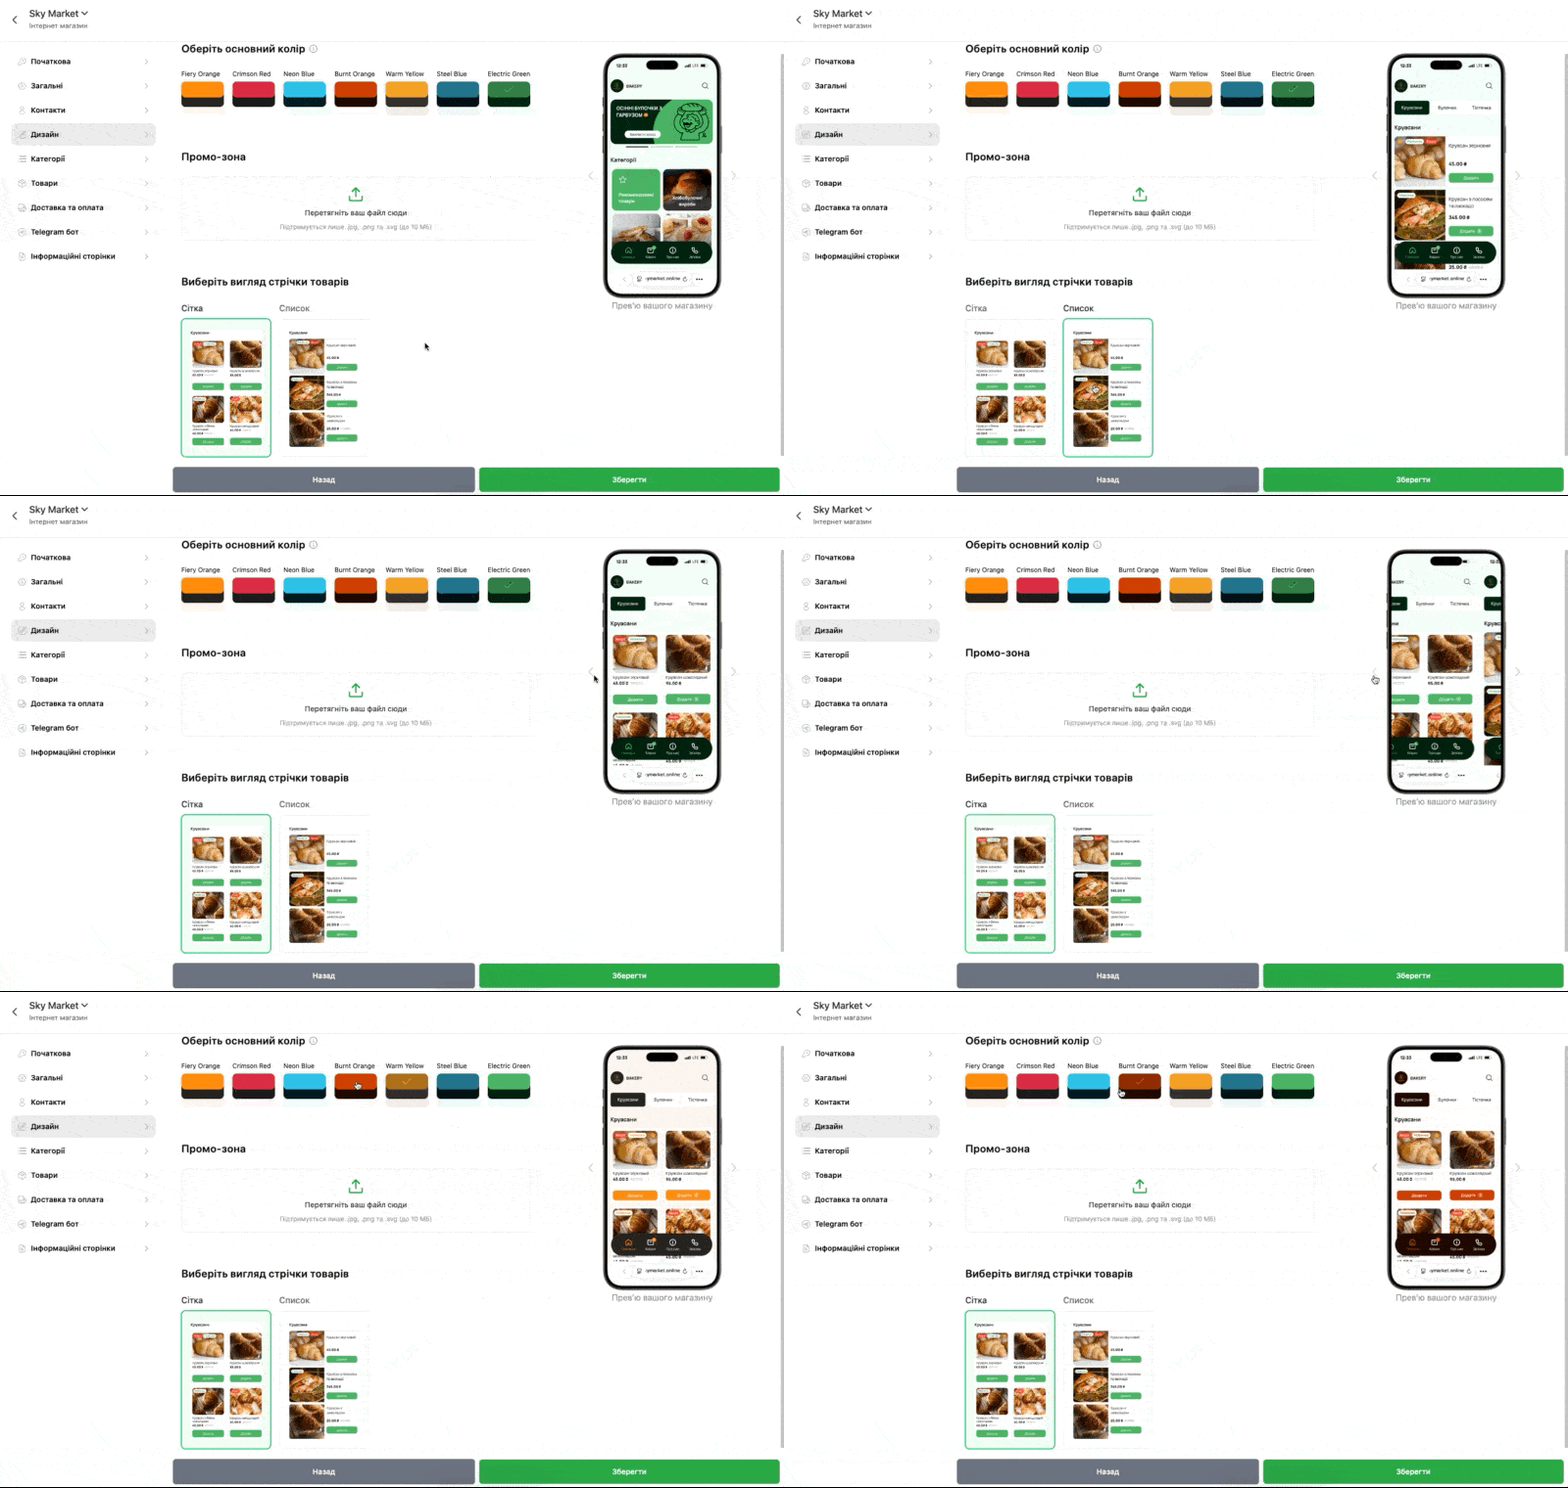
We believe that color has meaning, so we give you the opportunity to choose exactly the one that will additionally highlight your store and match the logo, room design and so on.
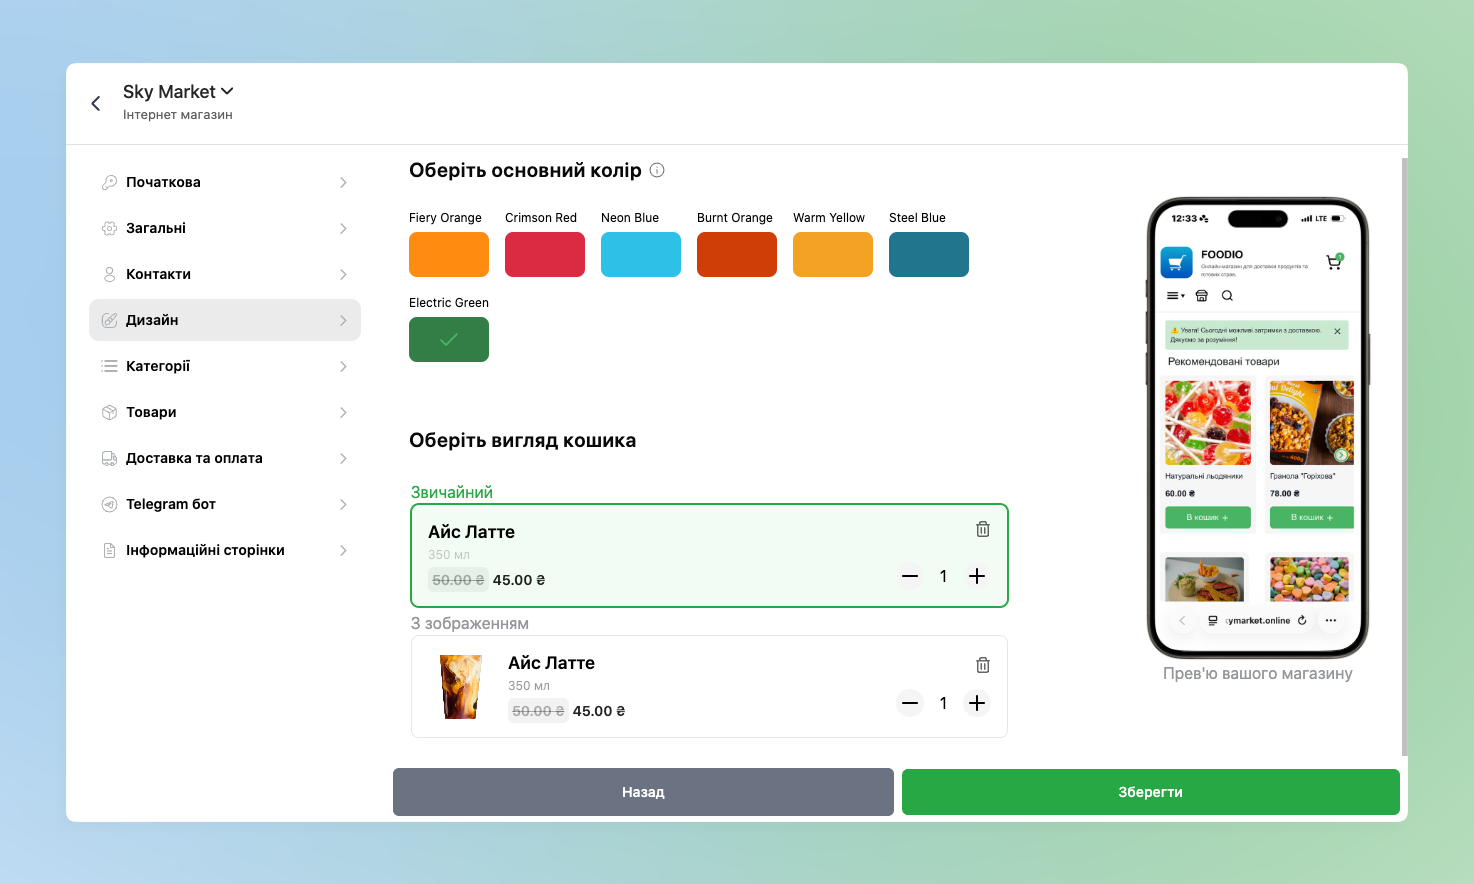
Depending on the specialization You have the opportunity to choose what your cart will look like – is it important for the goods to have an image, or is it enough to see only the item name.
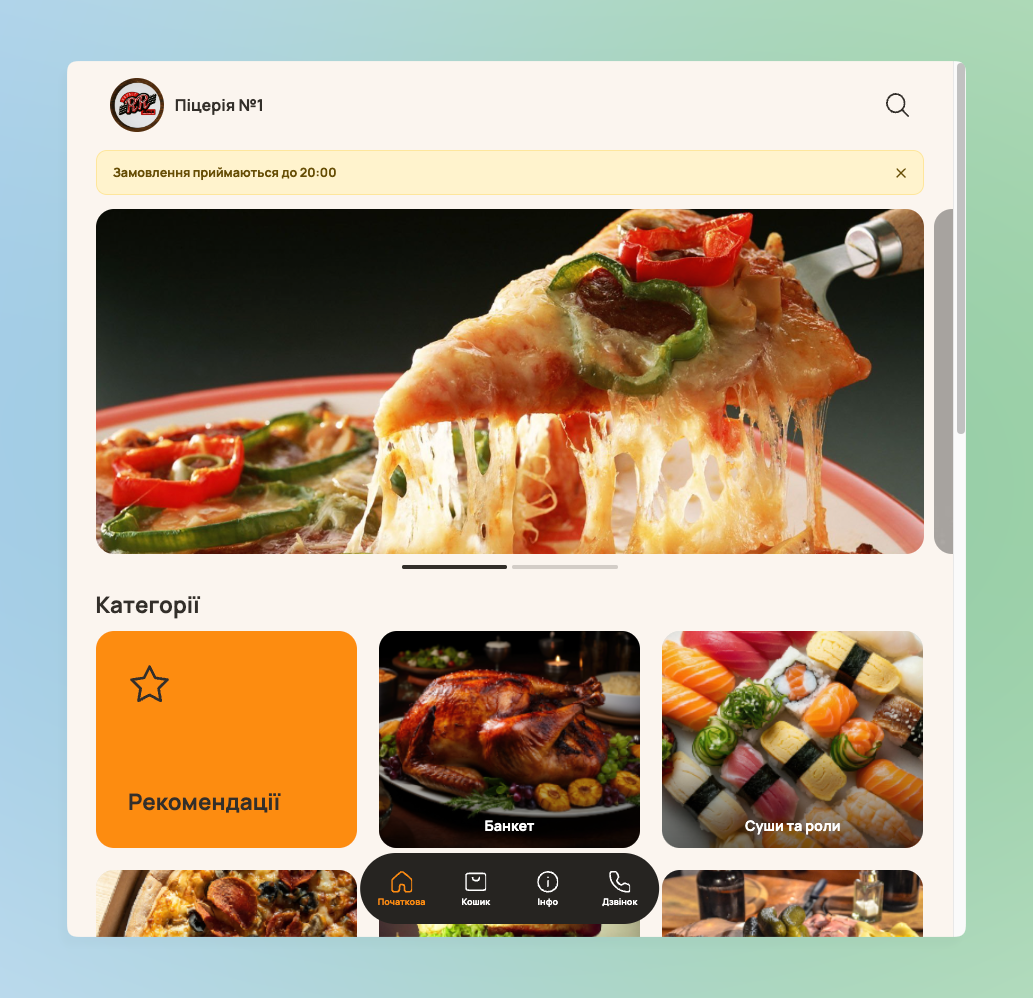
👉🏻 For convenience, you do not need to go to the store link every time to make sure what exactly the look will be before making changes – our team of professionals created samples that display what the store will look like when using different design settings.
Two templates for the online store look are available to choose from:
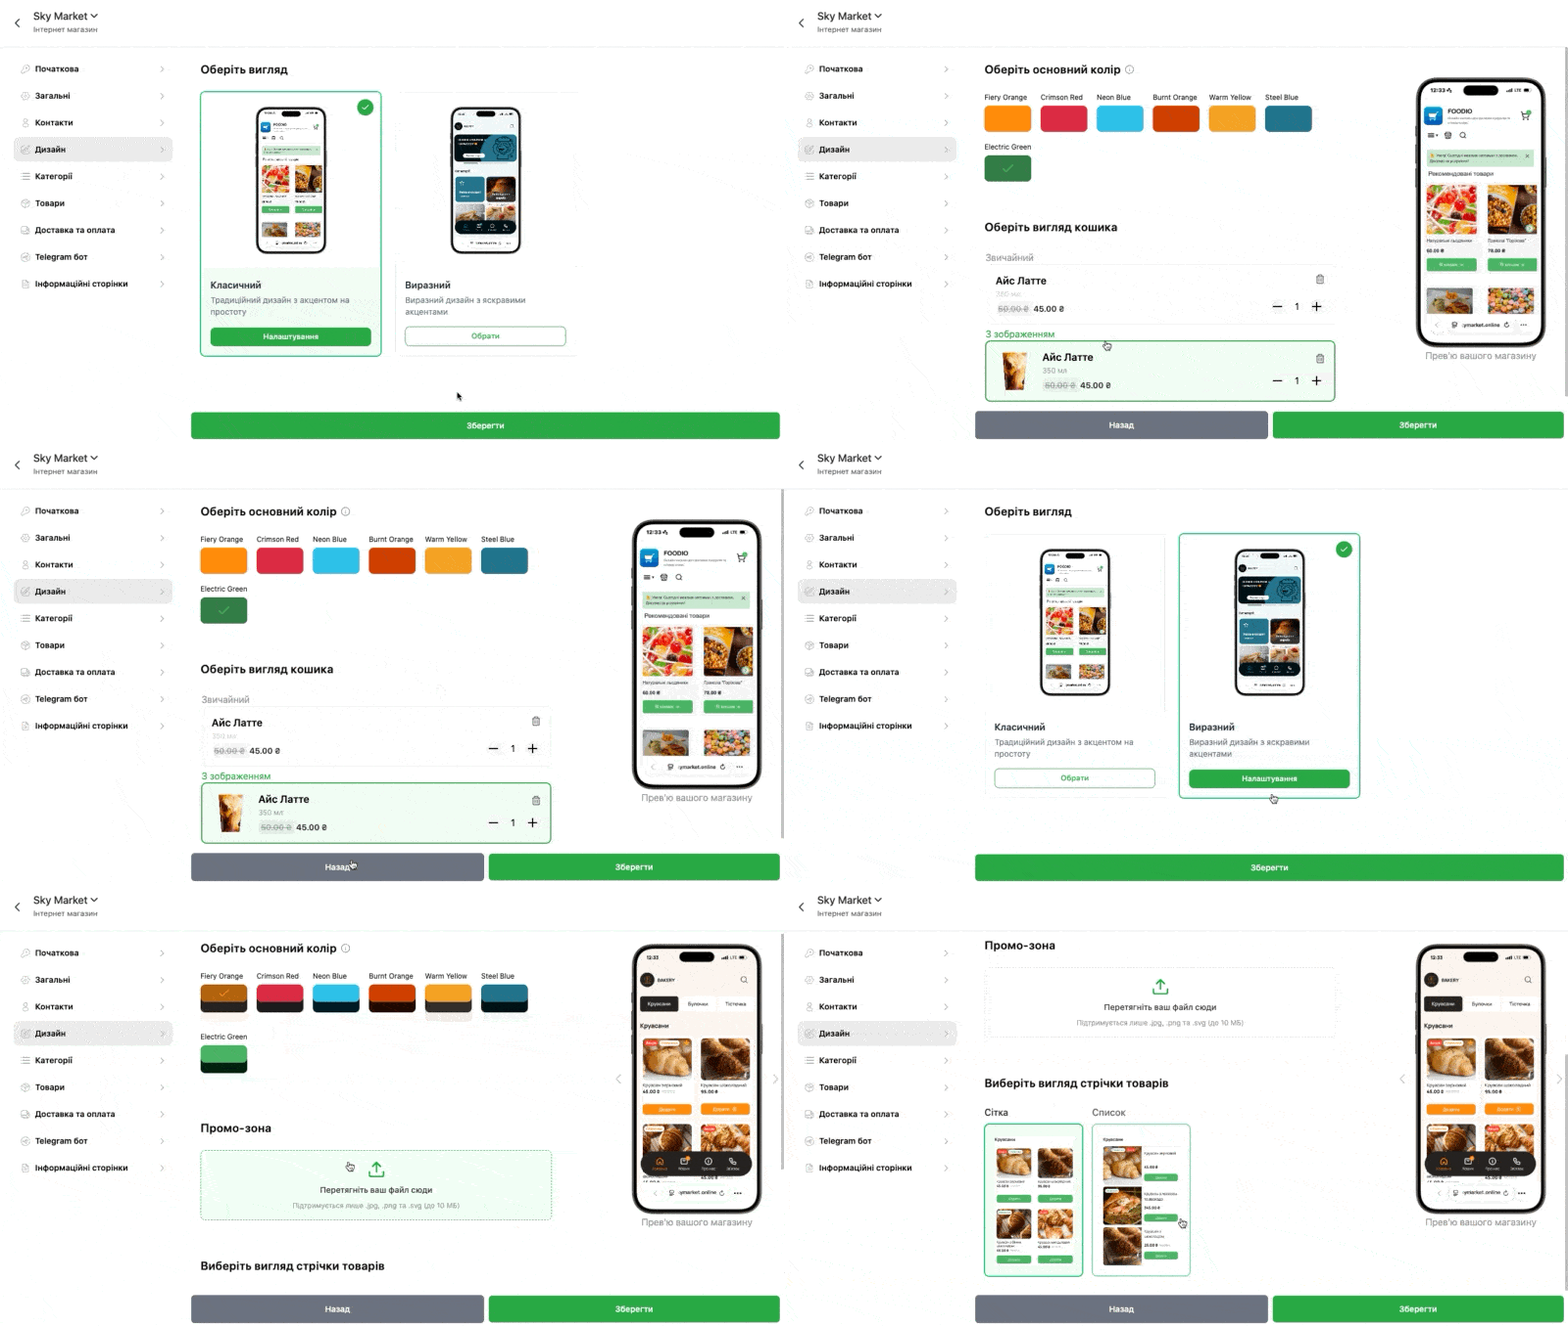
- In the Classic design a more restrained look. Additionally you can set:
- Main color of the online store
- Also the look of the cart – solid text or additionally with an image
- Expressive design more emphasizes attention on the items. Additionally you can set:
- Main color of the online store
- Promo zone – photo at the top of your online store
- Look of the goods feed – grid or list
Categories
To configure categories click in the section Categories.
In front of you the list of categories from Skyservice is displayed. If necessary you can change the name for Sky Market, its display status and order.
- To change the category name click on the name input field in the column Name displayed in Sky Market
- To activate a category change the switch to green in the column Active
- To change the order of categories, hold the mouse or finger on the mark “6 dots” to the left of the category and drag to the desired place
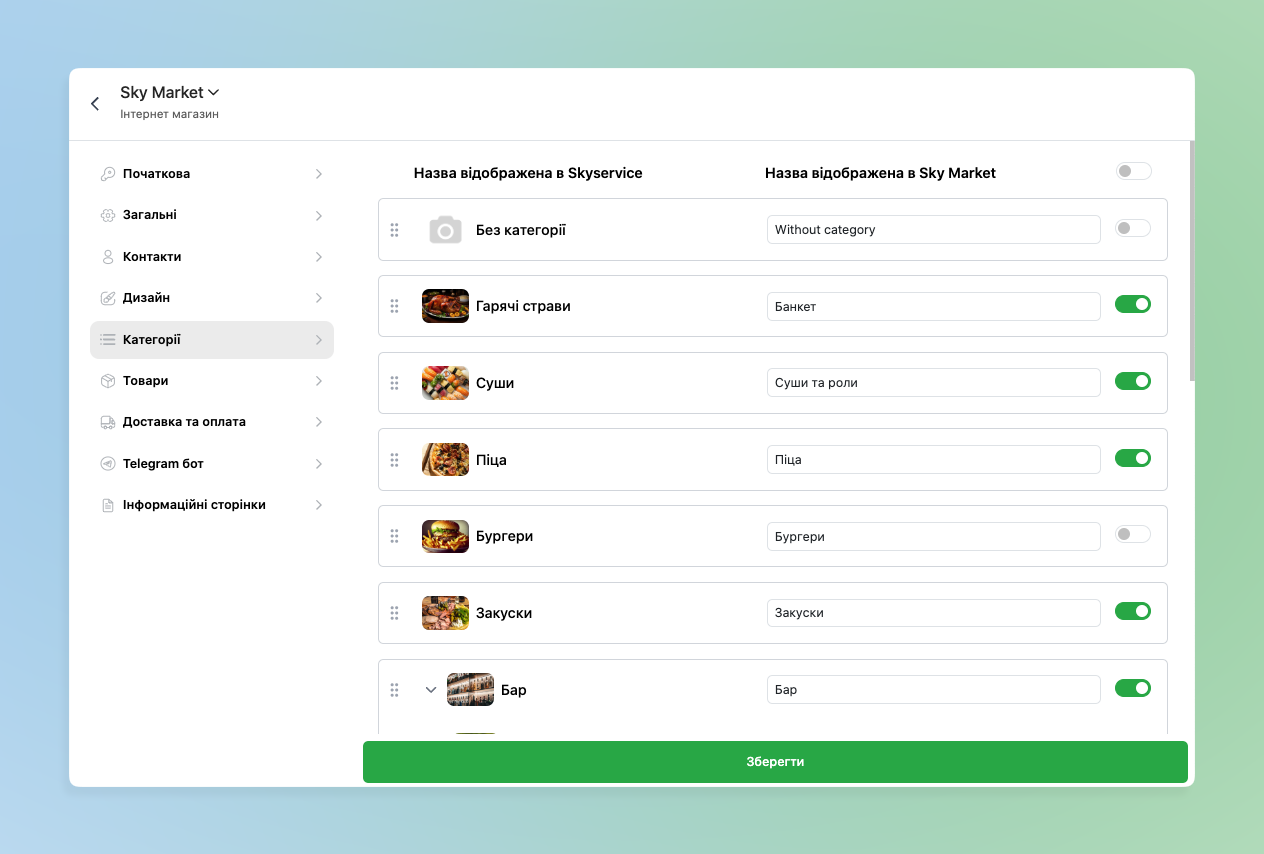
❗️ Attention! If you deactivate a category, it will not be displayed in Sky Market as well as the goods from it!
Goods
To configure goods click in the section Goods.
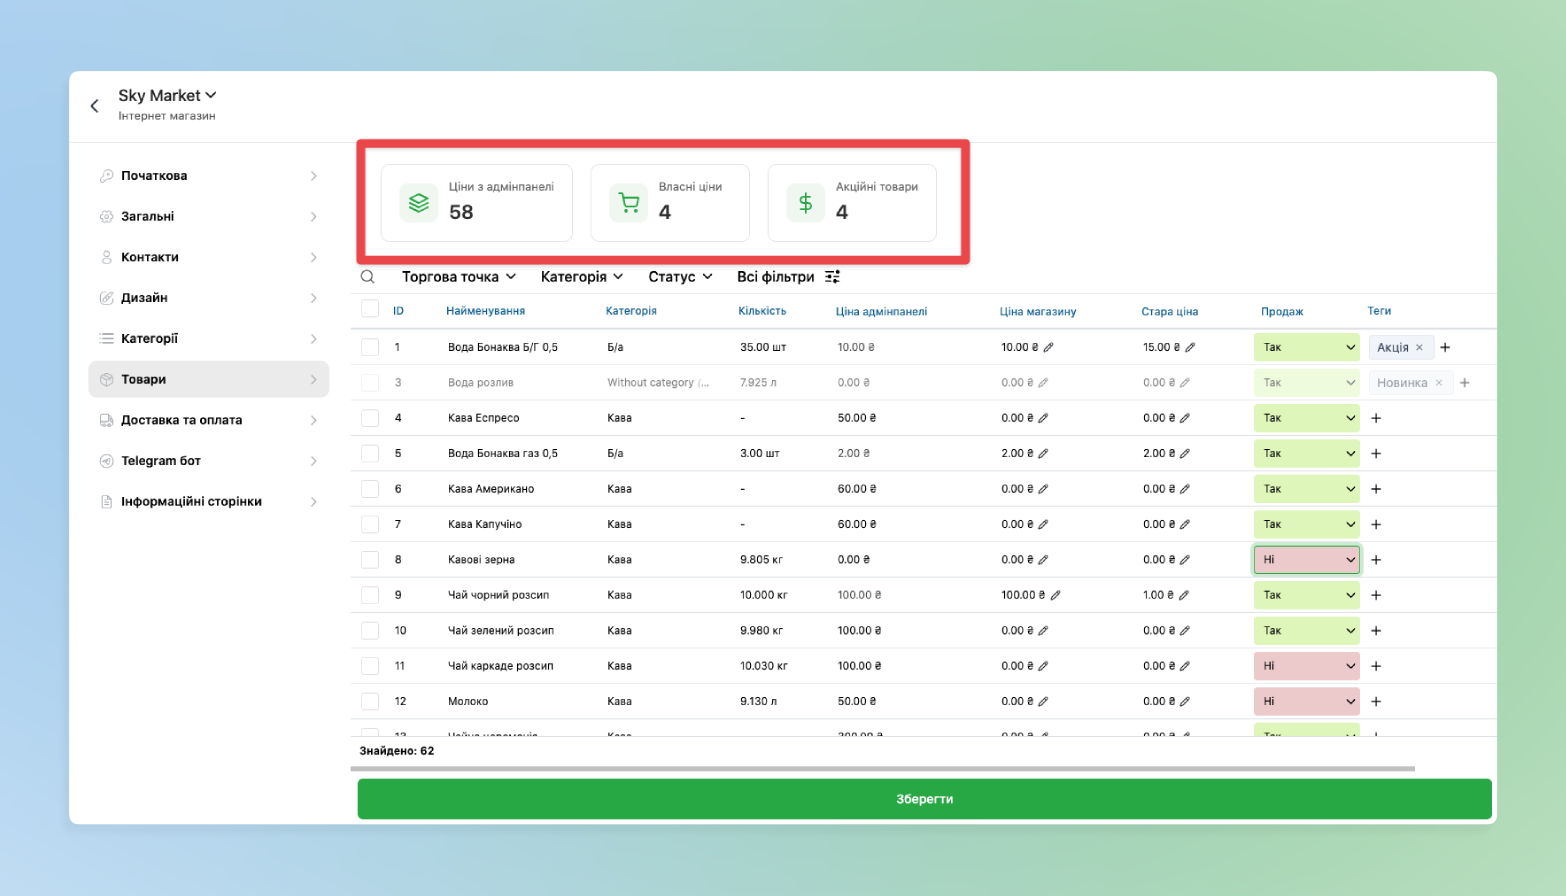
☝🏻In this section at the top a block is added in which you can see the number of items with different pricing according to Skyservice and Sky Market:
- Price from admin panel – number of goods with prices set from administration
- Own prices – items with separate prices for the online store
- Promotional goods – number of items with the filled field Old price
👉🏻 If necessary there is an additional possibility to use filtering by:
- Sales points
- Categories of goods
- Status of price:
- Price from admin panel – goods with prices from Skyservice
- With price for store – goods for which separate prices are set for Sky Market
- Promotional goods – goods for which the indicators “Old price” were specified
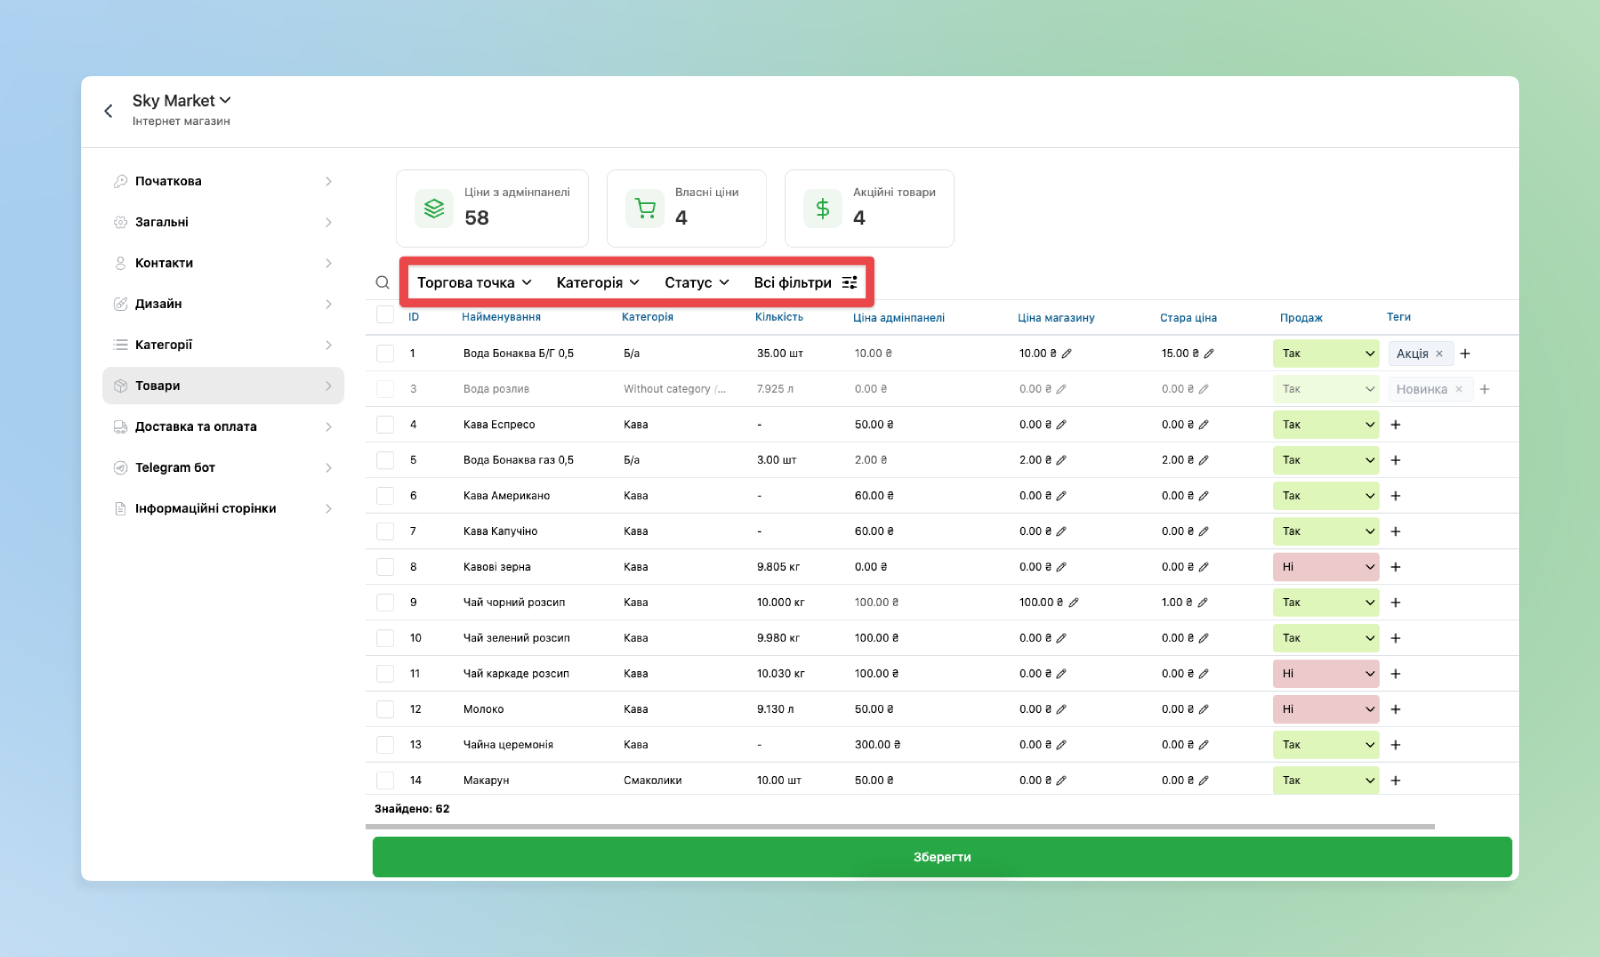
☝🏻All goods/products and their prices in Sky Market are displayed according to the settings in Skyservice by default.
- Column Category contains the name from Skyservice, if it has not been renamed by You in the Category settings (see above)
- Column Quantity displays the balance of the goods by sales point
- Column Price in admin panel contains the price from Skyservice
- Column Price in store – you set the price specifically for Sky Market
👉🏻 Price changes in Skyservice do not affect pricing in Sky Market.
- Column Old price – initially has the value “0.00₴”, but, for example, at a Promotion You can specify to display in Sky Market the profitability of the offer
- ℹ️ Changing the price in the columns “Price in store” and “Old price” does not entail price changes in Skyservice
- ℹ️ If the indicators are specified Price in store and Old price – Price in admin panel is not displayed for buyers in Sky Market
- ℹ️ If you have synchronized prices in Skyservice and Sky Market – the second column Price in store can not be used. The column Old price will still work correctly
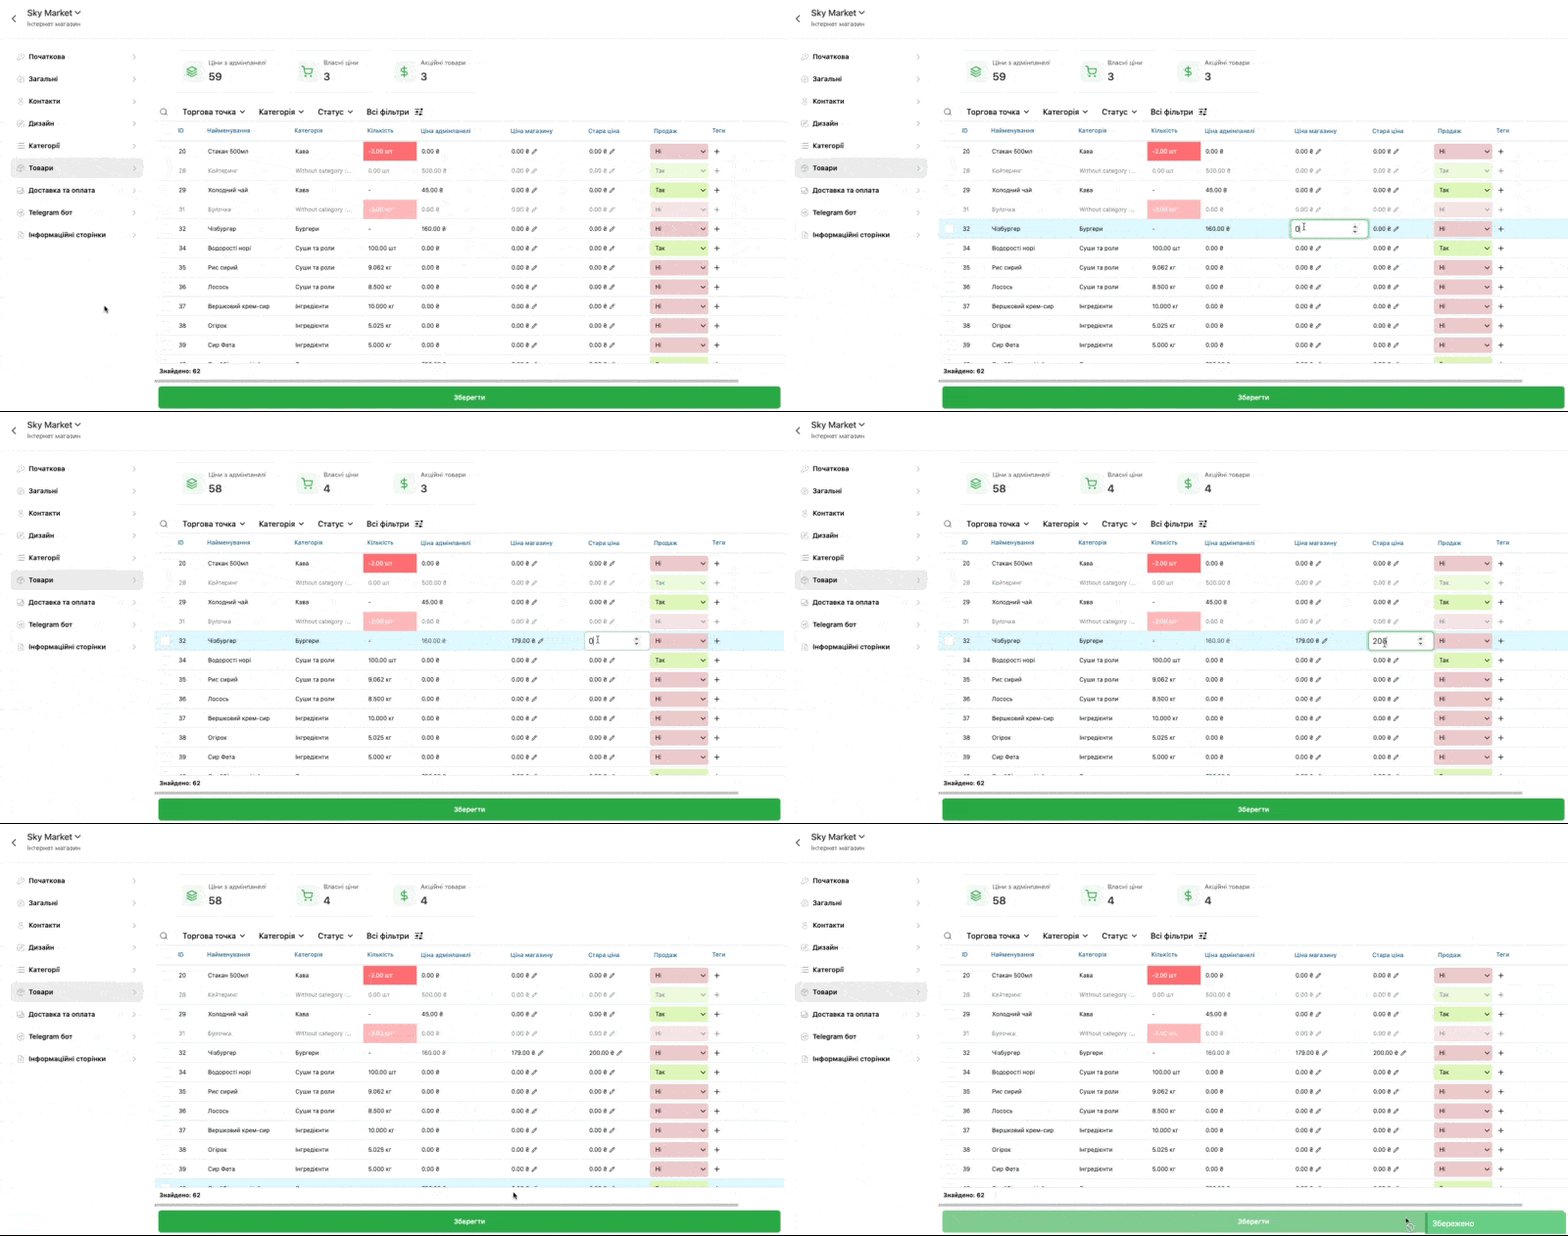
❗️Note! When working with synchronized prices between the online store and administration, pay attention to Promotions. If the price in Skyservice changed due to the promotion – it is worth also correcting Old price.
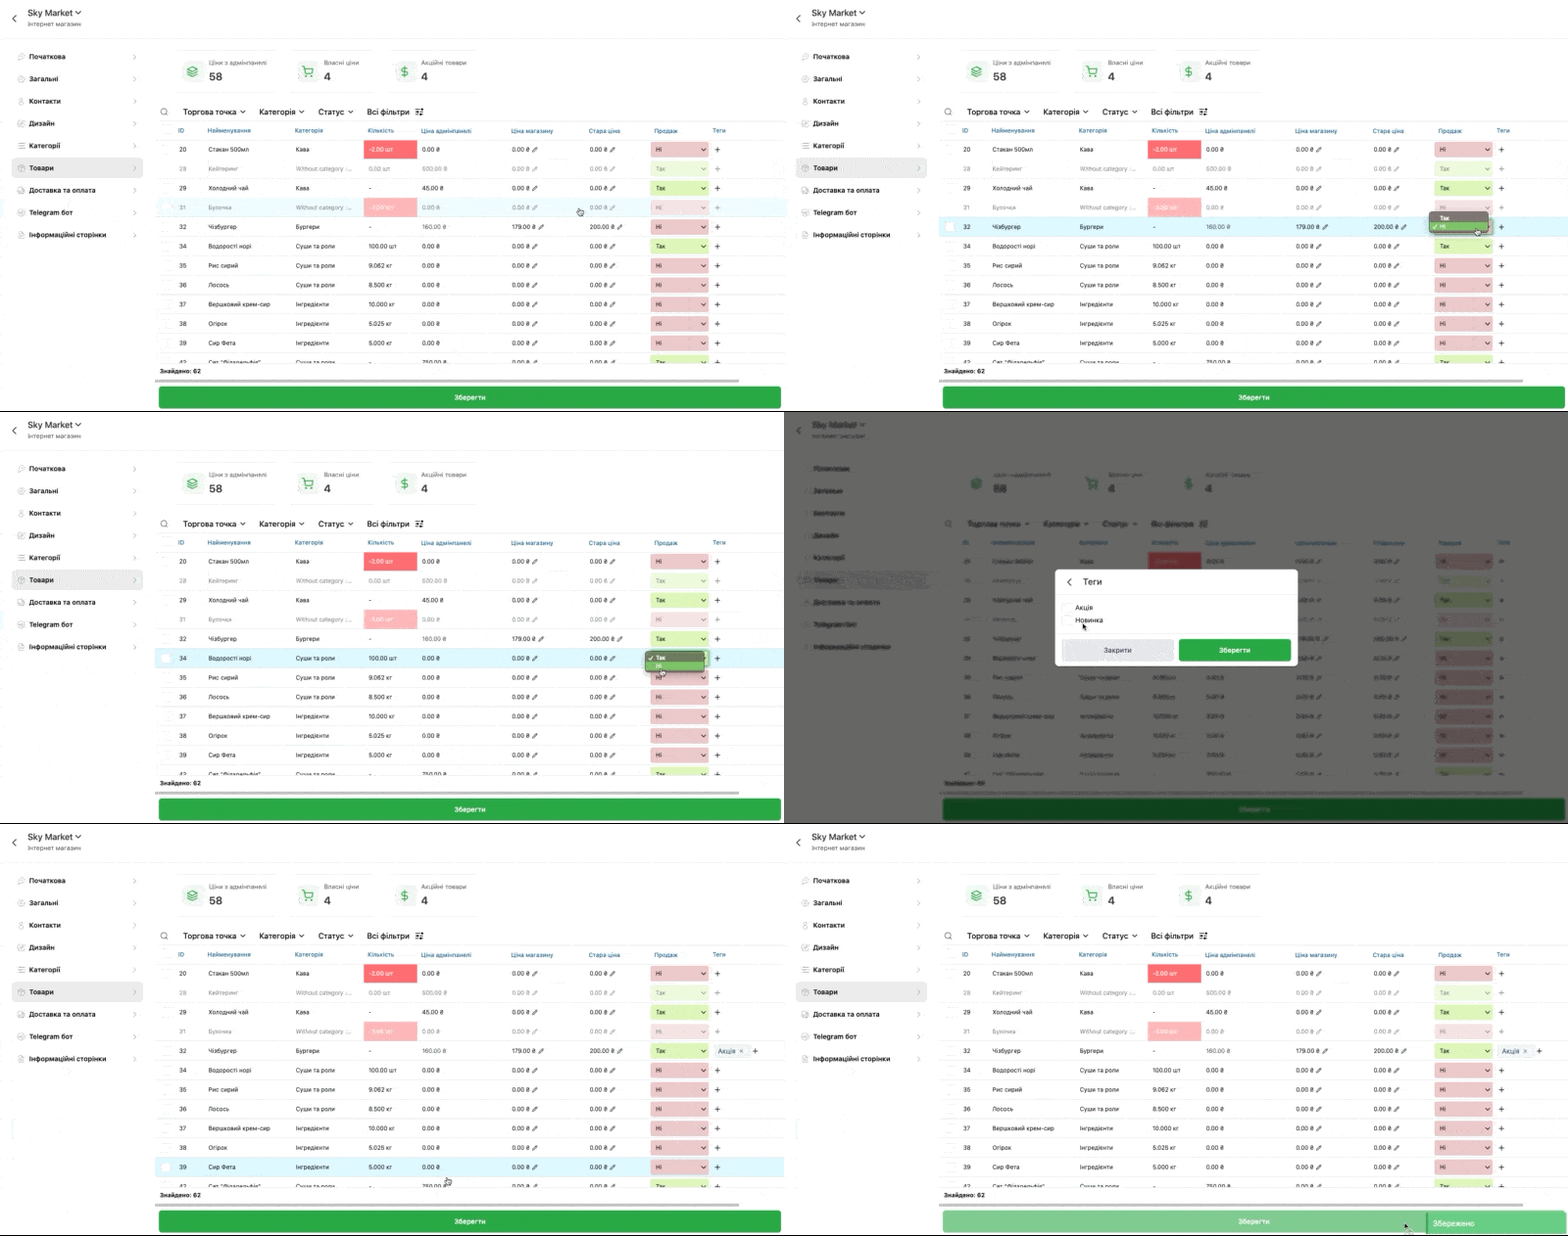
- Column On sale – you set which specific goods should be On sale specifically in Sky Market
- Column Tags provides the choice to specify a Promotion or Novelty regarding a specific unit of goods/product
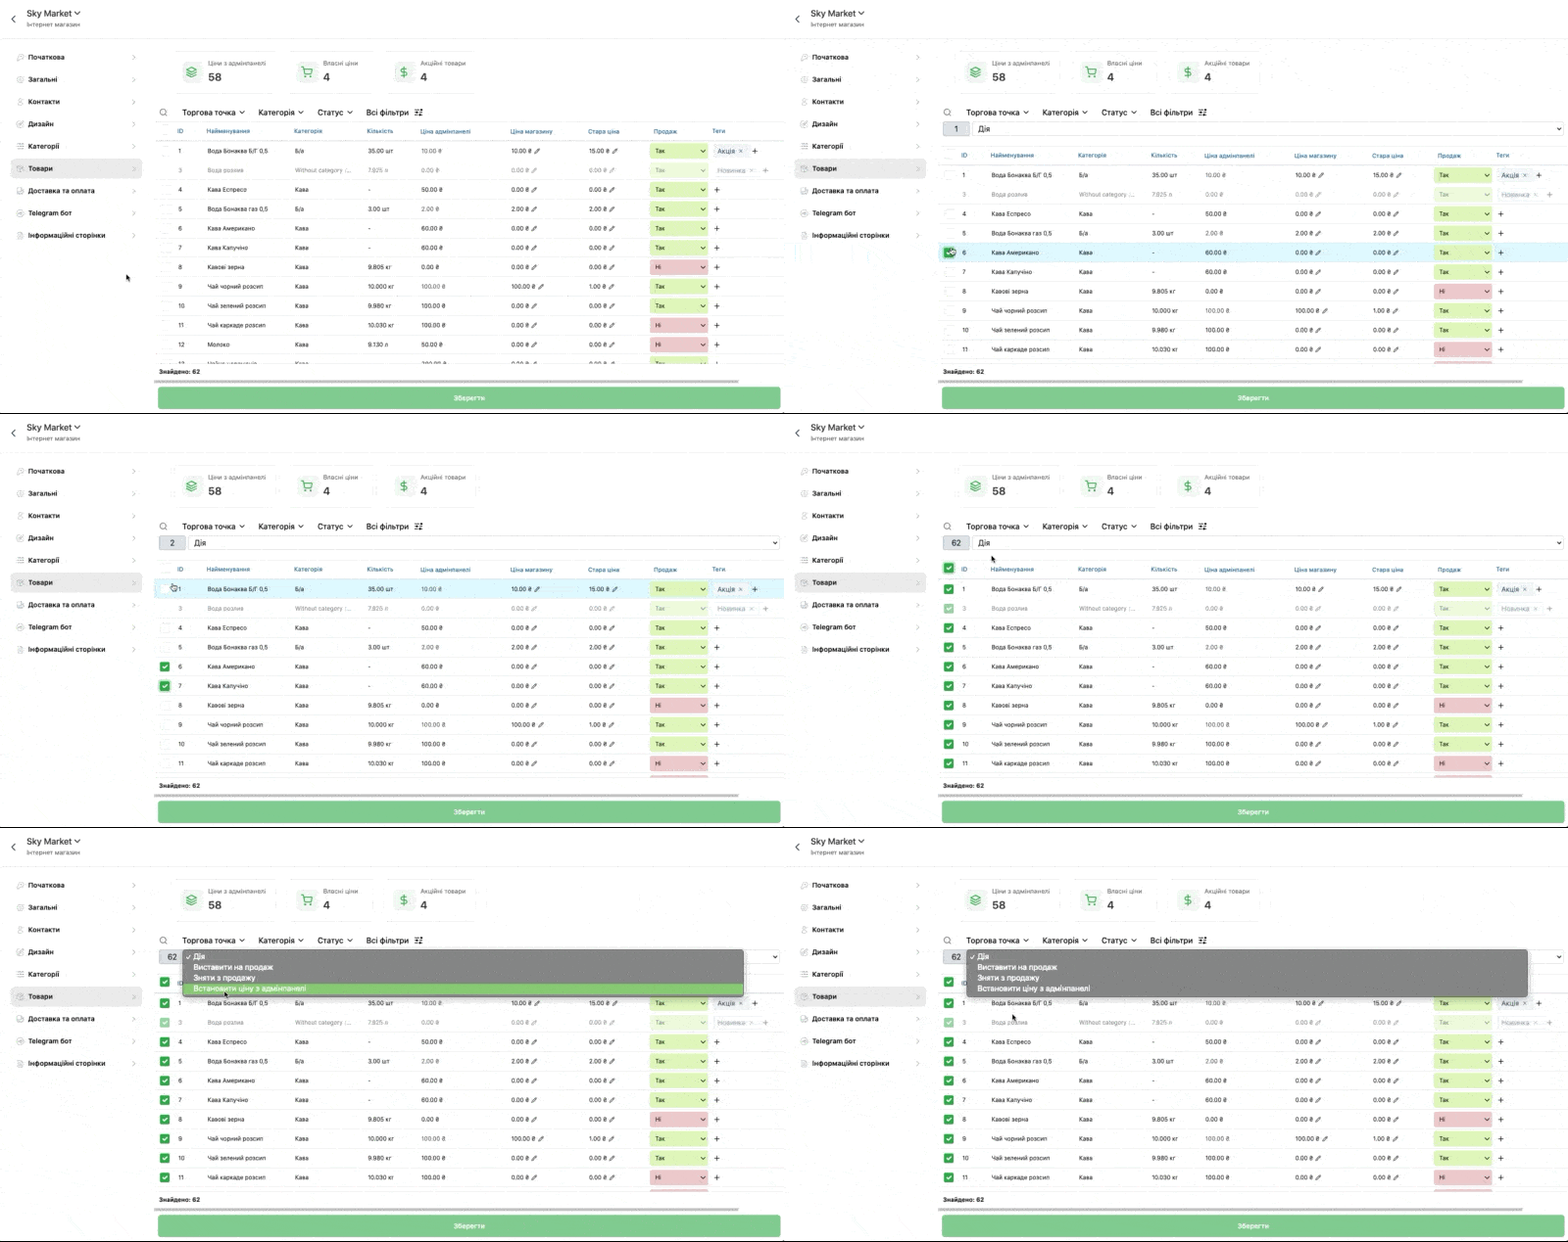
☝🏻Additionally it is also possible to apply mass actions with the selected goods:
- Put on sale – set which goods should be on sale for Sky Market
- Remove from sale – massively remove goods from sale in Sky Market
- Set admin panel price – for the selected goods synchronize the price with Skyservice administration
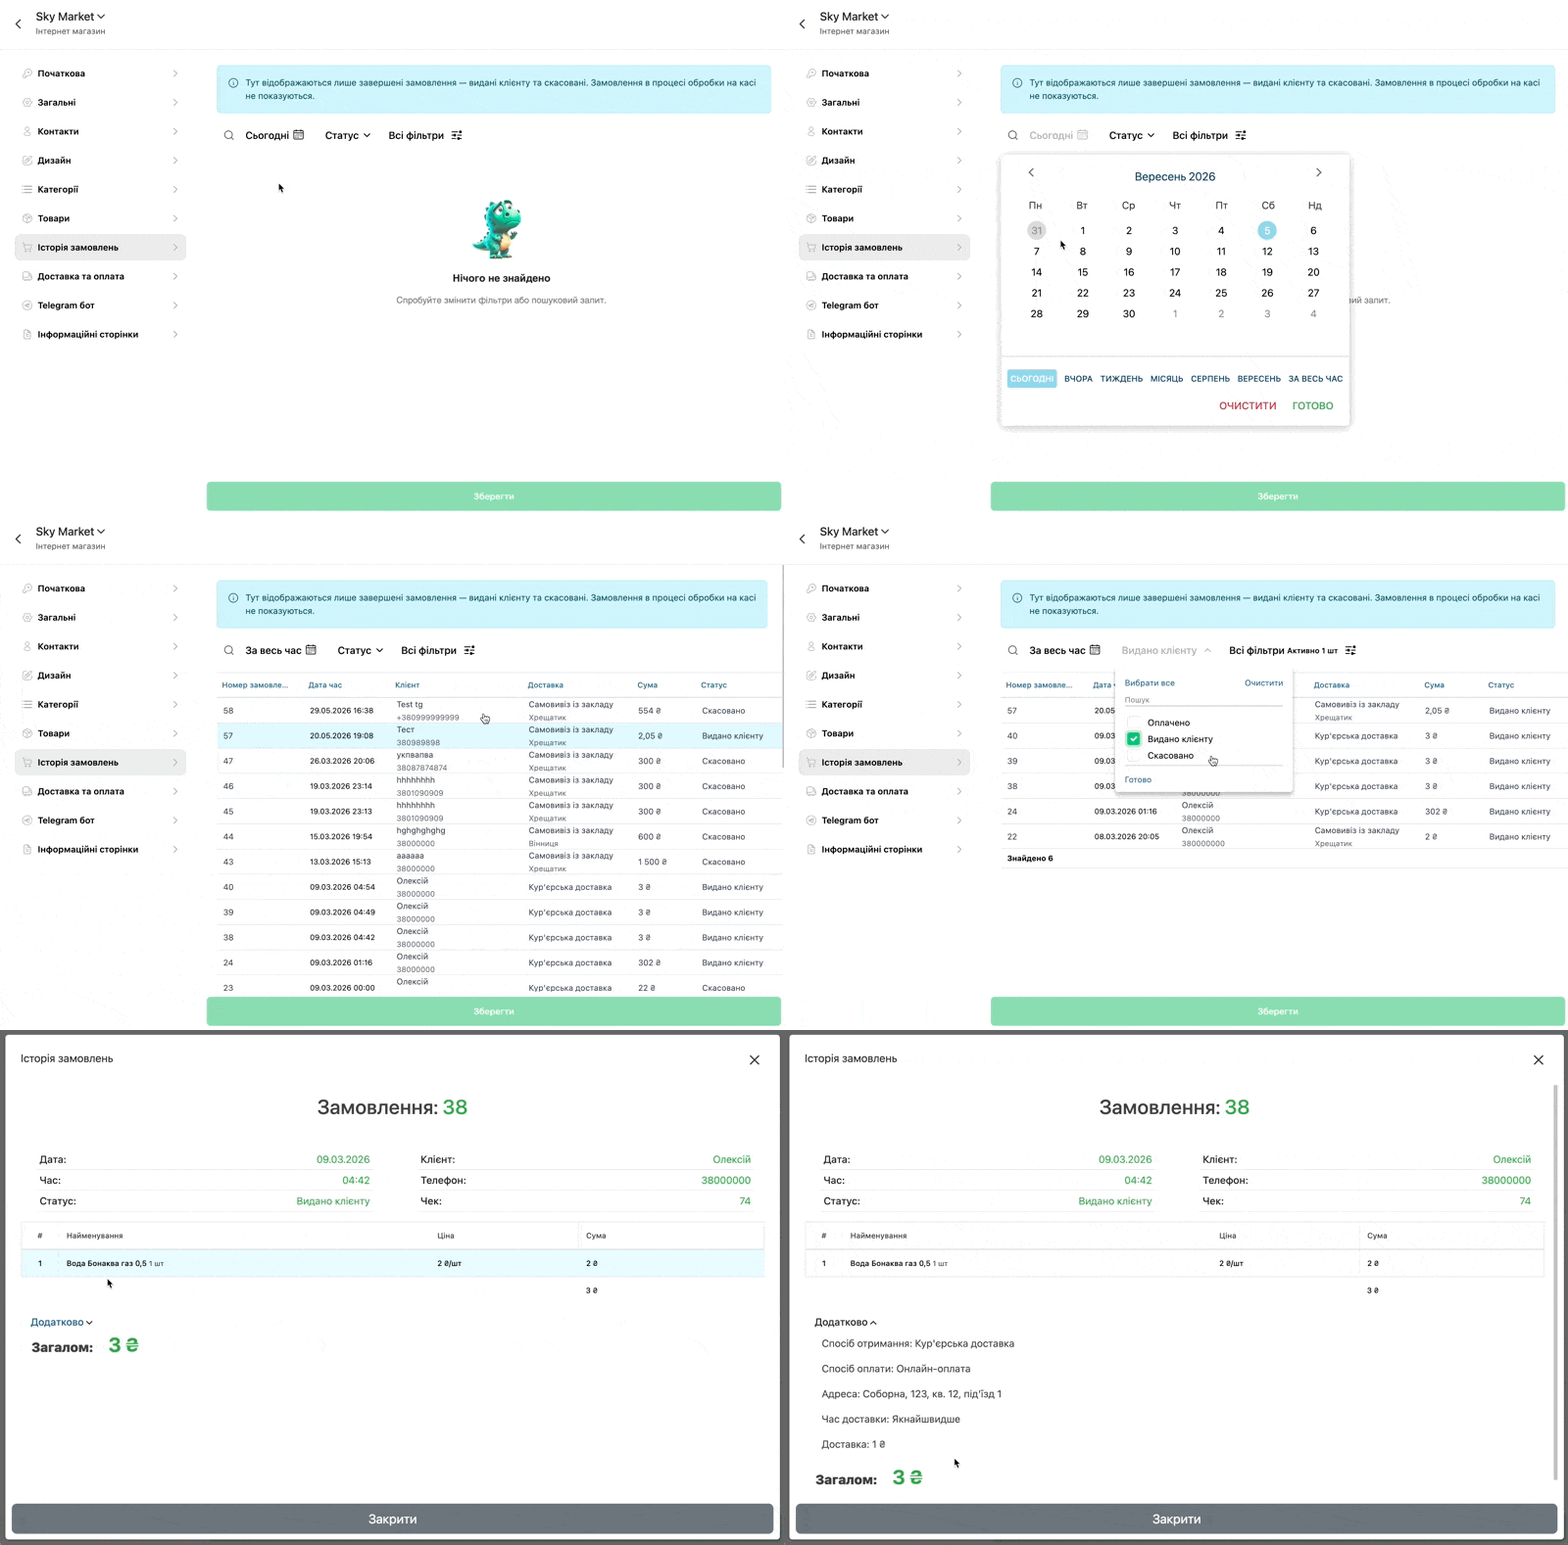
Order history
- In the list it is possible to perform filtering by:
- Period
- Status of the order:
- Paid
- Given to client
- Cancelled
- You can also perform a search by number or client
- And below is displayed the list of orders through the online store, where is displayed Date and time of the check, buyer who created the order, Delivery method and Status
- Additionally by clicking on the sale in the next window the order itself is displayed directly
Delivery and payment
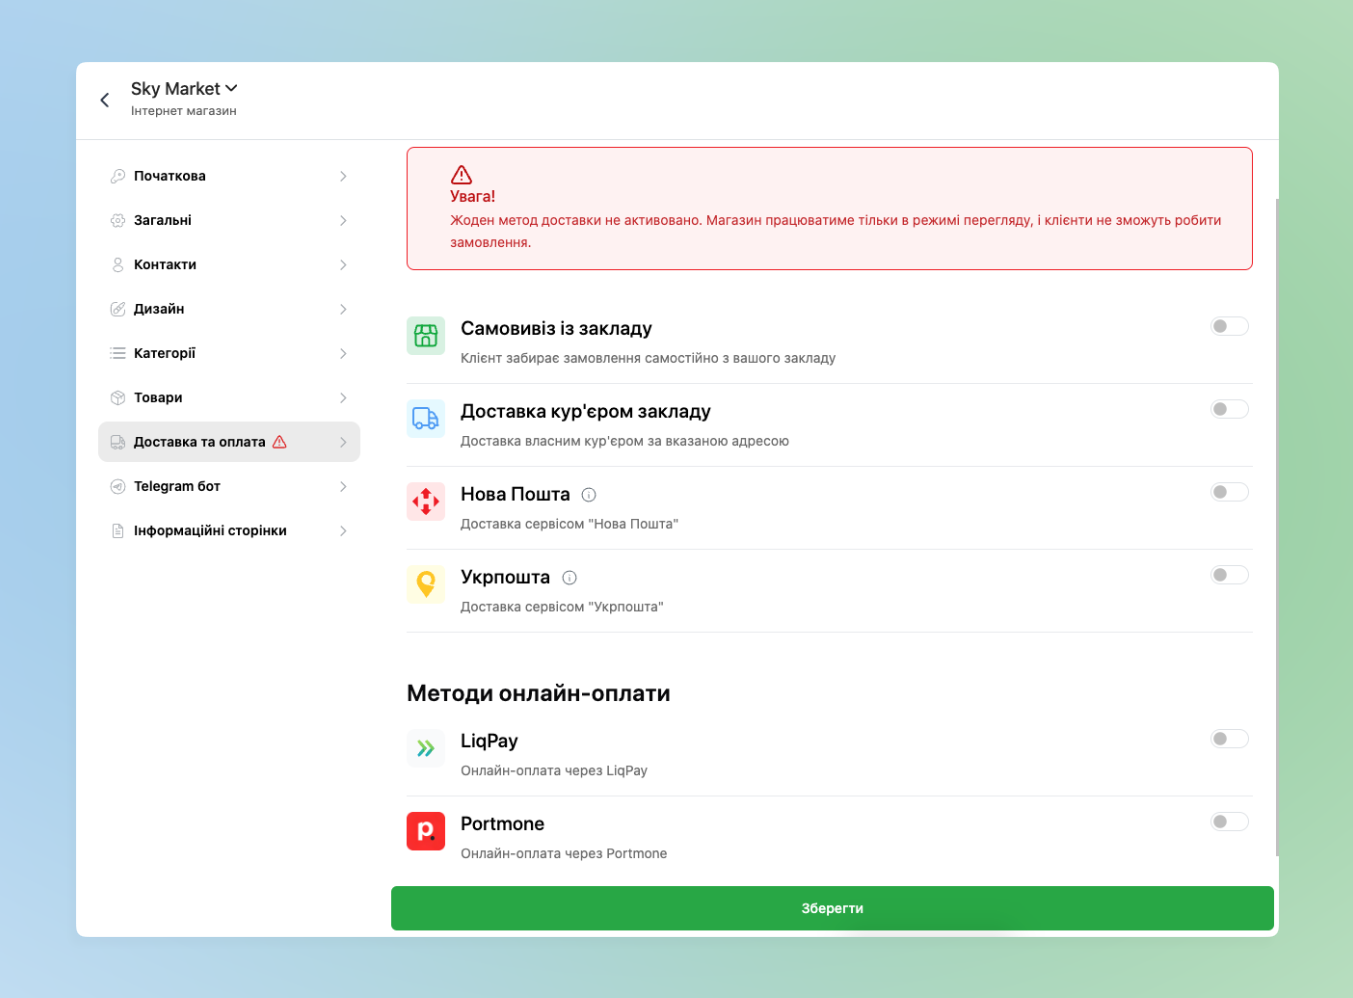
An opportunity has been added to set exactly how the buyer will receive their order. And in what way to pay for it.
Also buyers have the opportunity to pre-pay the order via LiqPay or Portmone.
For this an additional block has been added in the corresponding section.
Delivery method
Using Sky Market it is possible to create orders with three different Delivery methods:
- Pickup from the venue – allows the buyer to specify that the order will be picked up at the venue
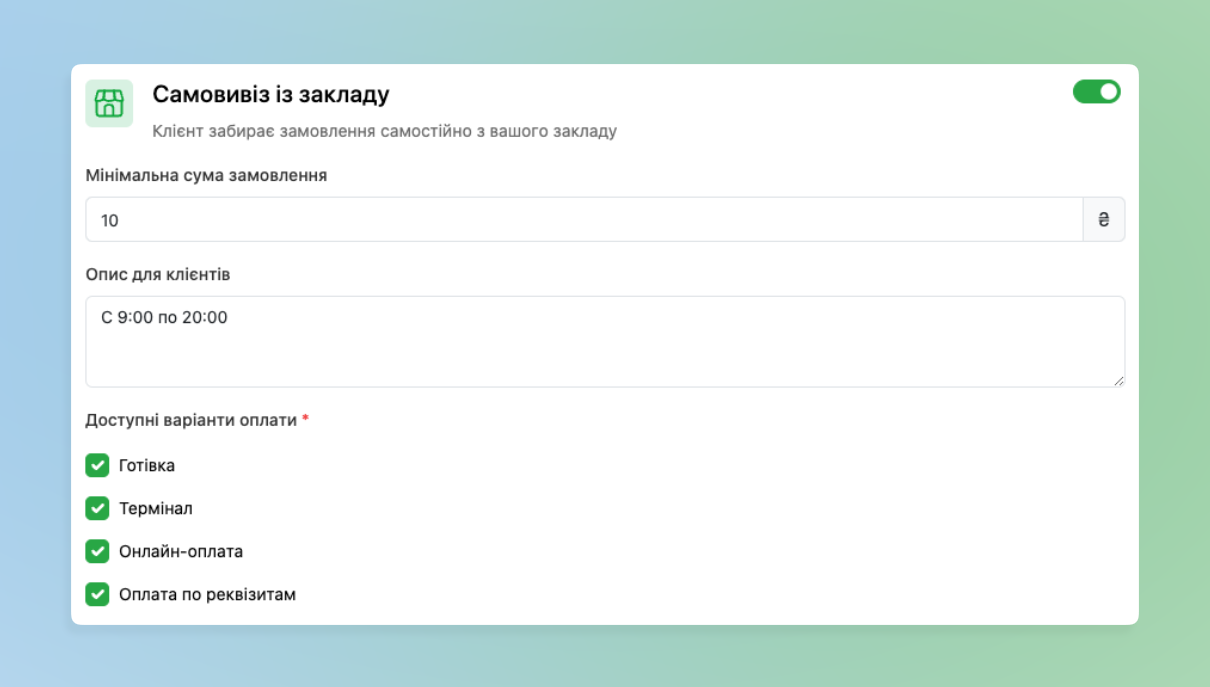
- Additionally you can set:
- Minimum order amount – the client will not be able to select this delivery method until there is a certain amount of goods in the cart. For example, to use the Pickup method the minimum amount is 300₴ – accordingly if the client selects goods for a smaller amount, the Pickup method will not be available for selection.
- Description for clients – additional information on the delivery method. For example, at what hours pickup is possible or the courier works, or within what limits delivery is possible.
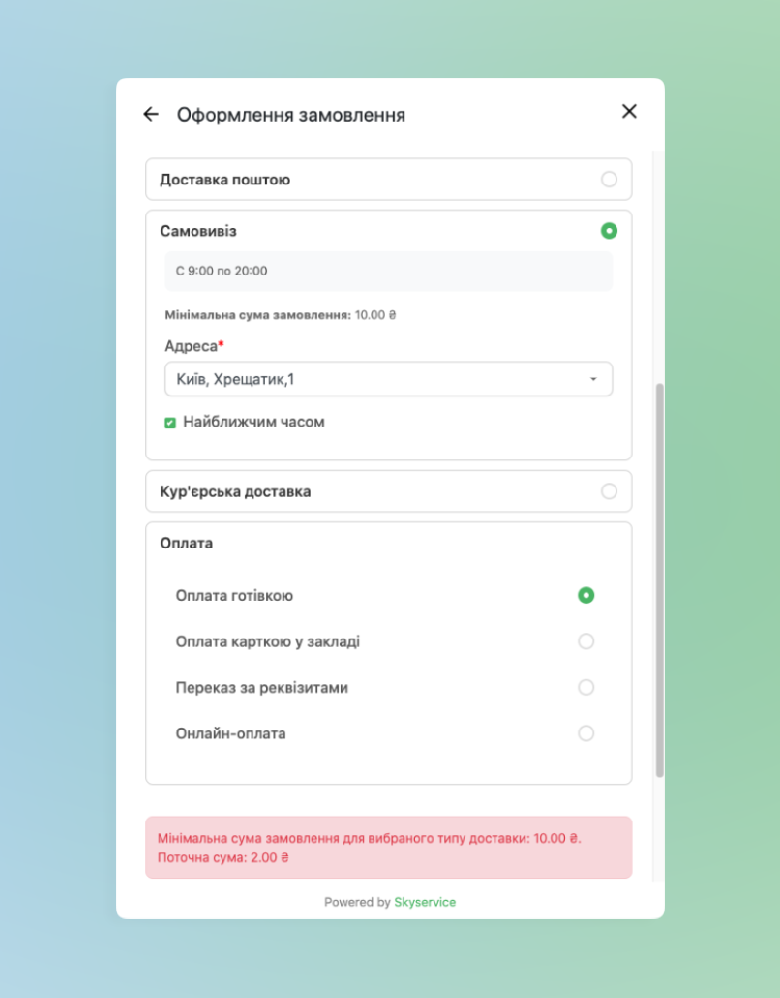
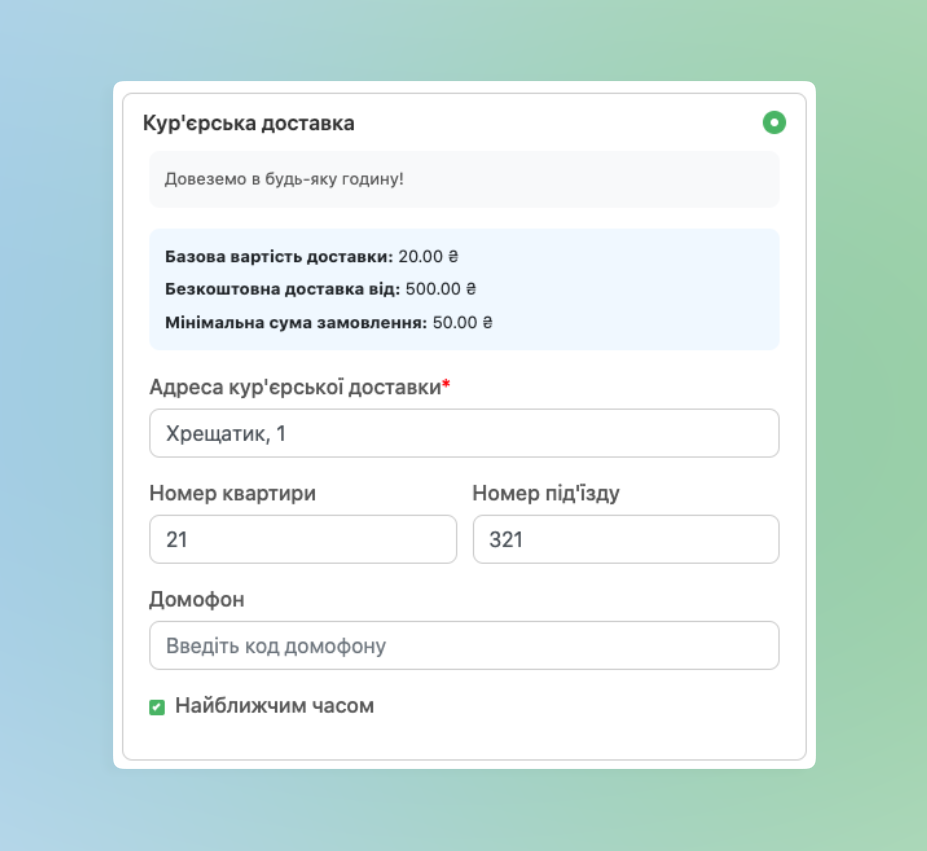
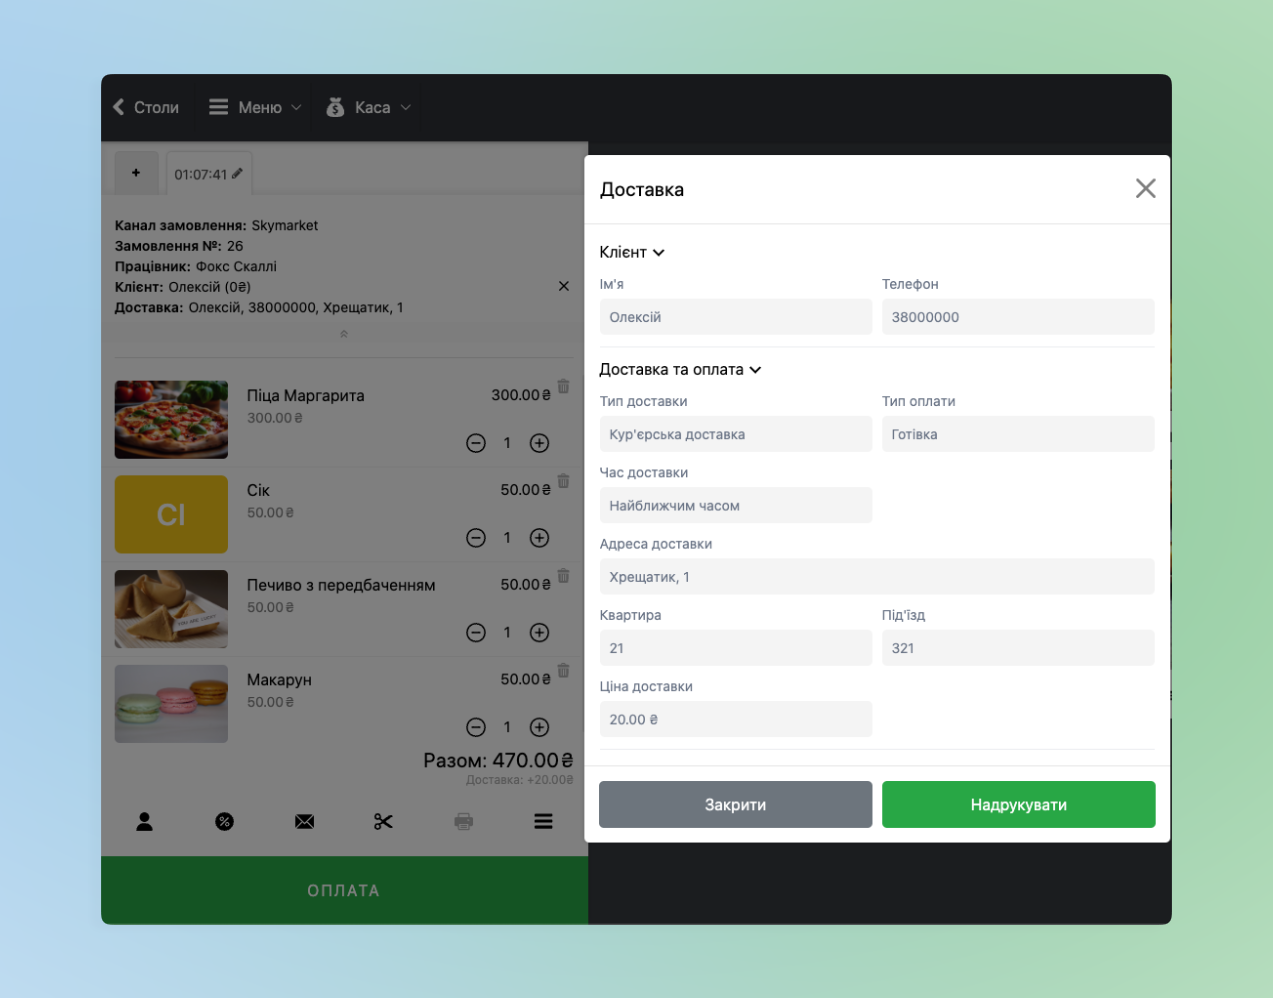
- Delivery by own courier – the client will additionally have the opportunity to order delivery when placing the order. The buyer will also need to specify the delivery address when ordering.
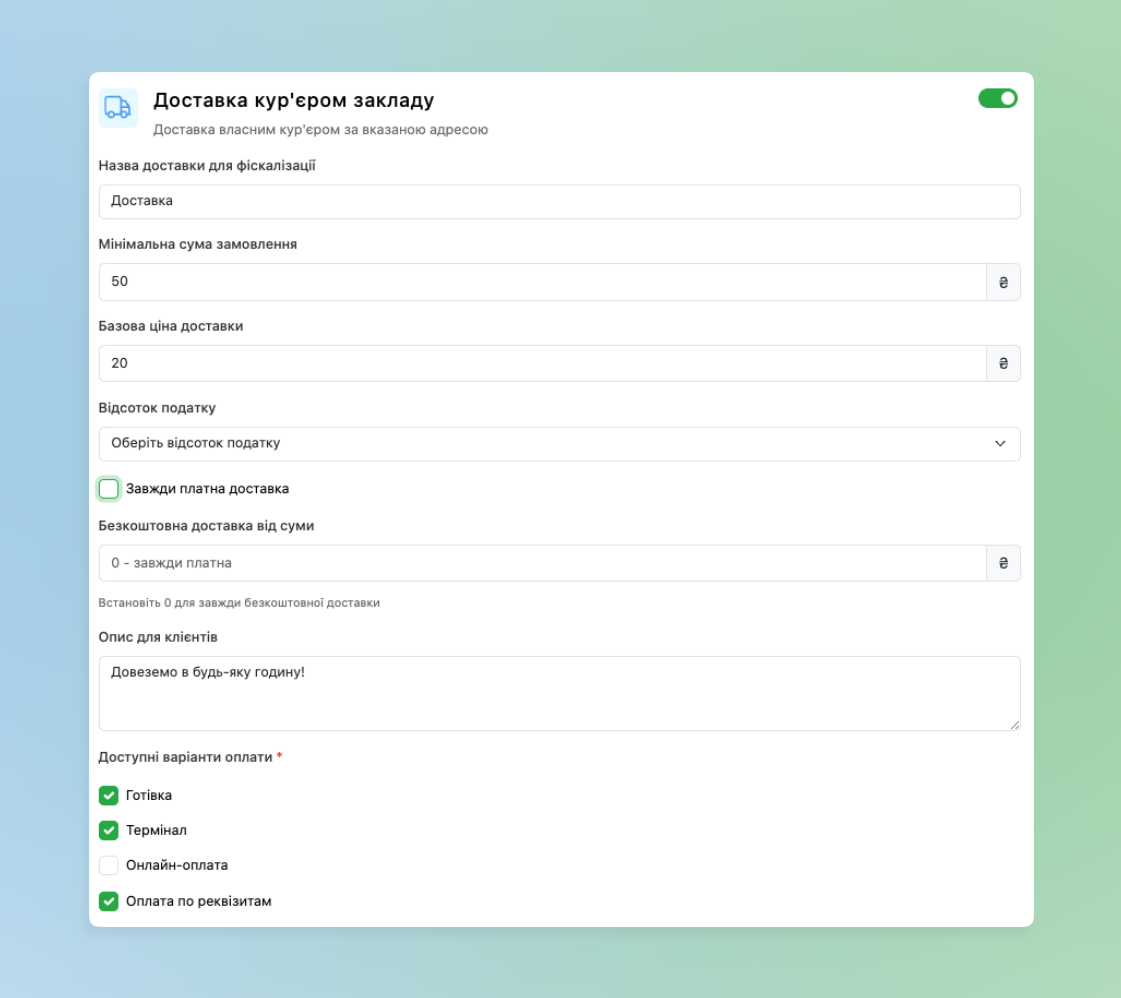
- In addition to Minimum order amount and Description for clients, which were mentioned in the description about Pickup, additionally you can set the following settings:
- Delivery name for fiscalization – in case of paid delivery and fiscal work, in this field you set the display as an item name in the fiscal check
- Base delivery price – the delivery price that will be automatically added to the order
- Free delivery from amount – if the client orders for this specified amount or more – the base delivery price will not be included in the order amount.
- Additionally the option Always paid delivery when activated removes the possibility to generally set free delivery
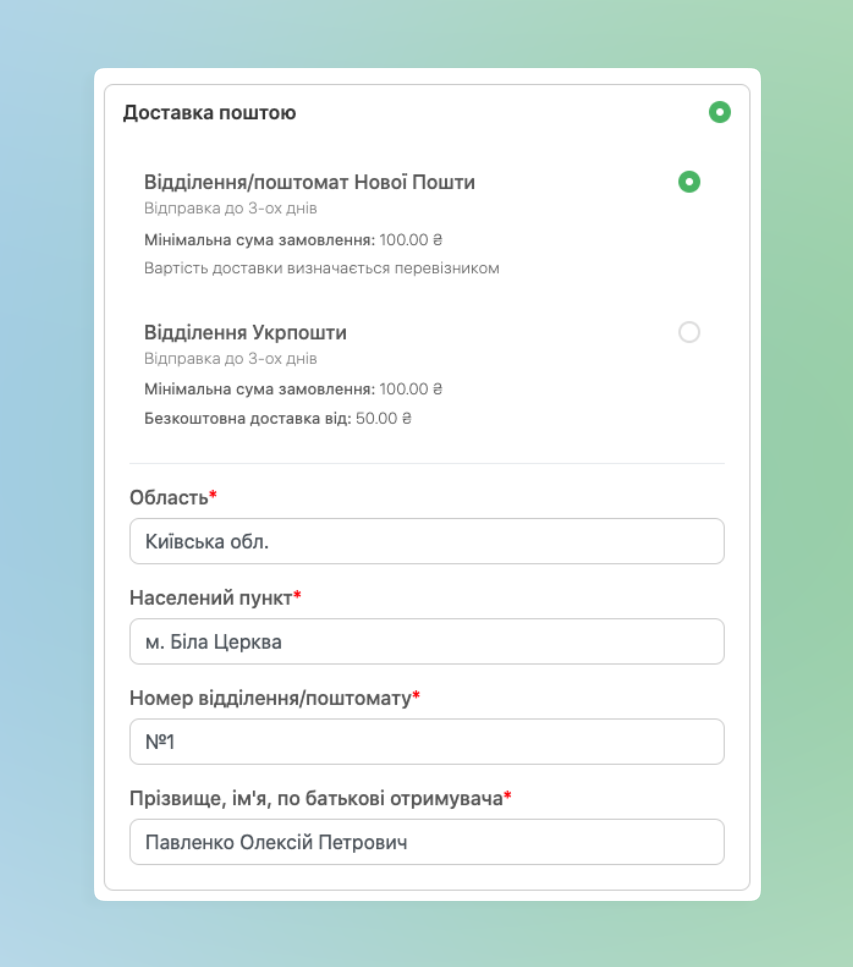
- Delivery by mail – adds the client the possibility to make orders by mail with the additional specification of all necessary data for sending. You can set which specific carriers are available for selection:
- Nova Poshta
- Ukrposhta
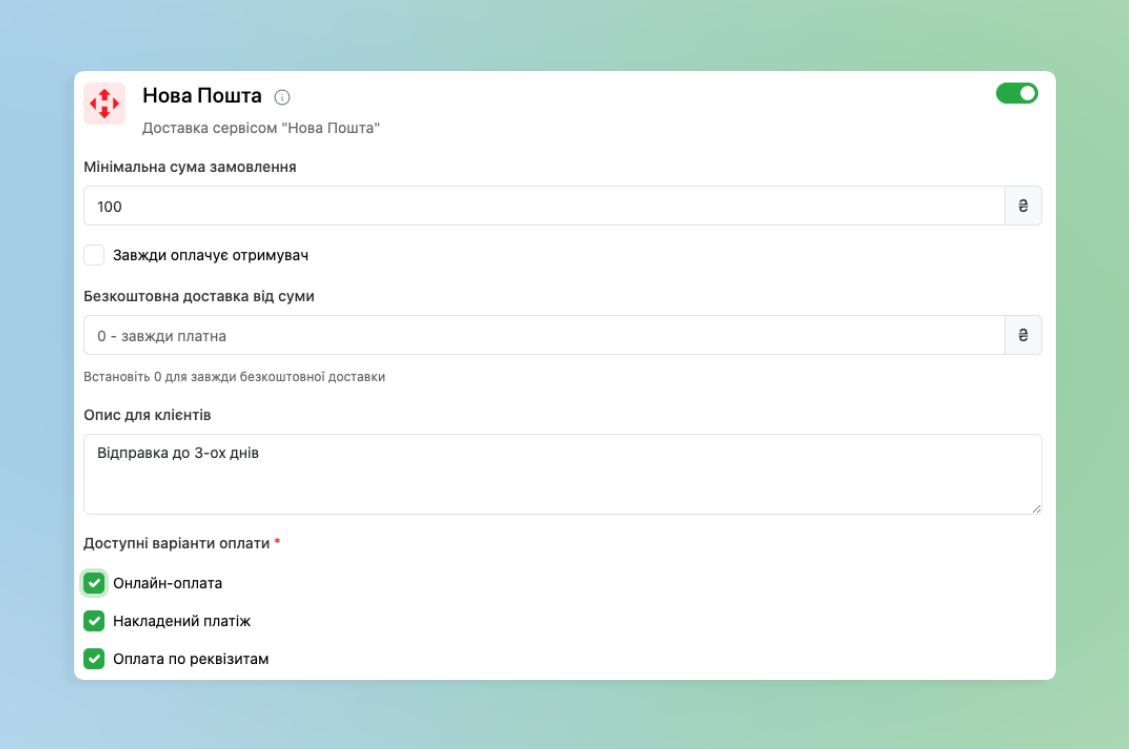
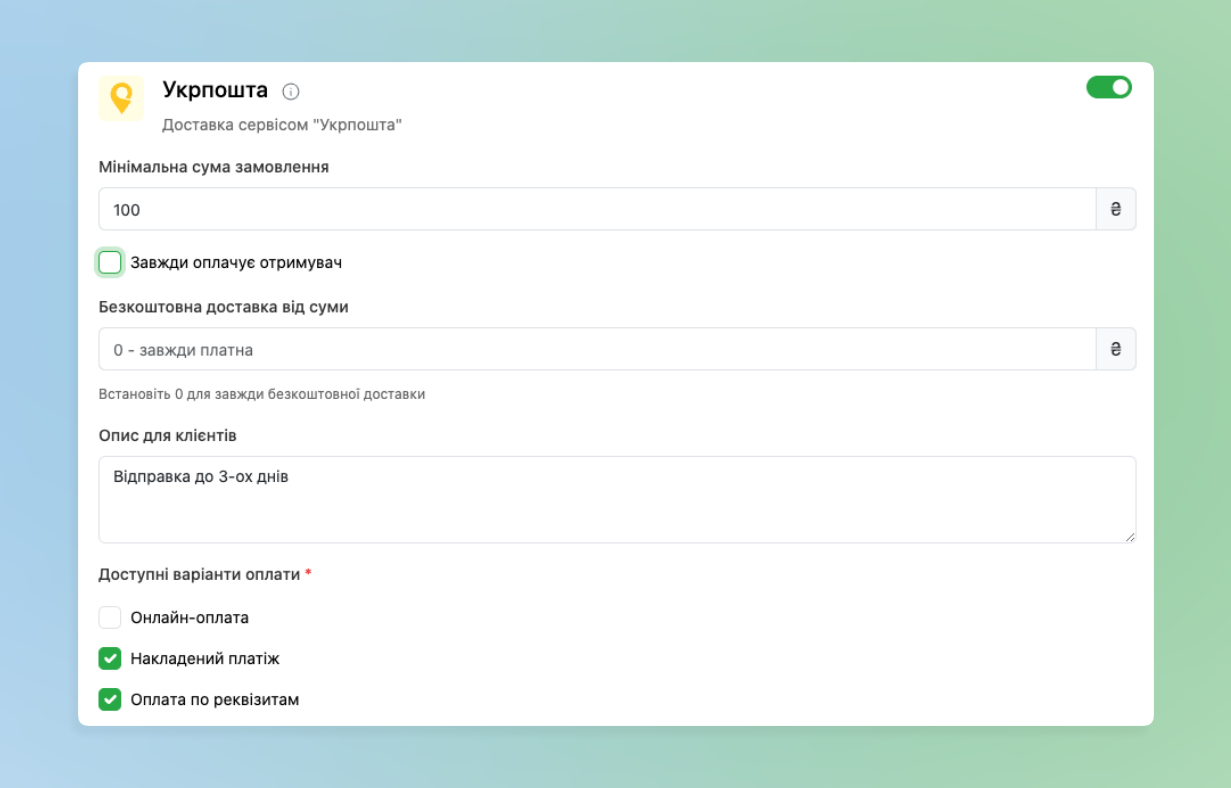
- As with previous settings, there is also the possibility to set Minimum order amount and Description to the goods.
Also, as with courier delivery, you can specify from what amount free delivery is possible:- Additionally the option Always the recipient pays according to the carrier’s tariffs means that the buyer will always pay for postal delivery and the field Free delivery from amount will be unavailable.
Payment method
For each delivery method you can also additionally set which specific Payment method will be available
- For Pickup and Courier delivery:
- Cash payment – when receiving the order the client pays with cash
- Terminal – payment of the order using a bank terminal
- Online payment – the buyer will have the opportunity to pay for the order in Sky Market using LiqPay and Portmone payment services
- Payment by requisites – with this payment when placing an order the buyer specifies their email. Next when receiving the order it is necessary for the client to send an invoice to the specified email according to which they will pay for the order.
- For delivery by Mail you can specify Online payment and Payment by requisites, additionally you can set Cash on delivery.
For configuring Online payment a bit lower you can use payment services:
- LiqPay – to set up you need to:
- Register on the LiqPay main site
- After registration in the LiqPay personal cabinet obtain the following data: public_key, private_key
- Next enter this data in the program in the corresponding fields in the Sky Market
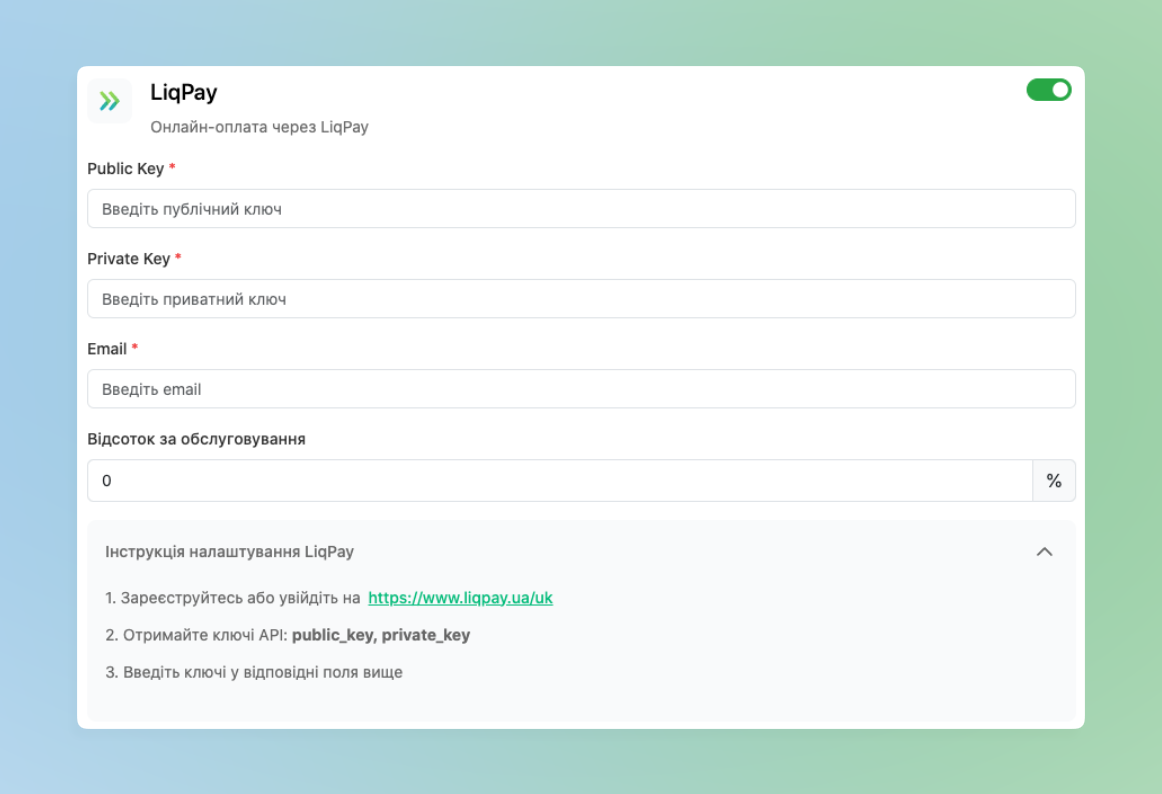
- settingsPortmone
- – to use this payment system you need to:Register on the
- Portmone main siteAfter registration in the Portmone personal cabinet obtain the following data: Login, Password,
- PayIDNext enter this data in the program in the corresponding fields in the
- Sky MarketAdditionally for working with Portmone you need to have configured Callback URL. To do this copy the link that is specified just below the settings in the program and provide it to
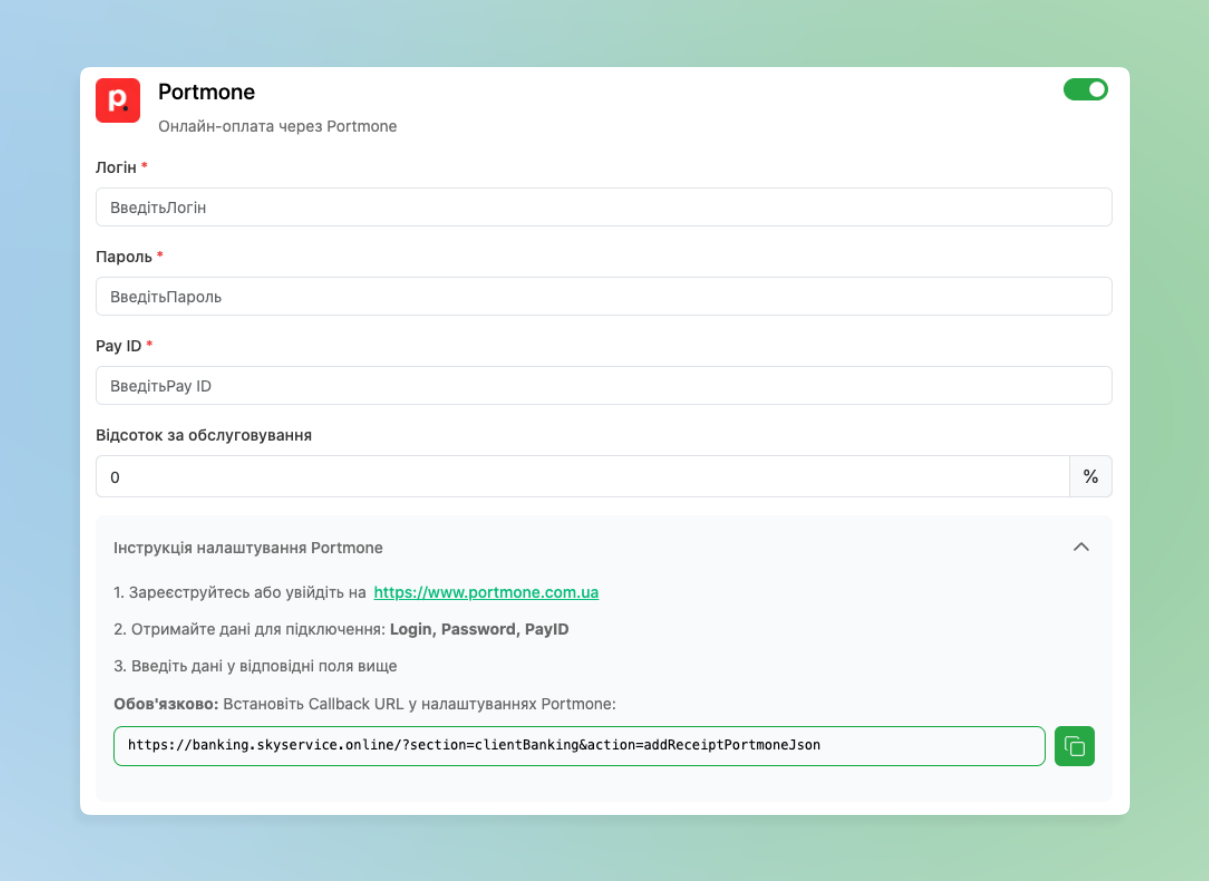
Portmone technical support☝🏻 Examples of forming and conducting a sale via Online payment we will consider in more detail in the following sections about creating an order in Sky Market and its subsequent display in the
POS terminal.
Portmone
for online payment. In the next subsection we will consider in detail why the commission is set for online payment.
Portmone – the payment service automatically holds its commission from the amount of the transfer. For example, LiqPay takes about 2.5-2.75% from each payment – this money is taken by
LiqPay
itself, not Skyservice. You can transfer this commission to the buyer in full or partially by specifying the percentage in the settings. Then this percentage will be added to the order amount and will be visible to the buyer as a separate item in the check.
- Display of the percentage for the buyerAfter setup the buyer in the cart when selecting online payment will seeA separate line “
- Commission for online payment (X%)
- ” with the amount in UAH
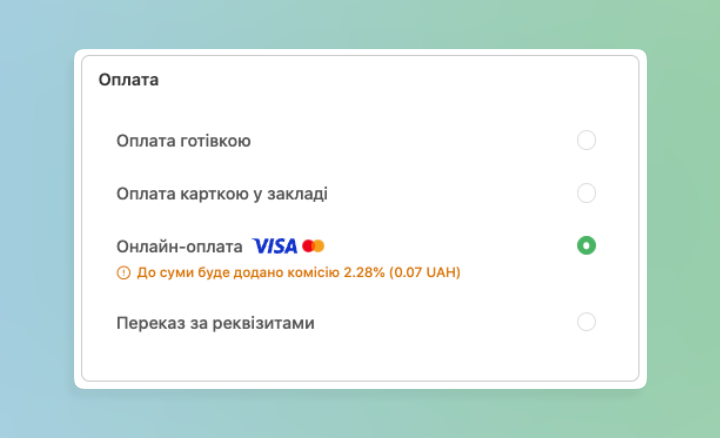
A tooltip immediately below the online payment selection button
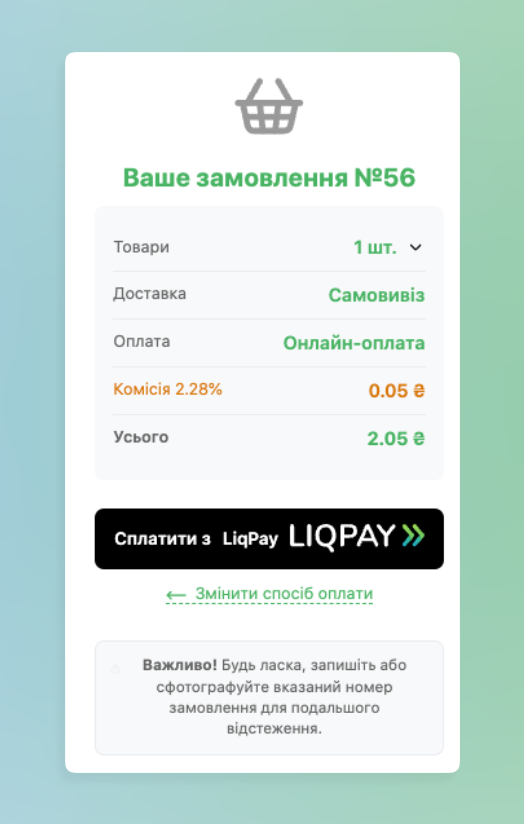
Updated total order amount☝🏻On the receipt after payment the commission is also displayed as a separate line – the buyer sees the full payment structure.☝🏻In
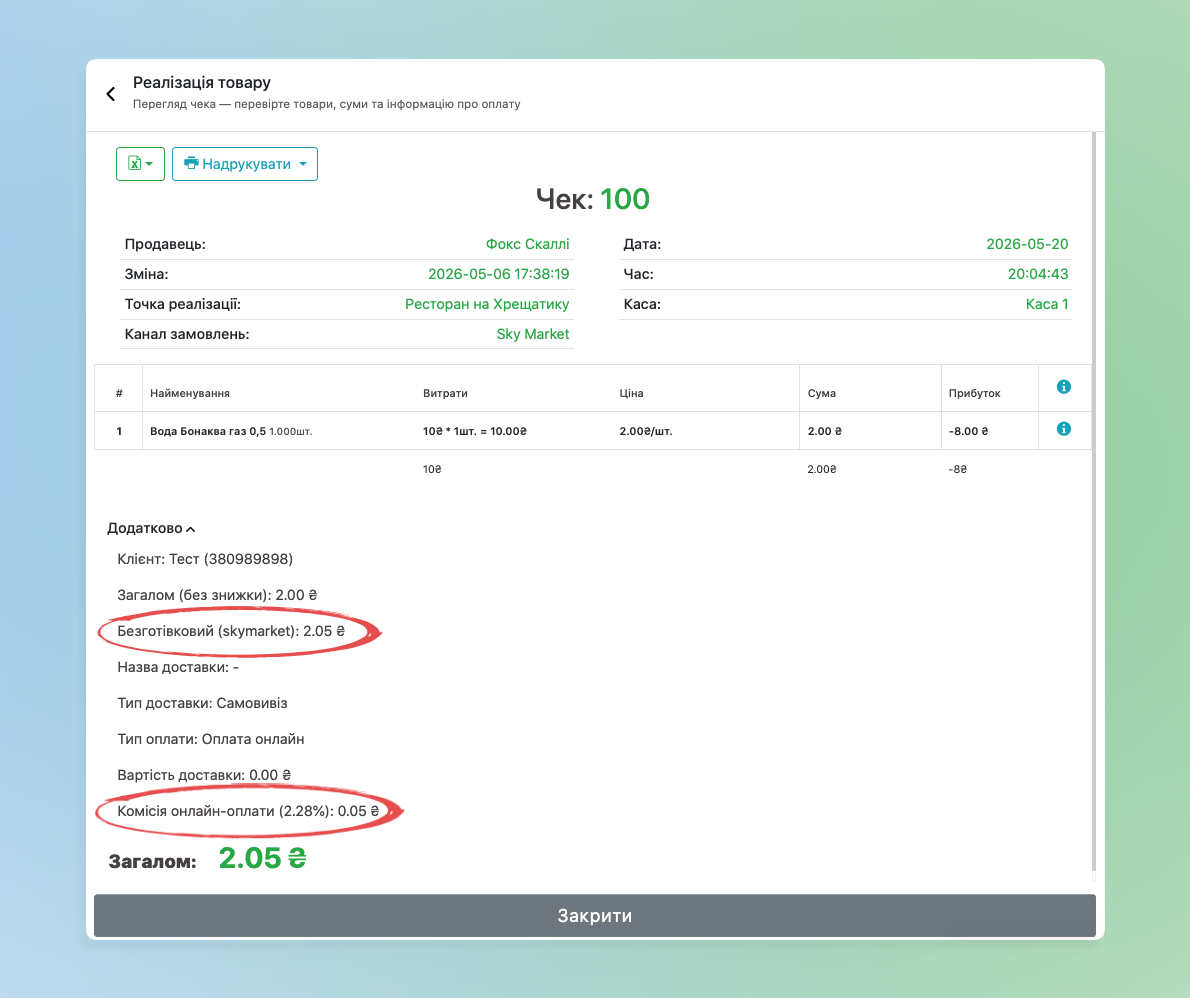
Example of display in the
Admin PanelImportant about taxes
- Service percentage be sure to carefully read the following information.
- The commission you receive from the buyer is your income
- . If you are a sole proprietor on a single tax, – the entire order amount together with the commission is included in your taxable revenue. This means that you pay tax on the entire amount.Simple example: the buyer ordered goods for 1000 UAH. You specified 2.5% commission – the buyer paid 1025 UAH. LiqPay took its commission (about 25 UAH), you received about 1000 UAH on the account. But for the tax authorities the sale amount is 1025 UAH, and the tax is calculated from this amount.
More about the fiscal check: with each order with online payment and commission > 0 the system automatically includes the commission in the fiscal check as a separate item “Service percentage”. This is your income and is subject to taxation according to your tax system.
We recommend consulting with your accountant
regarding the accounting of these amounts if you have doubts or a specific tax system.
- receiving notifications via Telegram Bot.
- For this go to the section Telegram Bot Click Show QR code➔ scan the code using a device with a camera or copy the link by clicking the button “copy
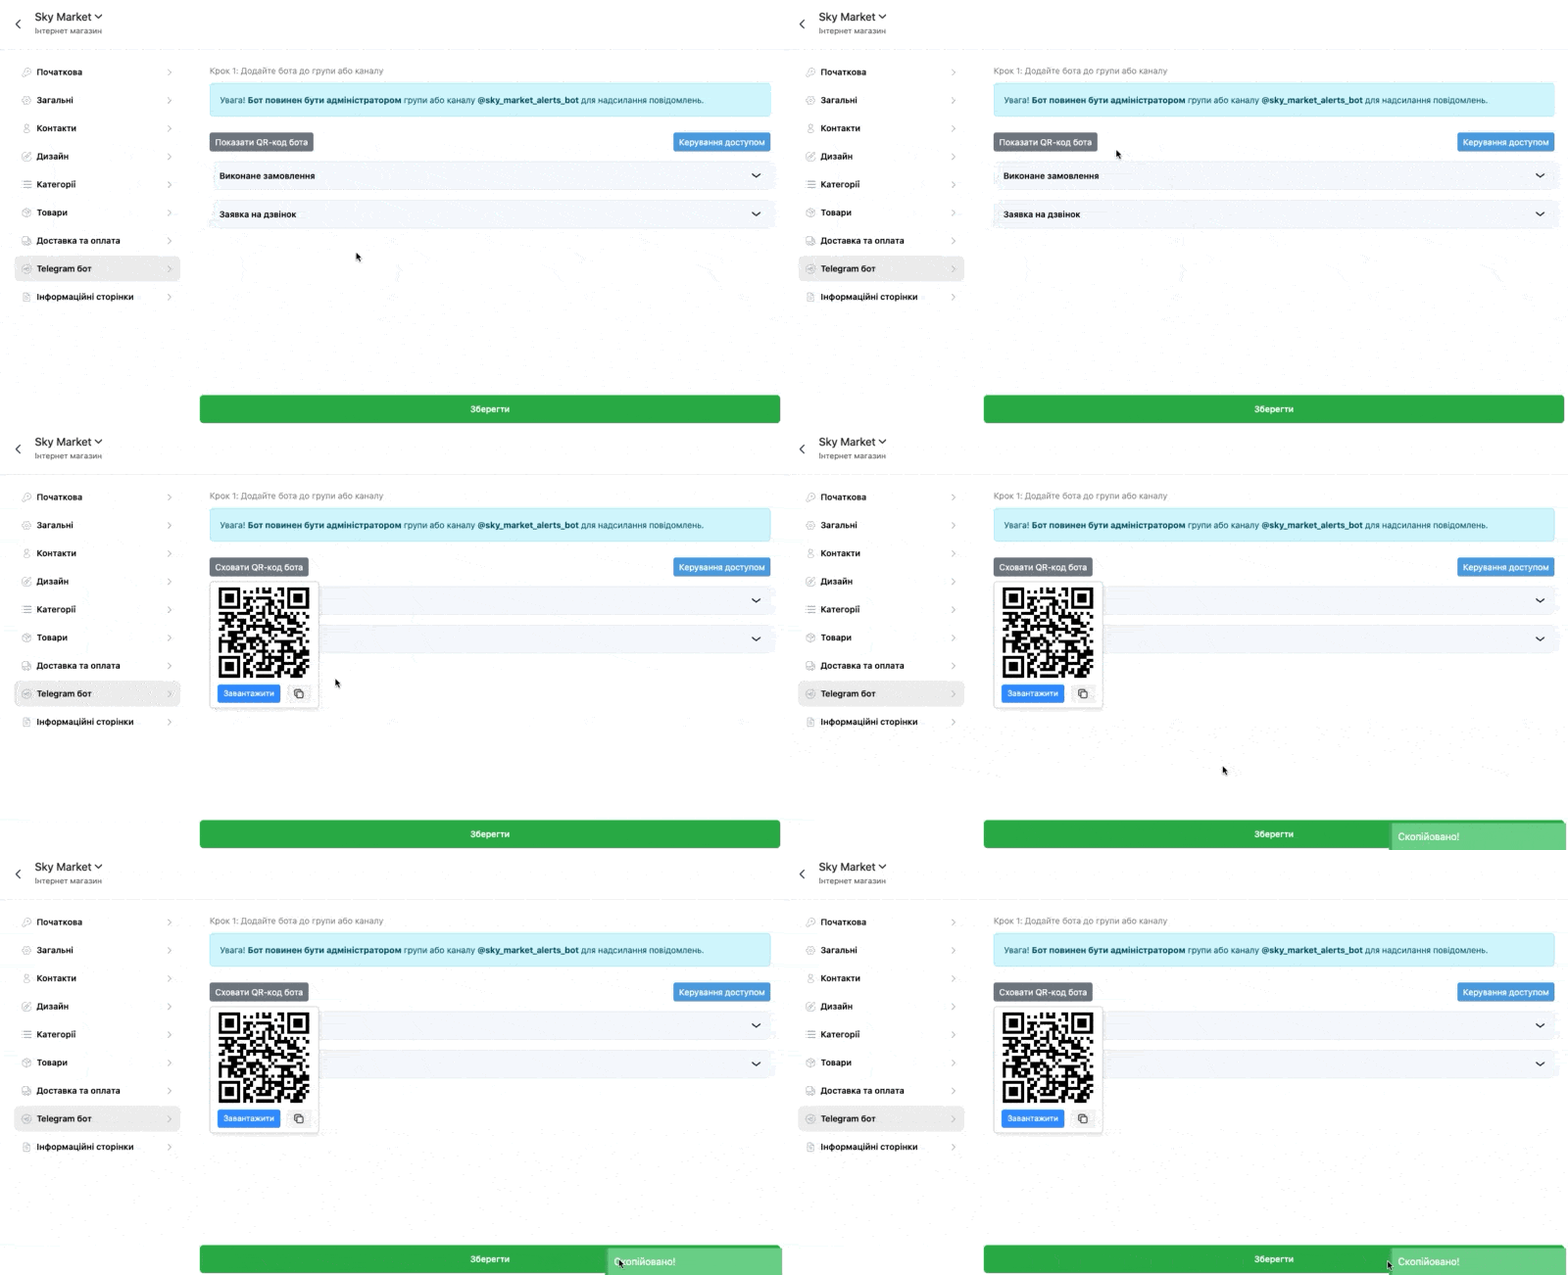
- “. The QR code image can also be
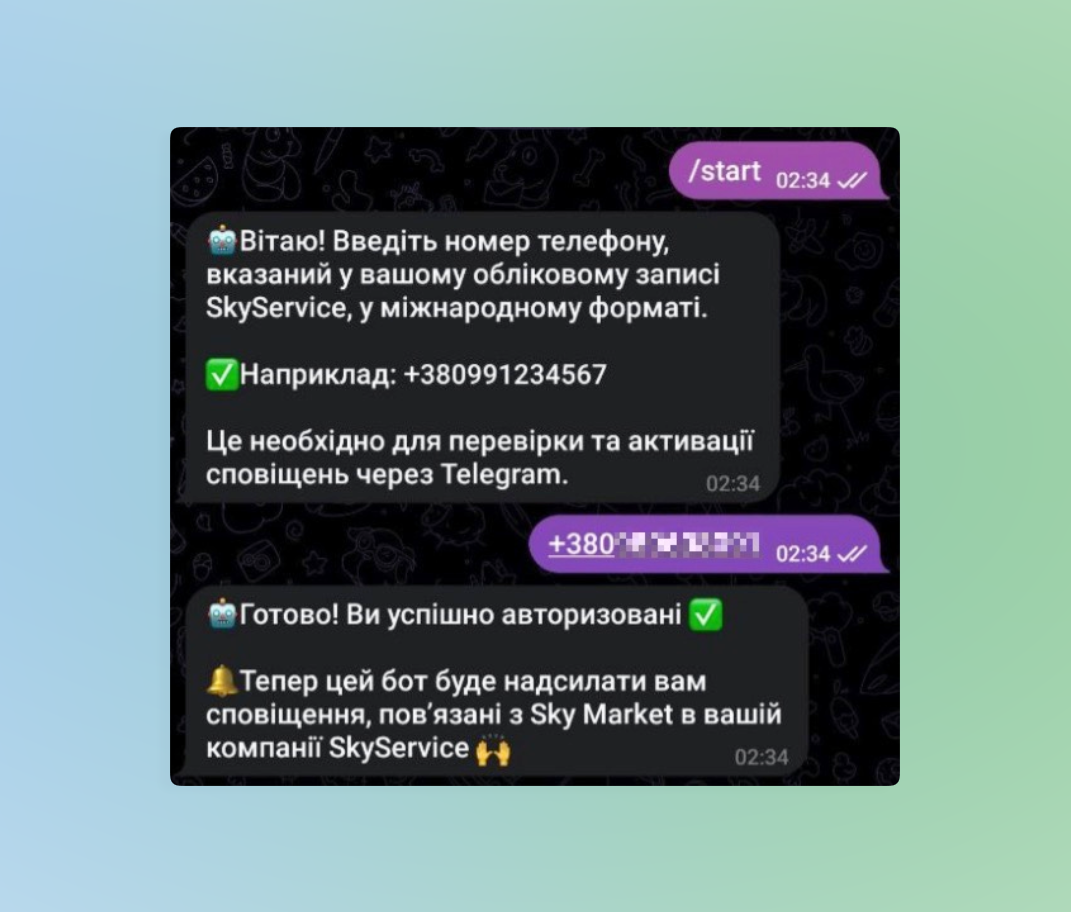
DownloadedAfter scanning and going to the Bot, it will next offer to specify the phone number. After specifying it you will receive a notification about successful connection. ❗
- Note! You need to specify exactly the phone number that is fixed for You or Your employee in the program.Under the button
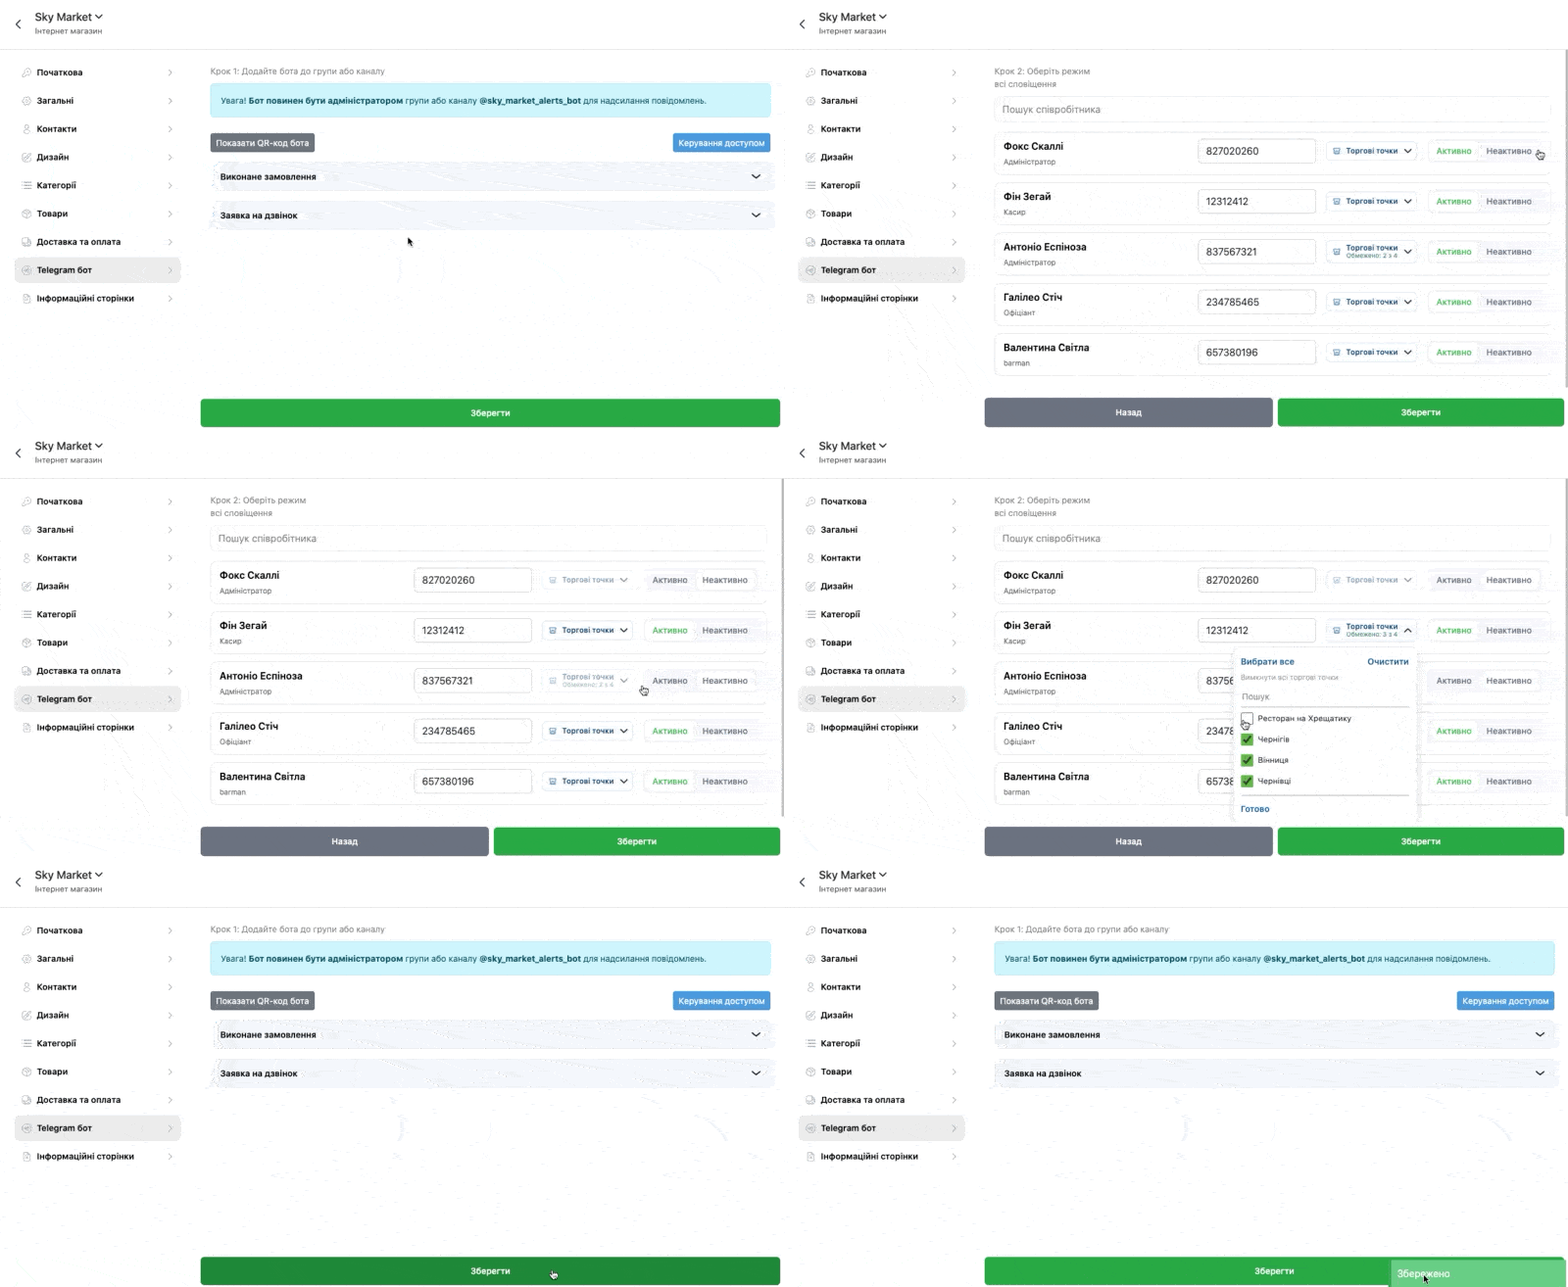
- Access management there is the possibility to configure exceptions regarding employees for receiving notifications. For example, select employees and a sales point on which they should receive notifications about orders.Click on Order placed and Call request
- to set the positions that should receive notifications about orders or the need to call the client in TelegramAdditionally if necessary click
- Configure exceptions next to the position to set which specific employees should receive messages
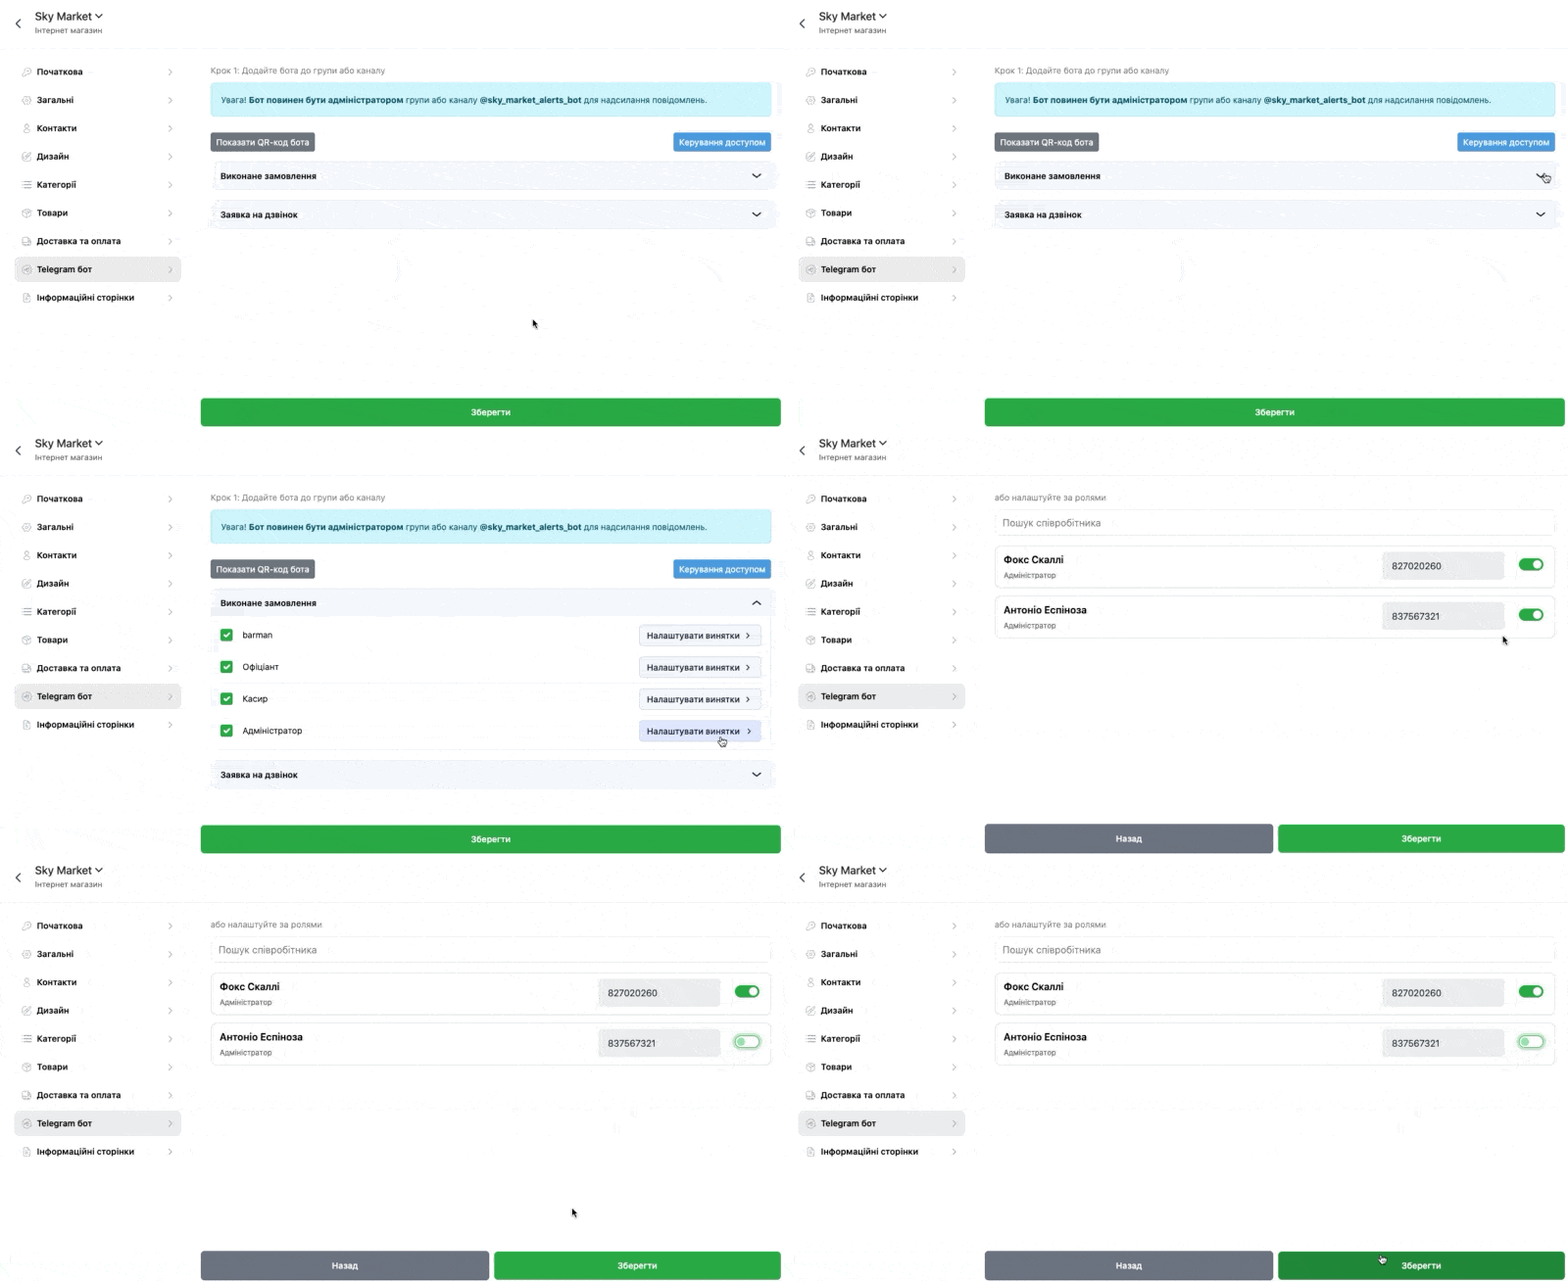
After settings, be sure to click
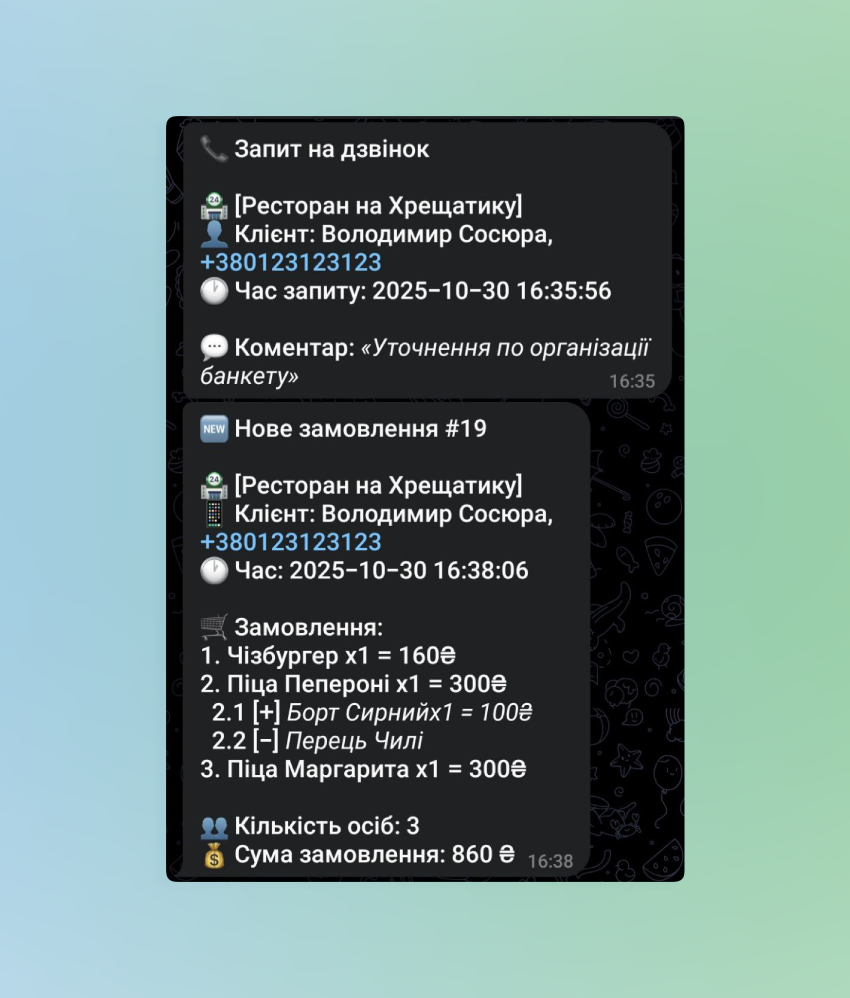
☝🏻At present notifications in the bot will arrive exclusively regarding new orders from the online store and notifications about the call request, but in the future the list of options for our and your convenience will be expanded
Example of notifications
- OtherThis section is intended for displaying additional information for visitors. For example, the history of your venue or information for orientation.In the
- Page name field specify the title for your description. For example: “About us”, “Our history”, “Venue news”, etc.In the
- Description field add detailed information that you wish to share with buyers
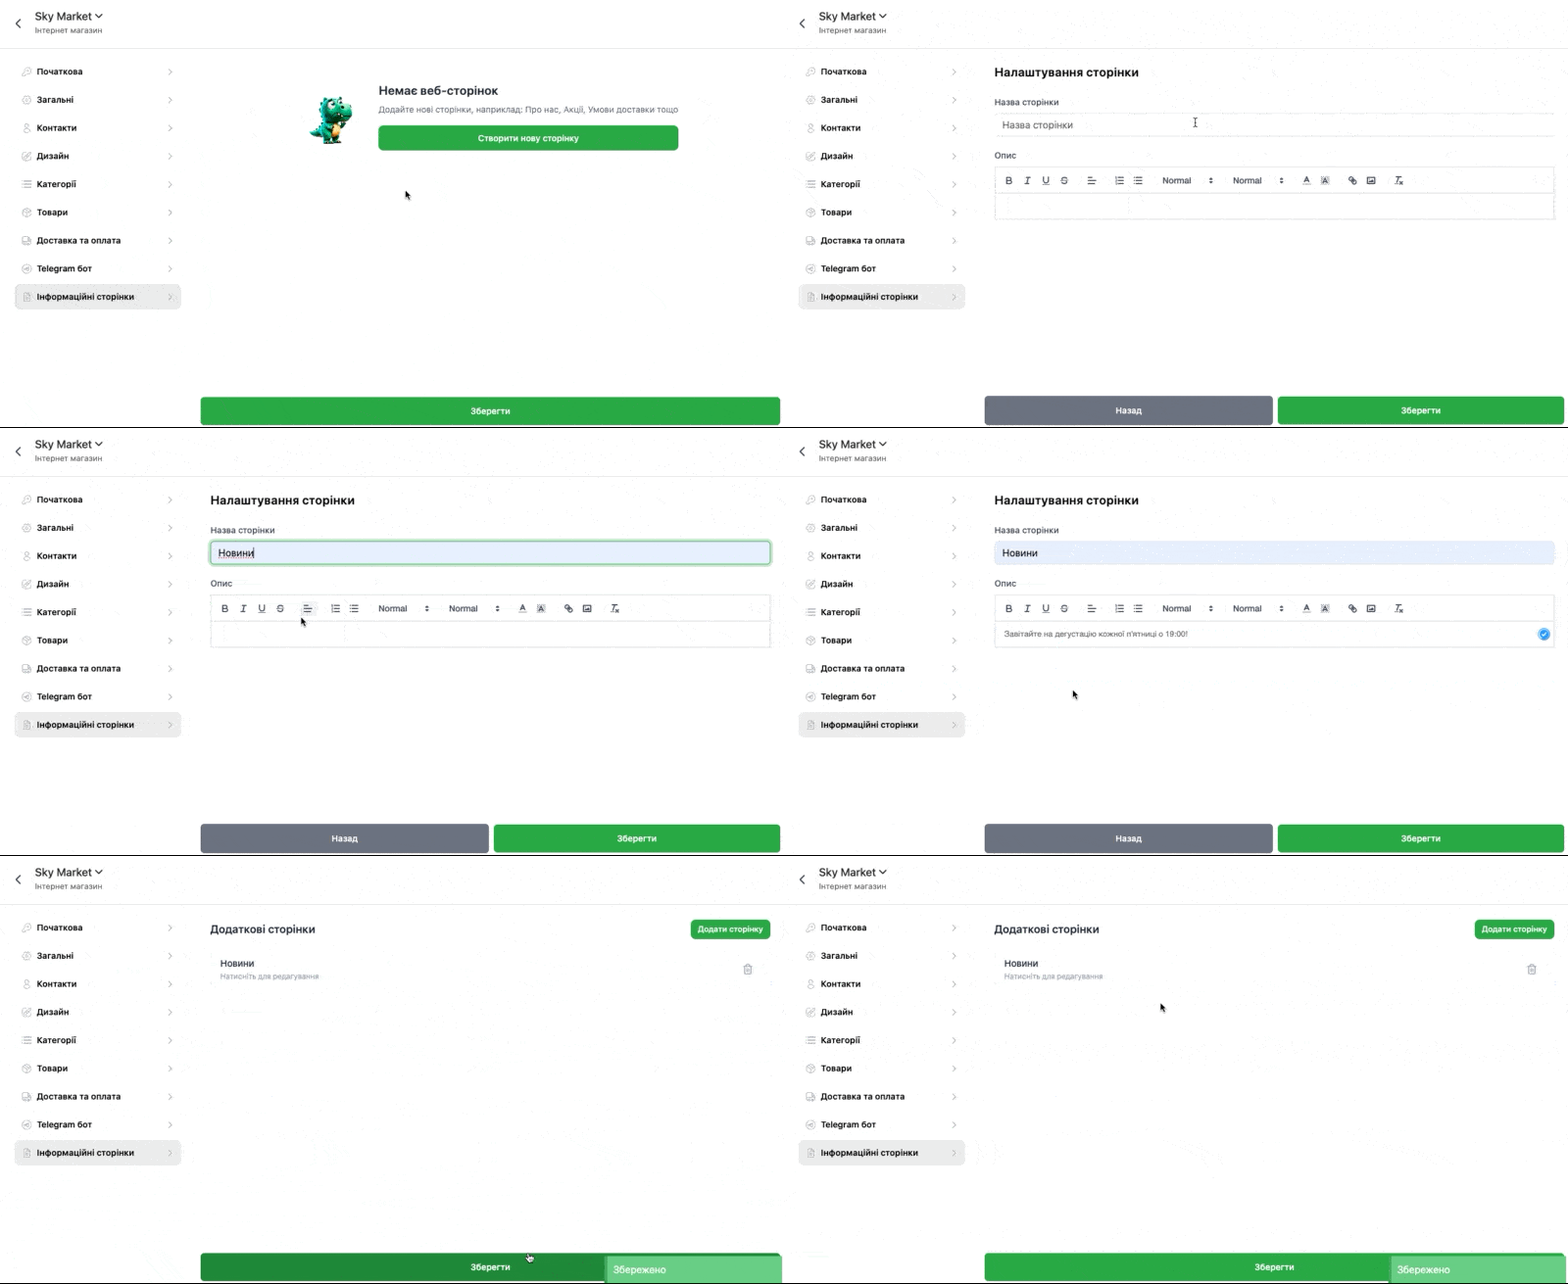
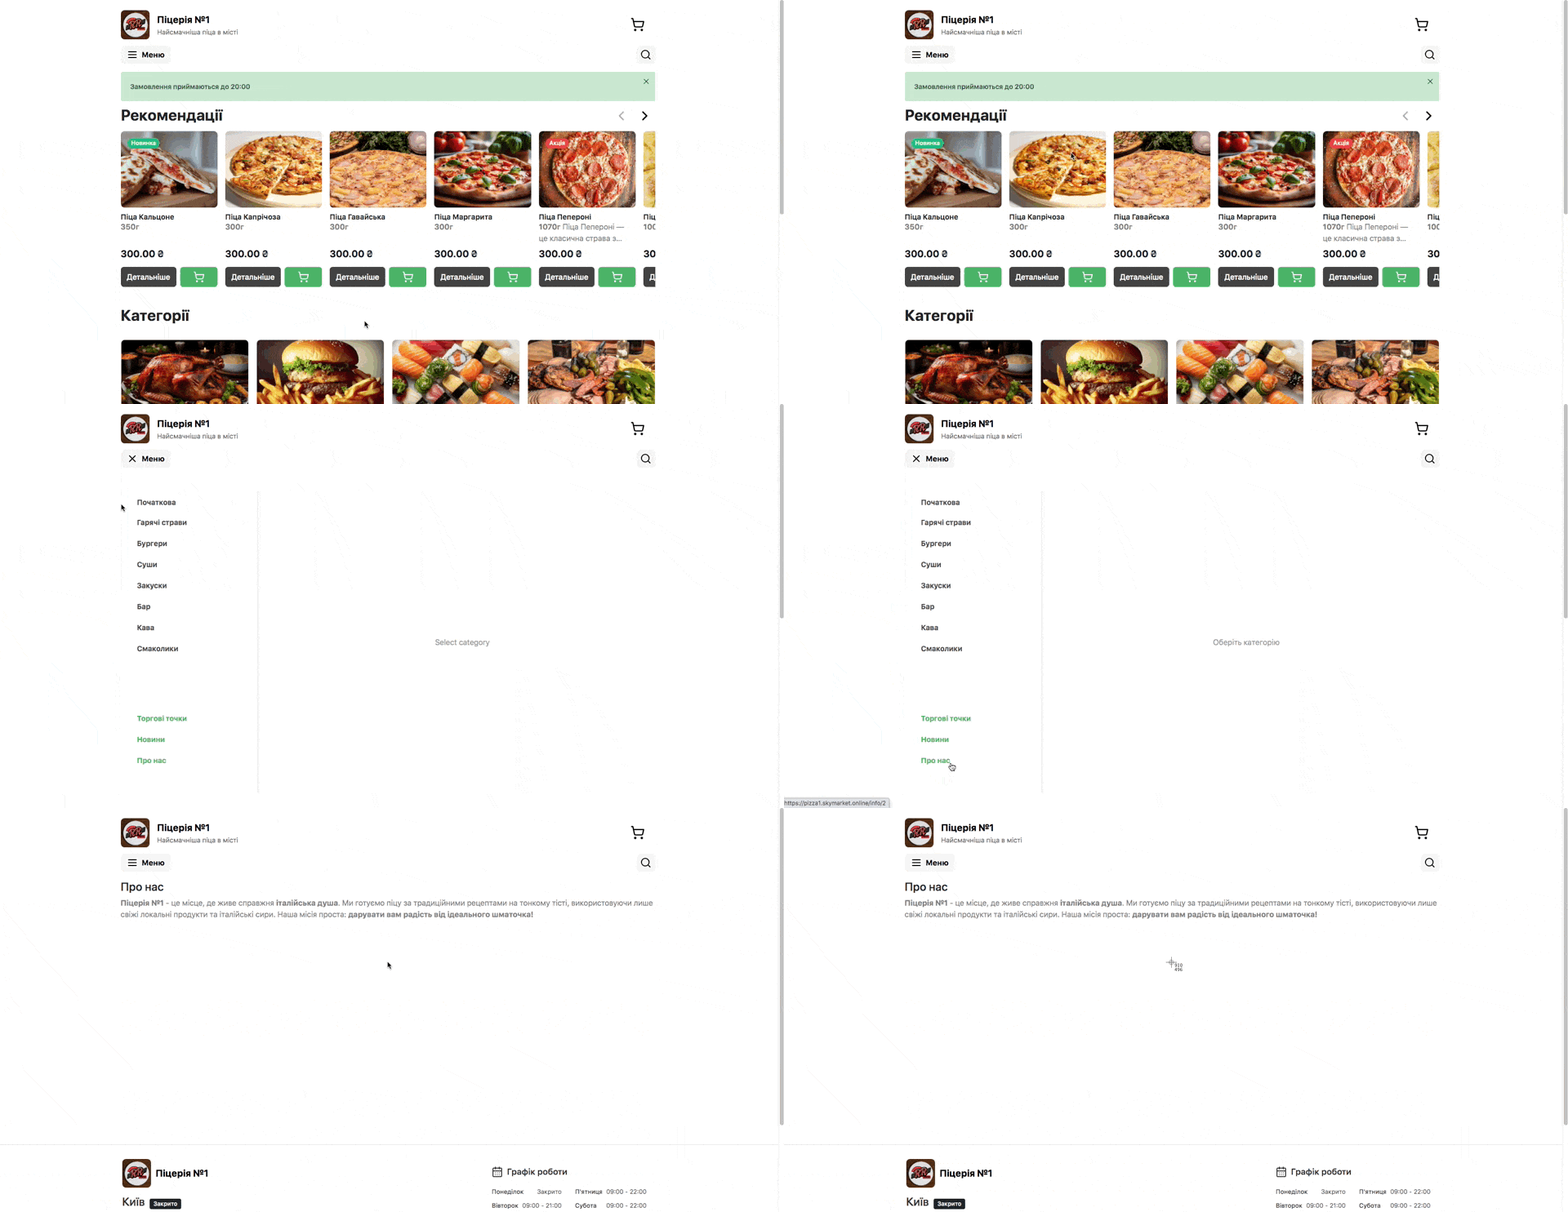
Save
Example of display in Sky Market
- Sky Market☝🏻The location of information about points of sale in the mobile version and web is slightly different, namely:Web version
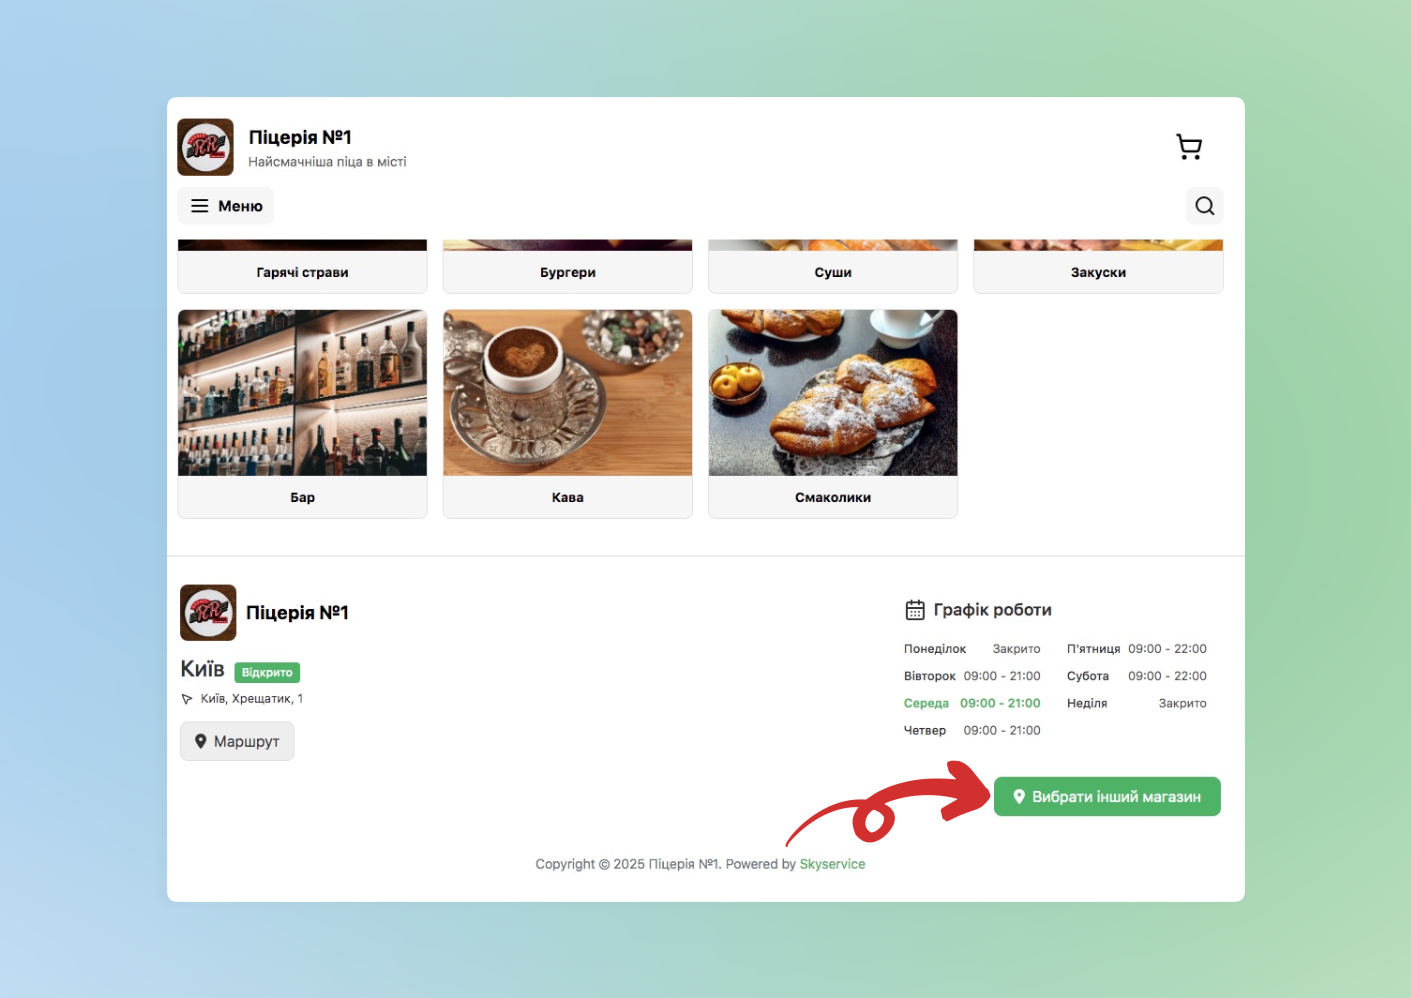
- – at the bottom of the showcase page under the button Choose another storeMobile version
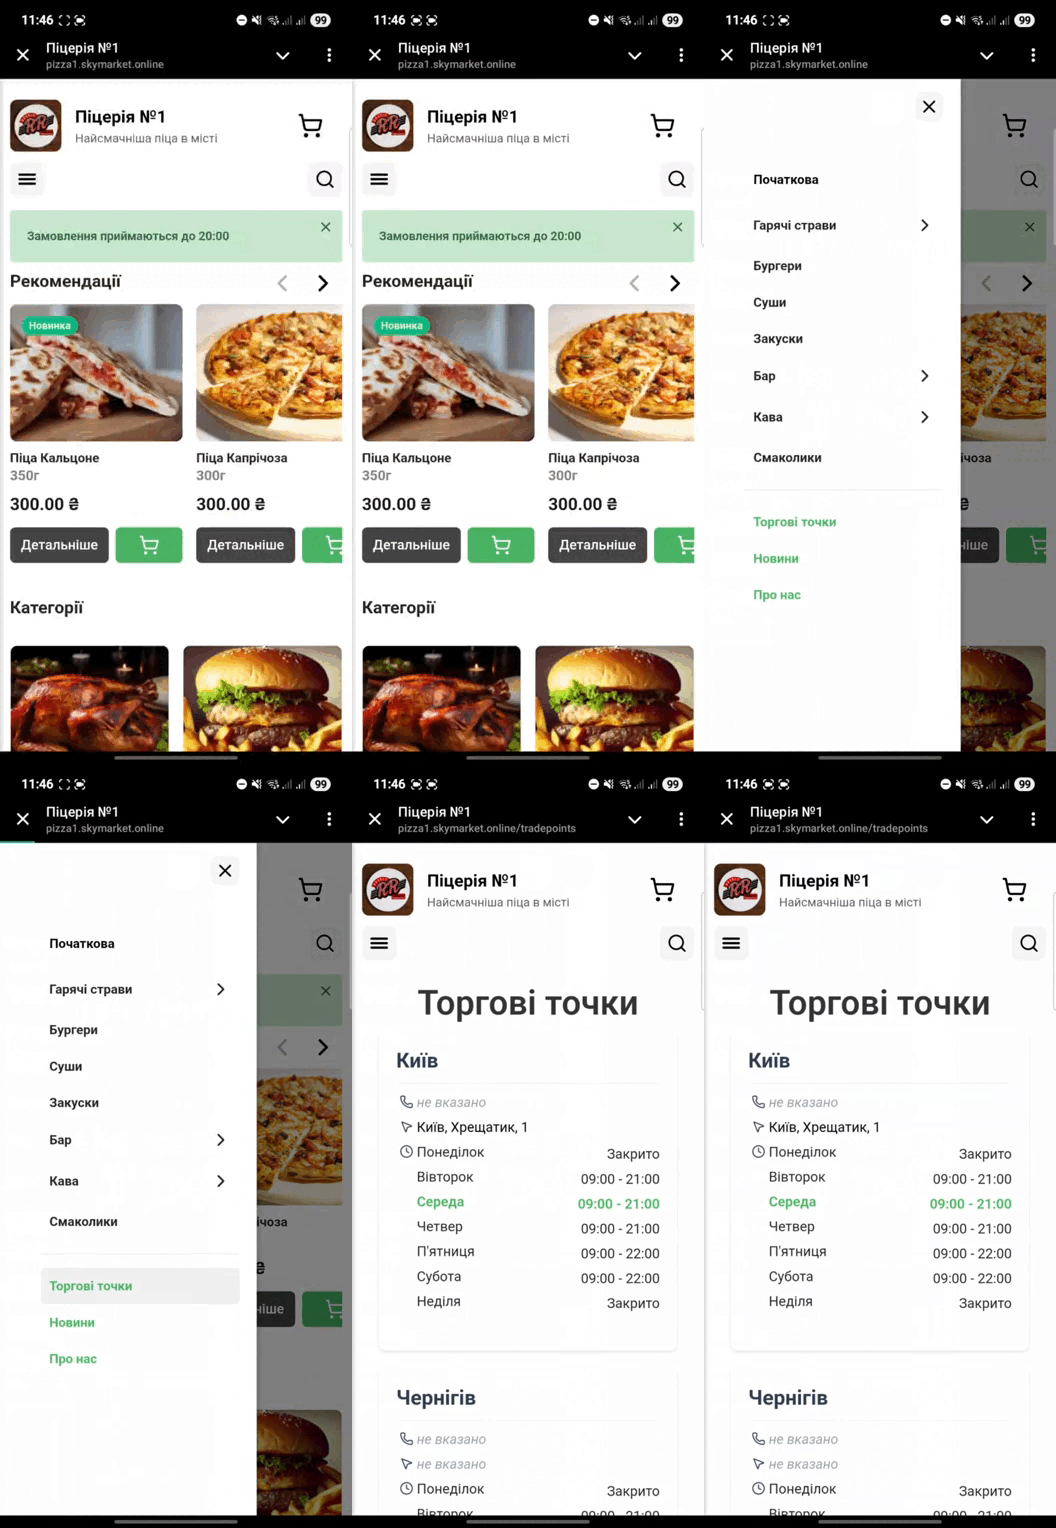
- Sales pointsCreating an orderYour client selects the required goods/product by clicking the button “
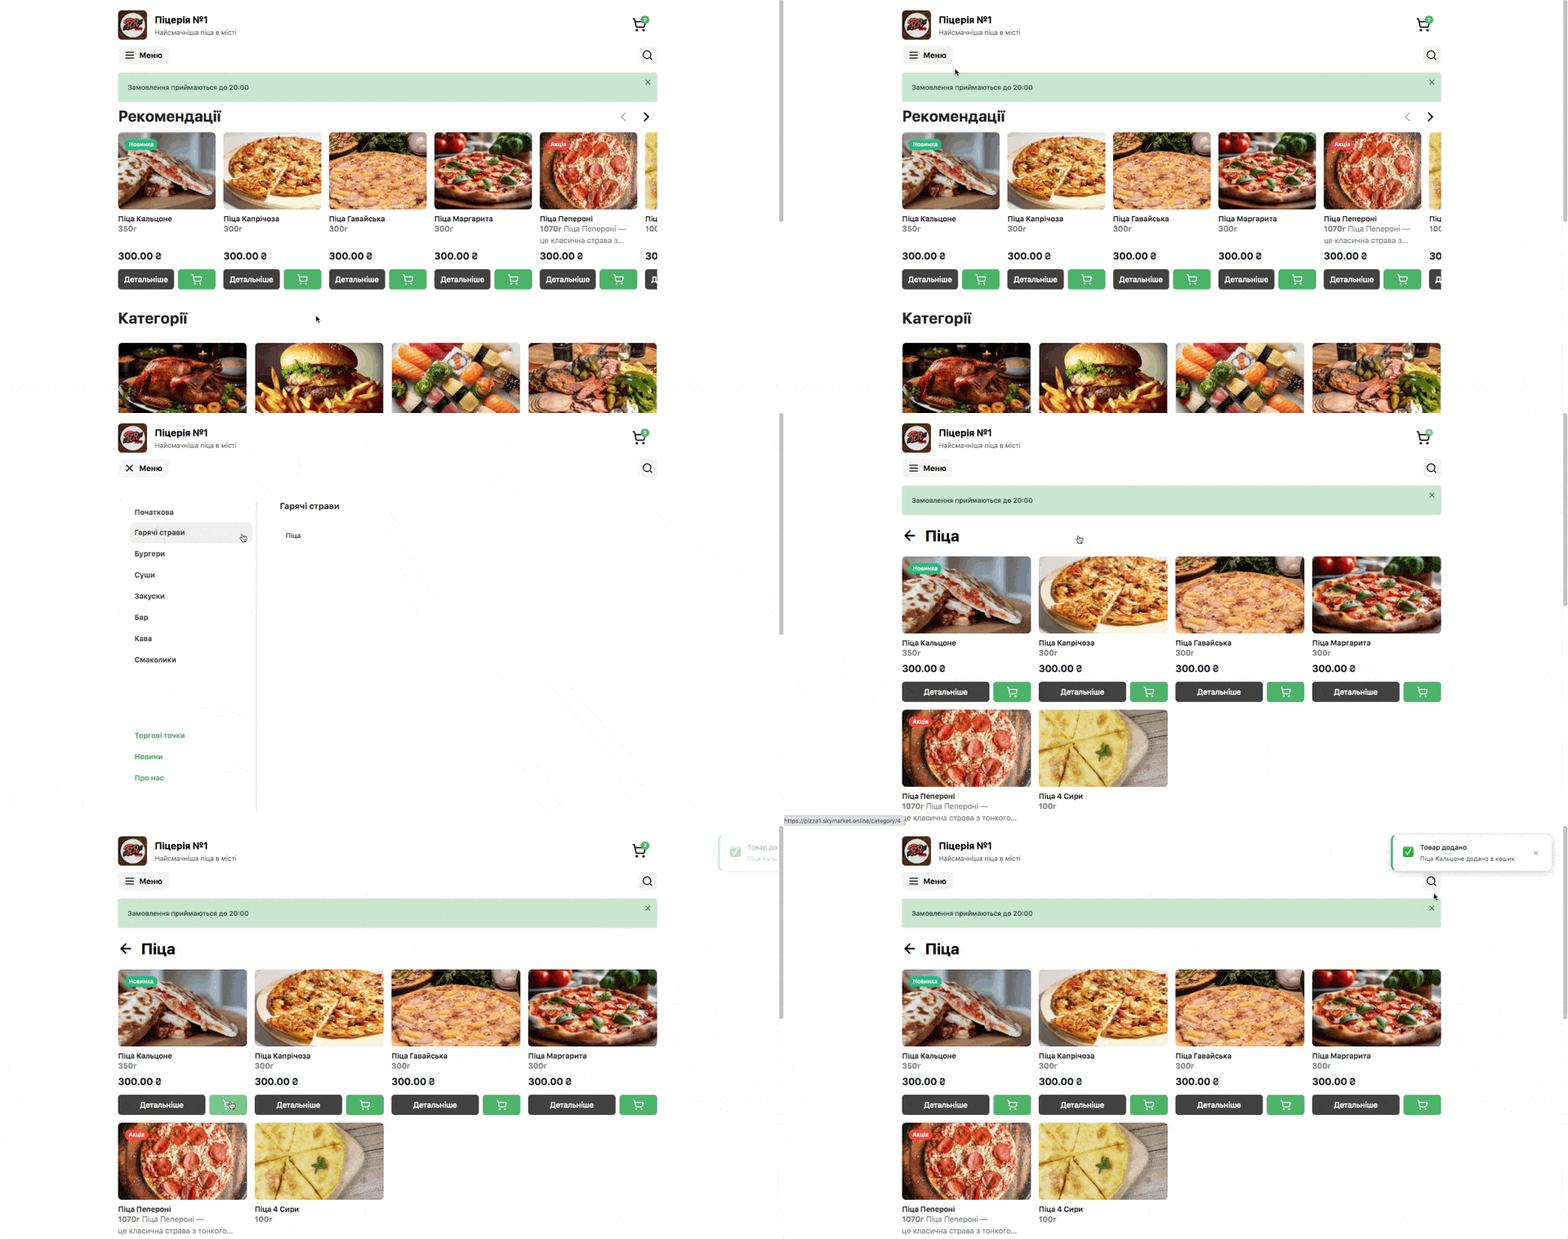
- 🛒“
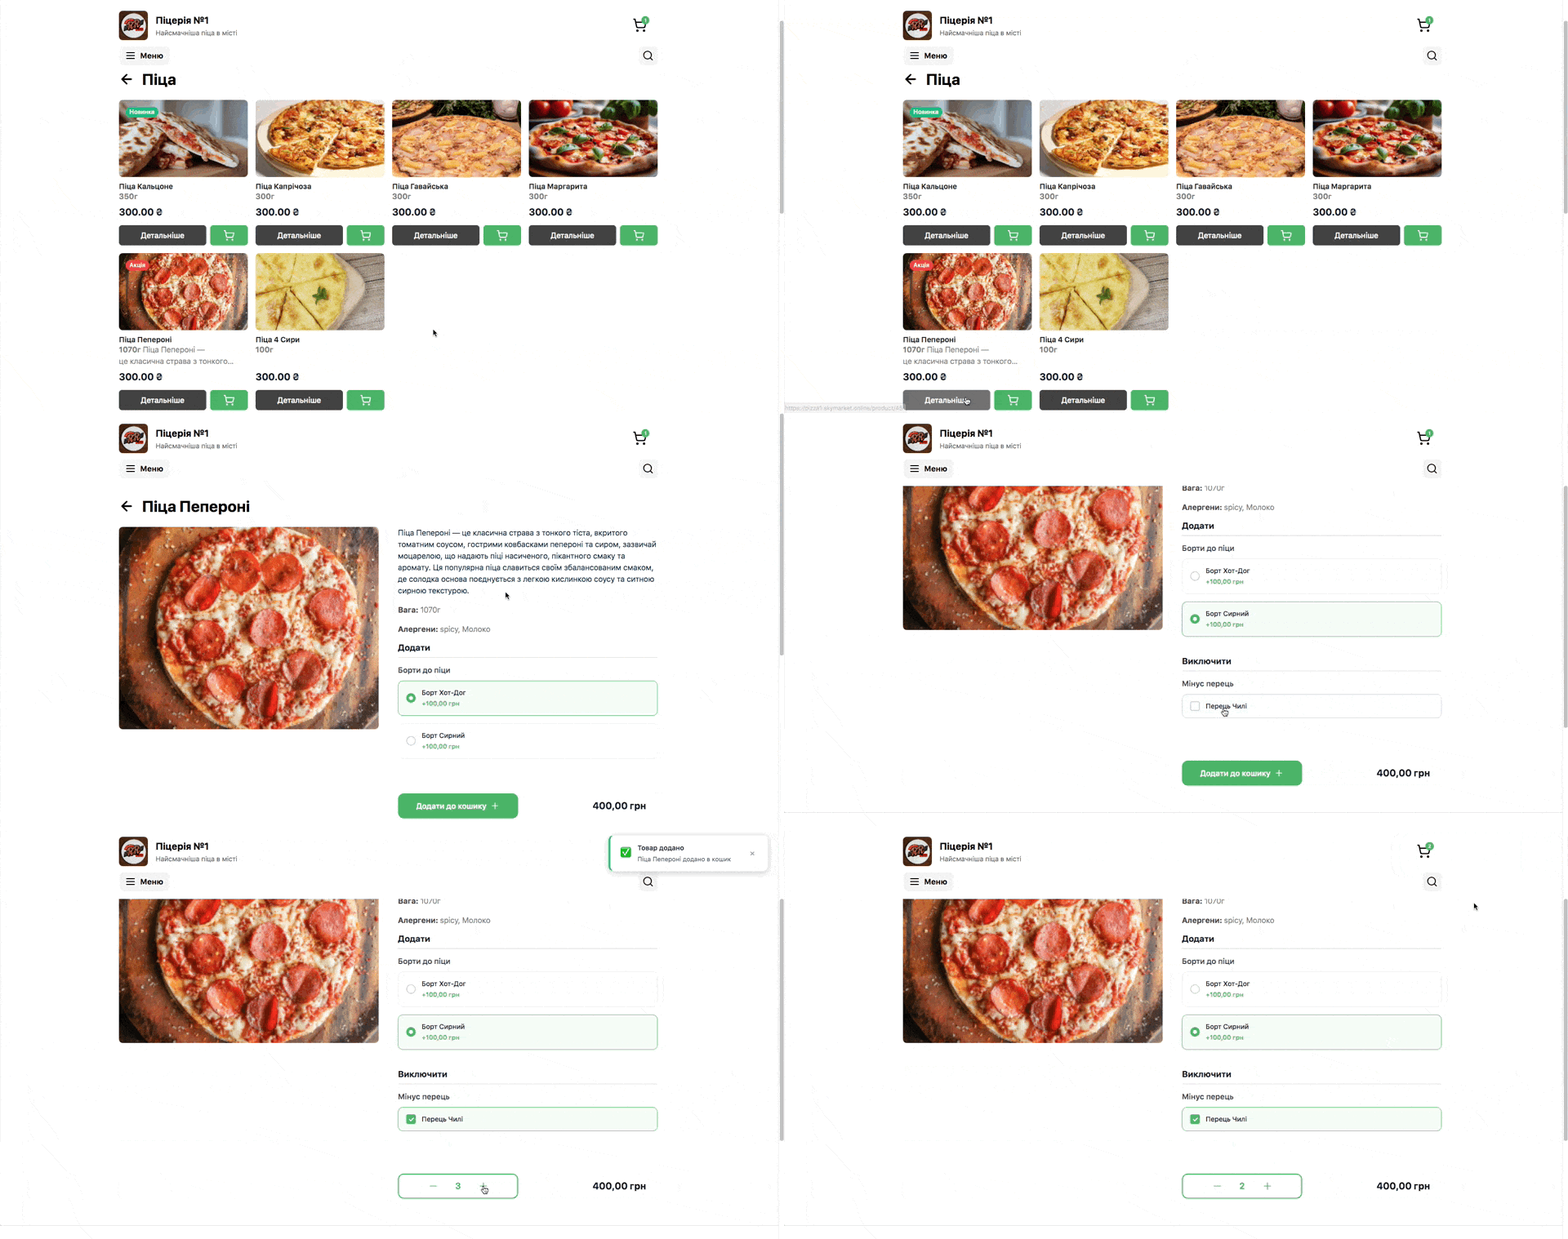
Also before the direct choice you can view the goods/product by clicking the button DetailsNext the ordered goods/product gets into the “
- Cart
- ” in which your client can:
- View the order list
- Change the quantity of goods/product
Delete the goods/product from the listSee the price for the goods and the total amount☝🏻Having made sure that everything corresponds to what was selected, you need to click on
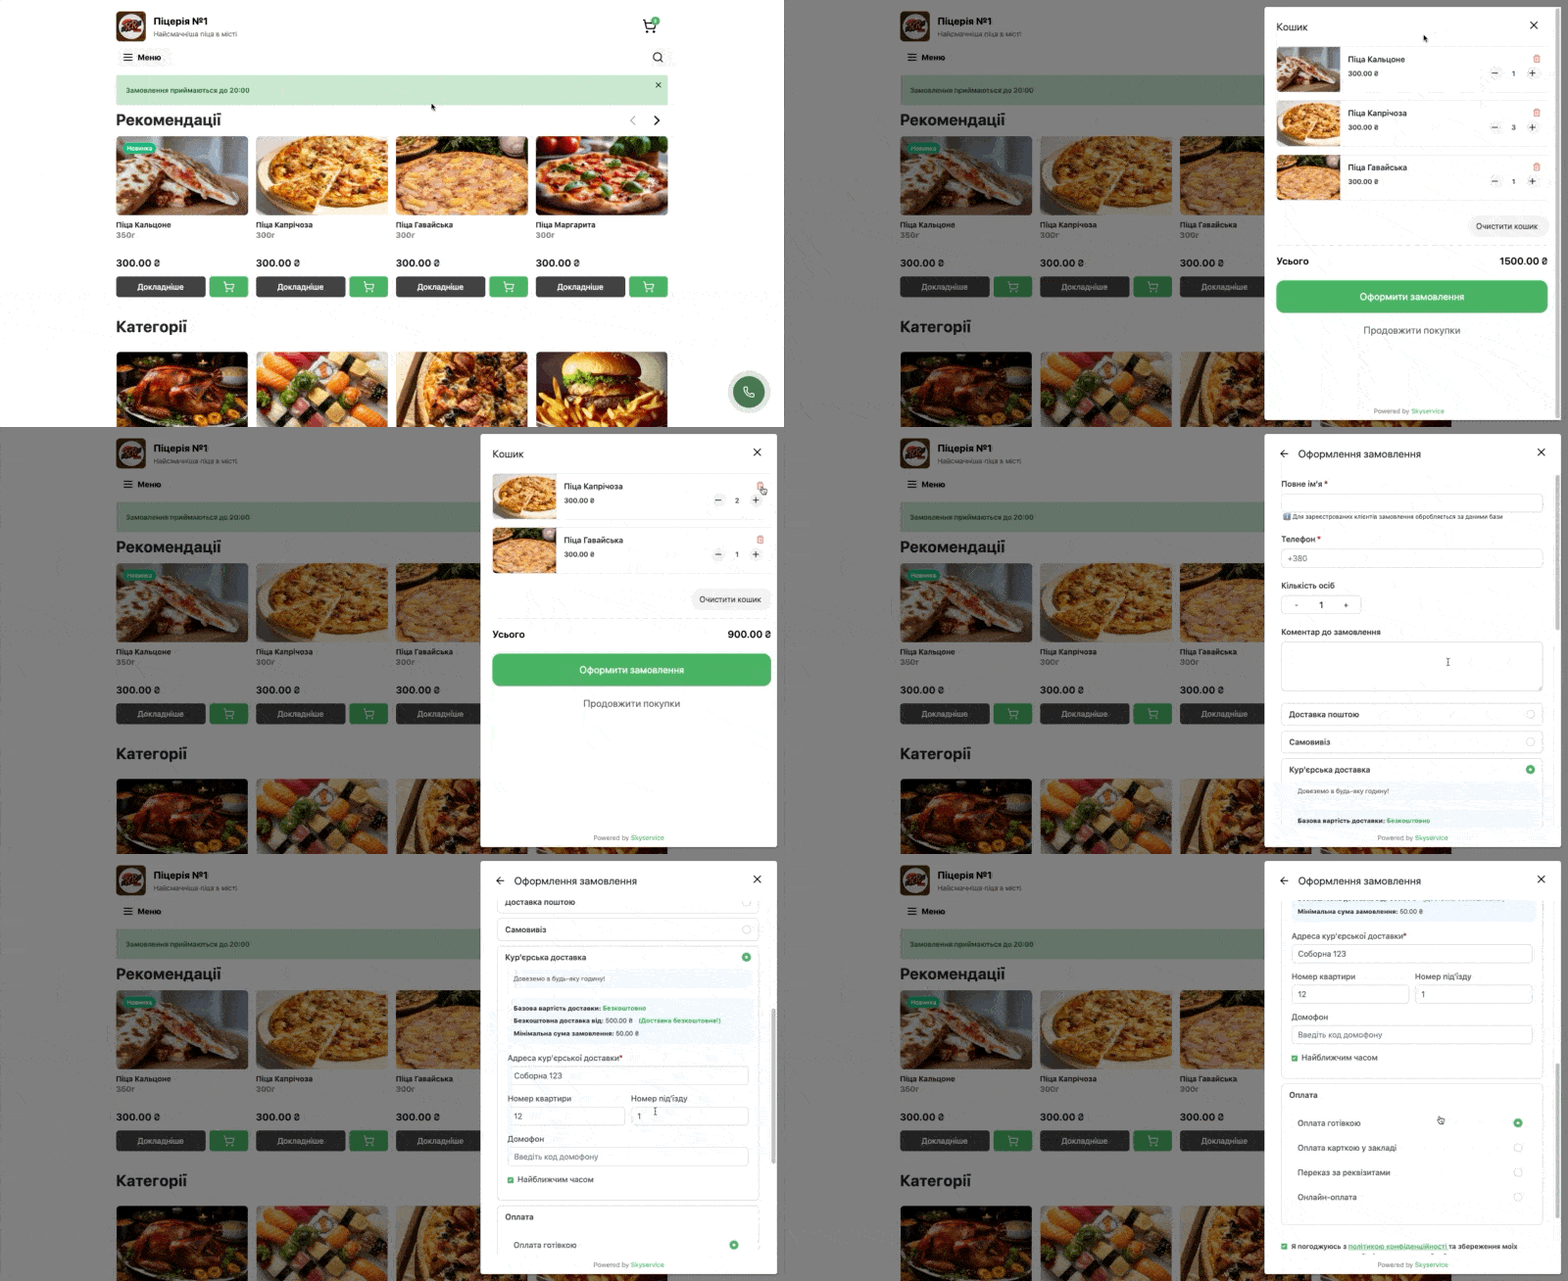
- Place order in which you need to fill in the specified fields: Name, Phone, Delivery method, additional data and Payment method.Additionally at
Online payment the client will automatically be transferred to the payment system that was previously configured. Next they choose one of the payment methods and pay the check. Display of payment in Sky Market is available in the payment system section, more precisely in the description of the payment display☝🏻 Orders via
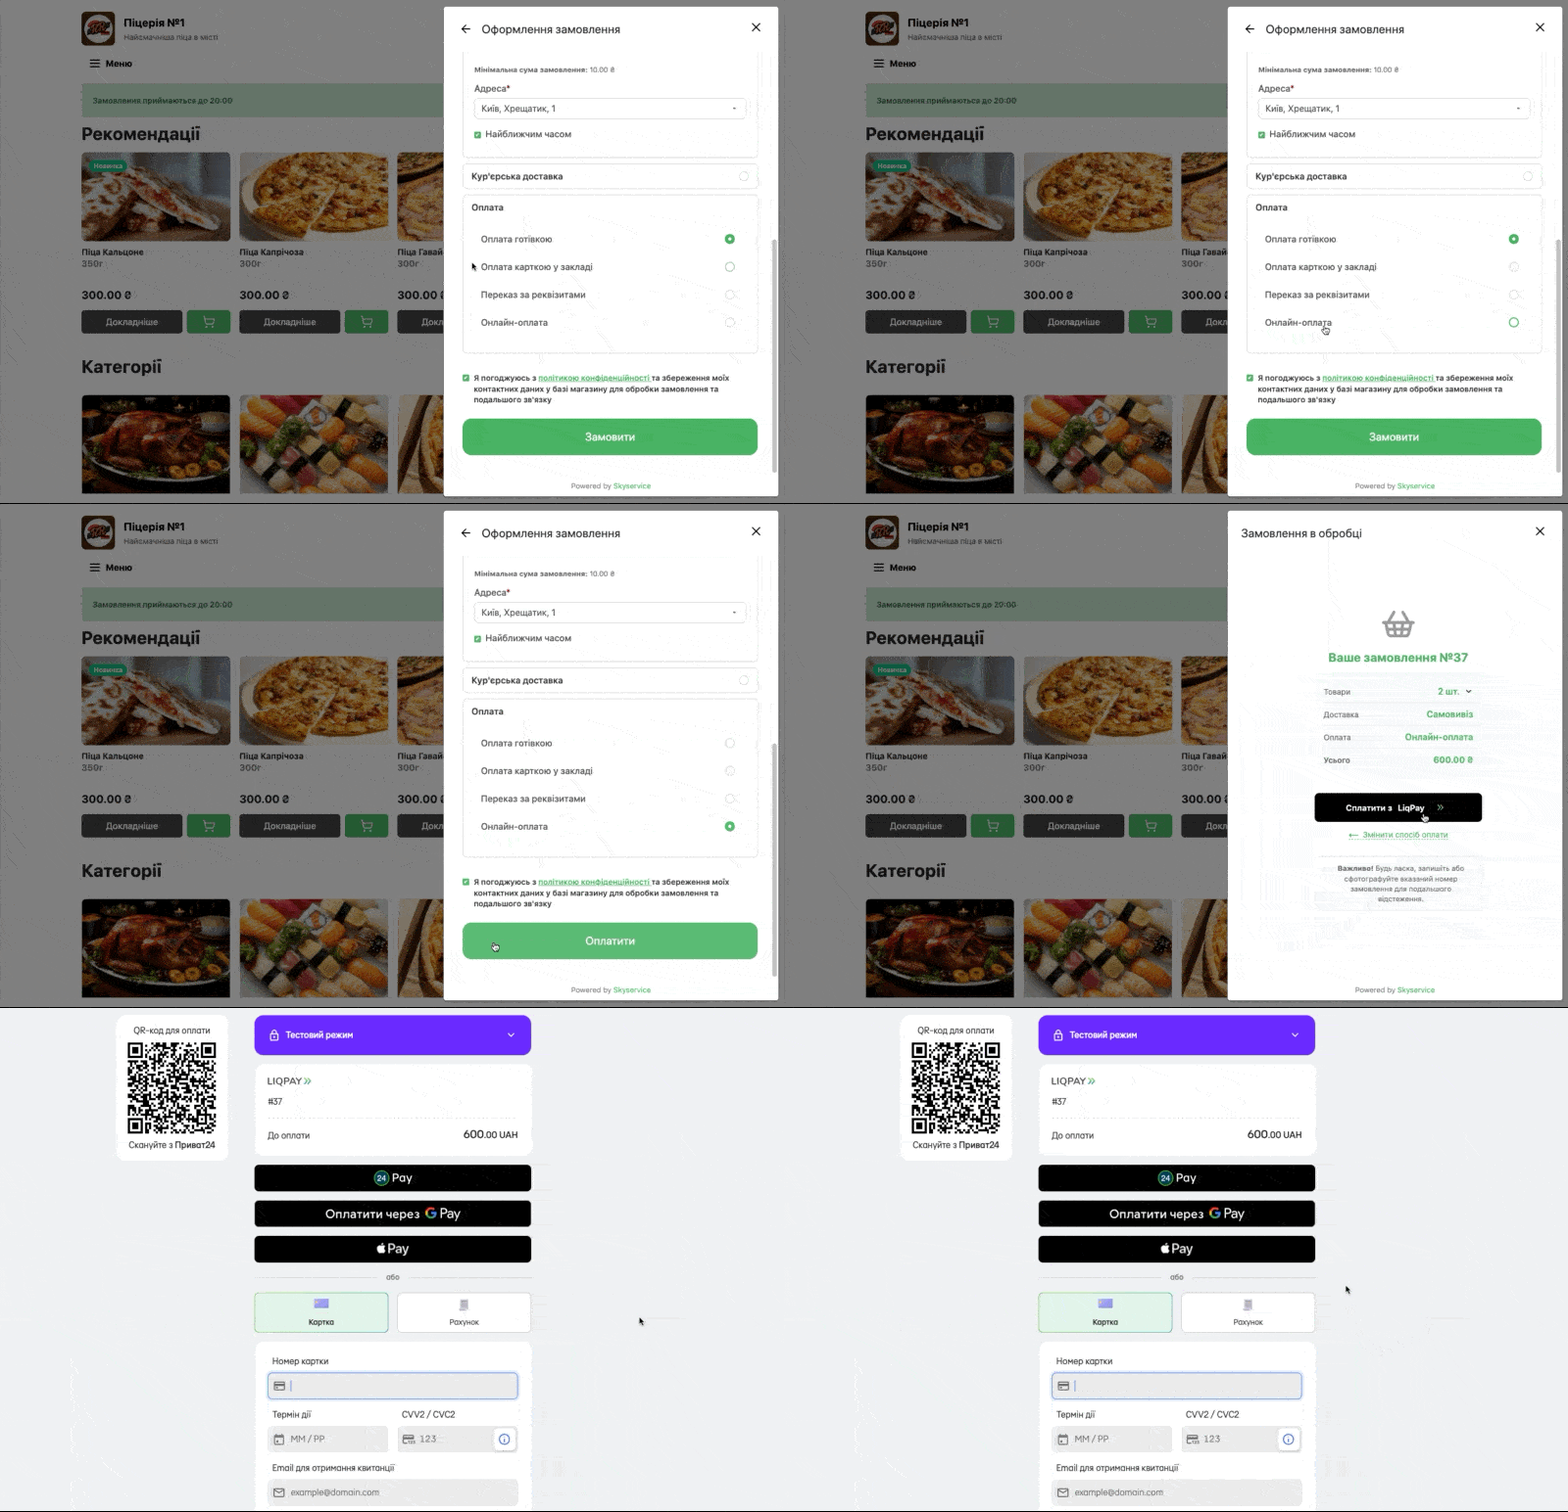
- Online payment
will be displayed in the POS terminal for its subsequent acceptance only after successful payment.
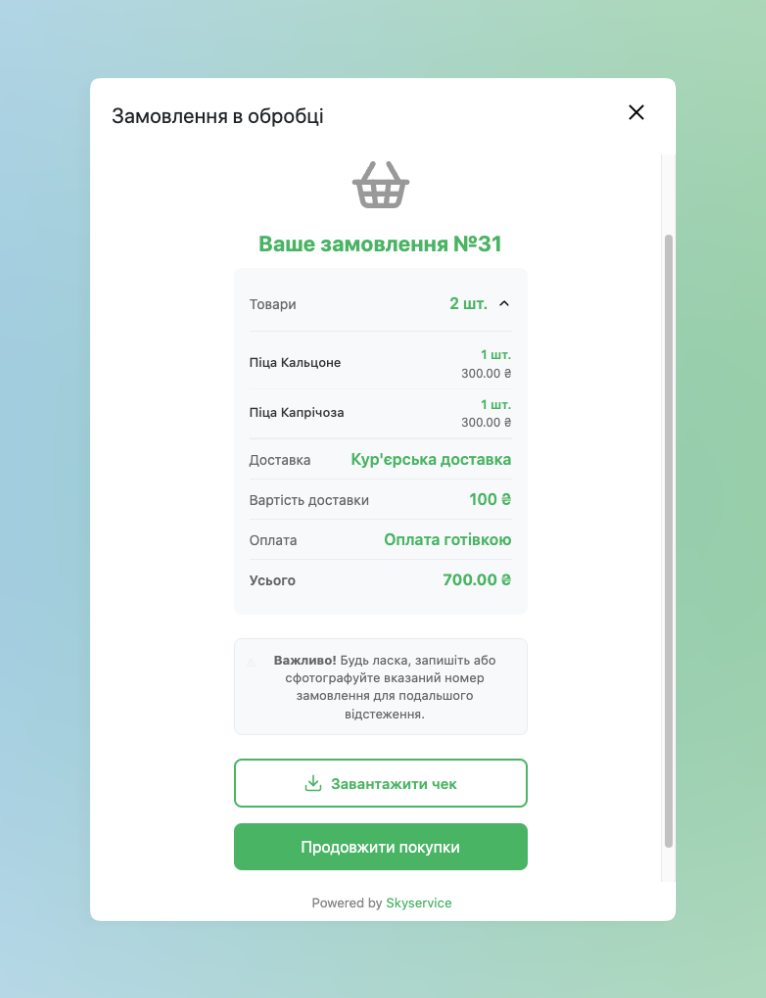
- After sending the order, the client will be offered to save the order number in order to, if necessary, contact the store for clarifications regarding the order
- Order in the POS terminal
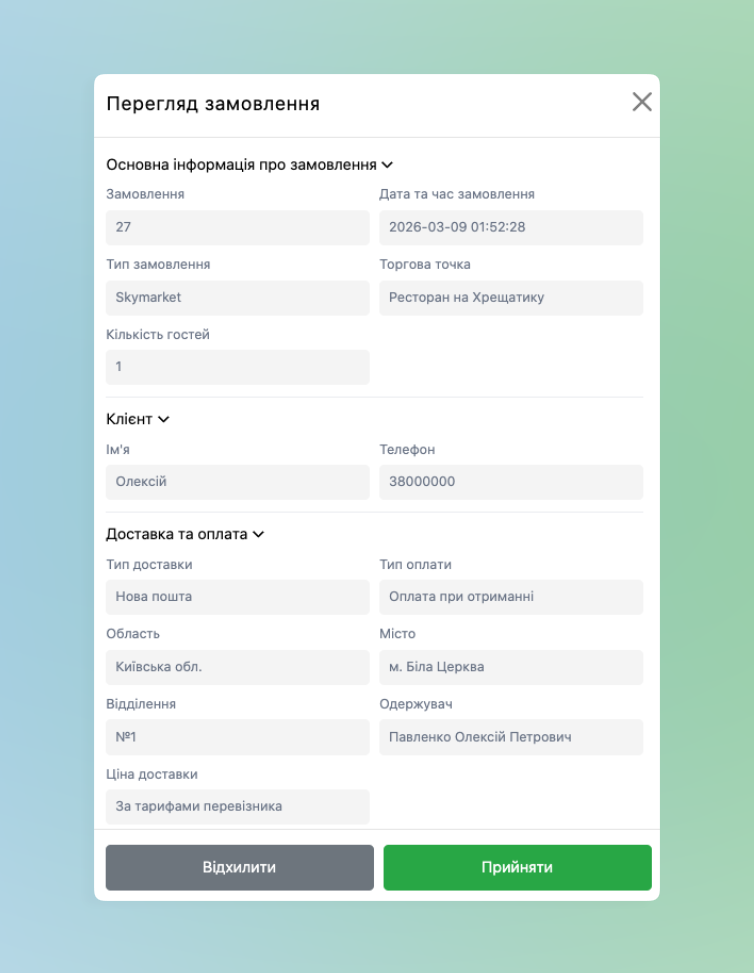
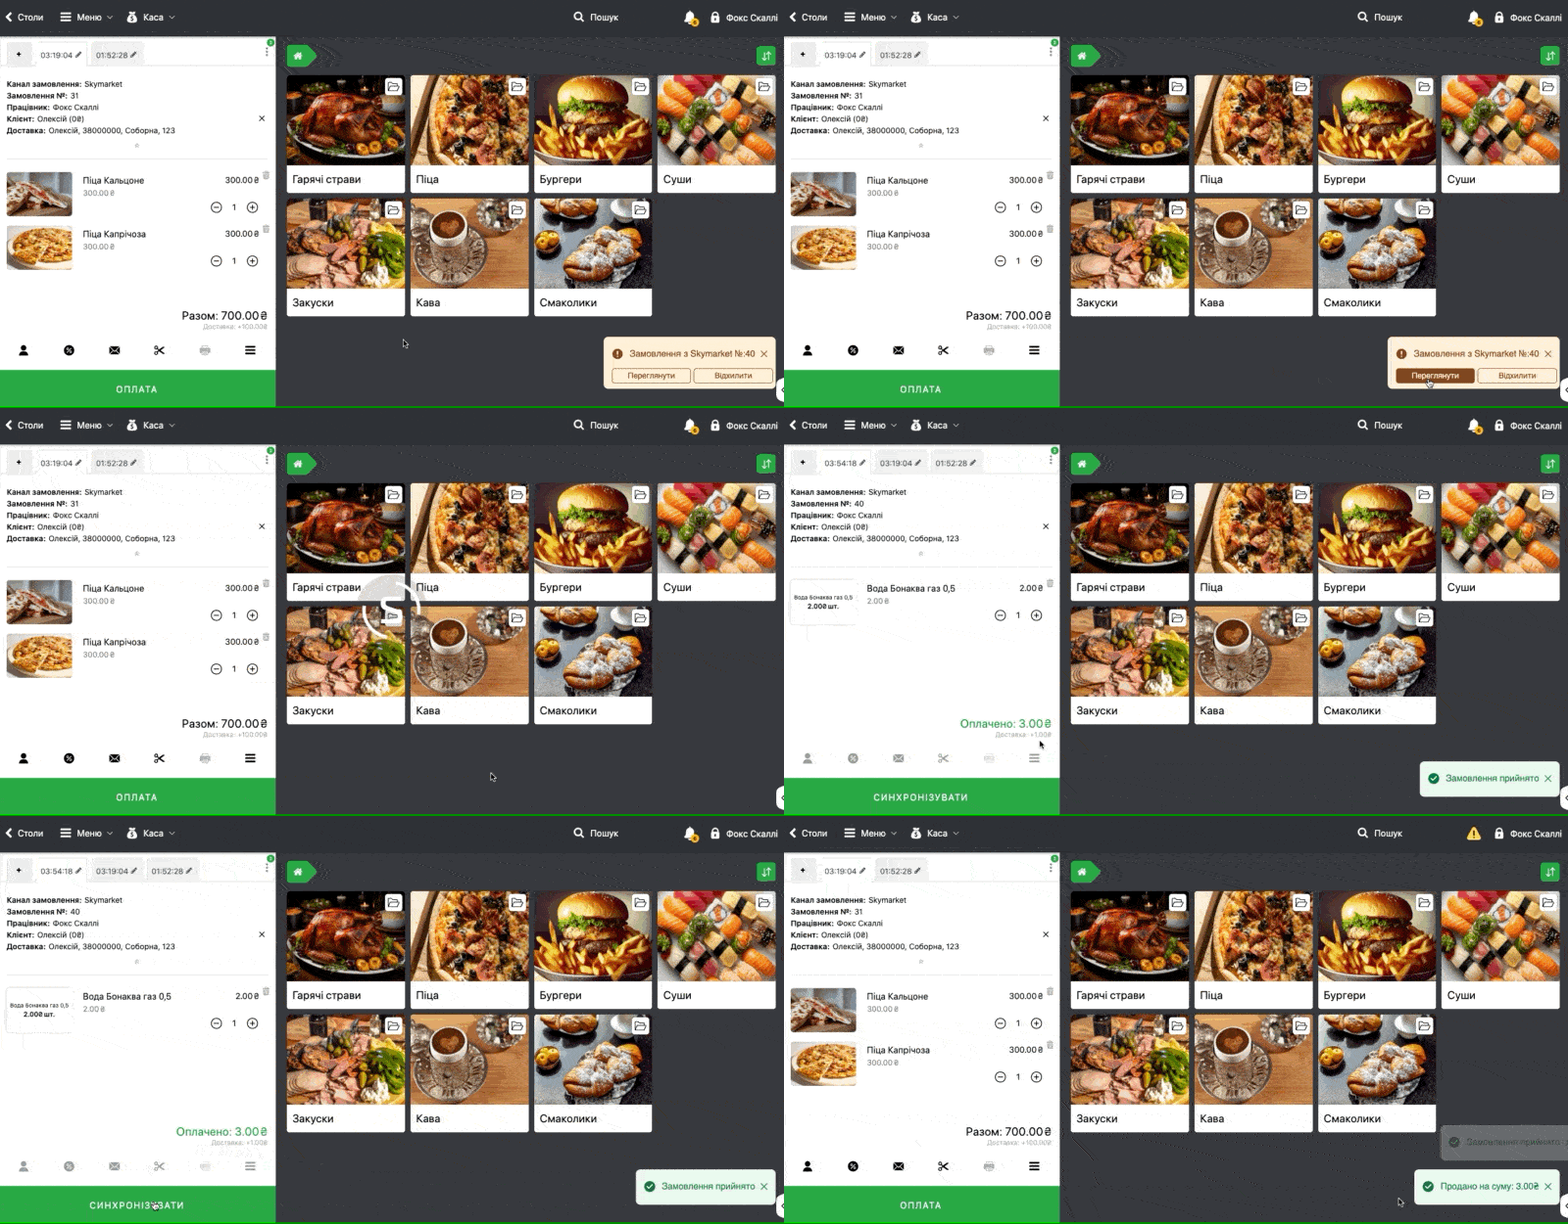
- In the POS terminal the order arrives with a sound notification:
- In a callAs a separate modal notification window
- Click ViewIn the next window you preliminarily view information about the order. It can be both Accepted
and Rejected❗️
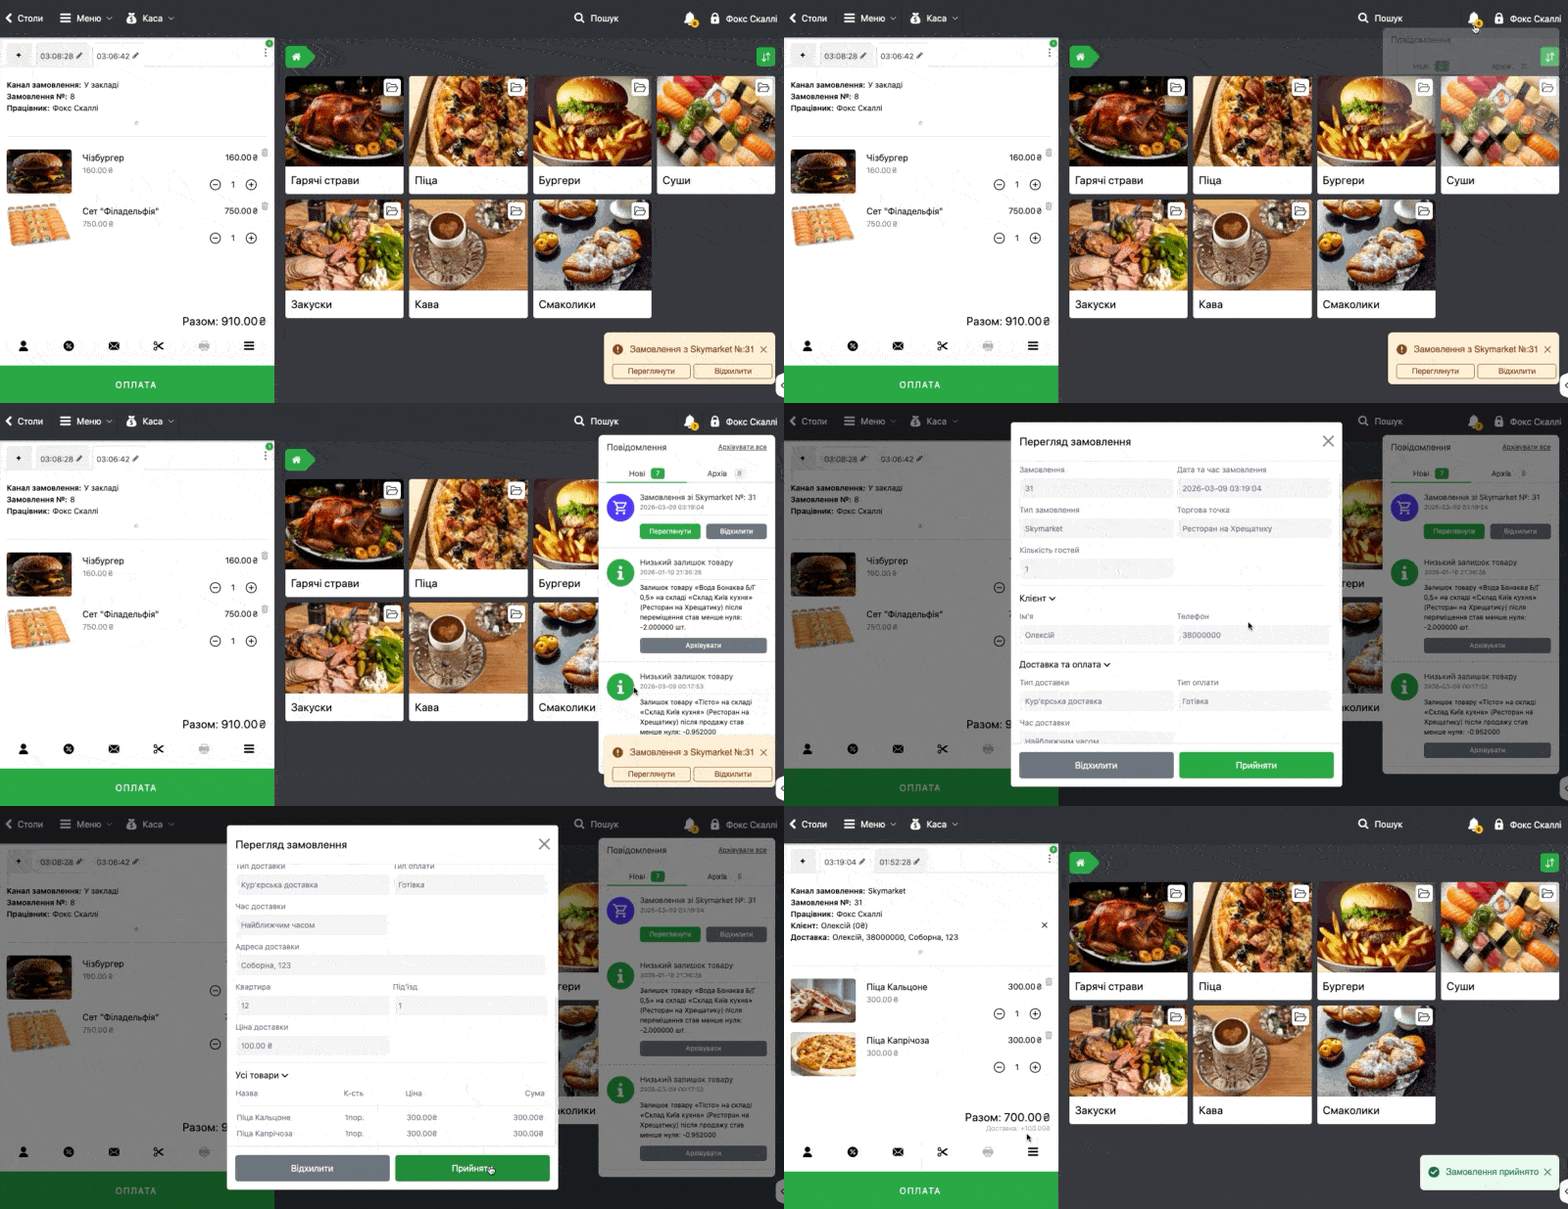
- Important! Rejection of the order cannot be tracked in the program and the buyer will also not receive an additional notification about cancellation.
- Click
- AcceptAfter accepting the order, it is displayed on the order panelAlso information about delivery can be printed on the receipt printer that is connected to the program – for this click on
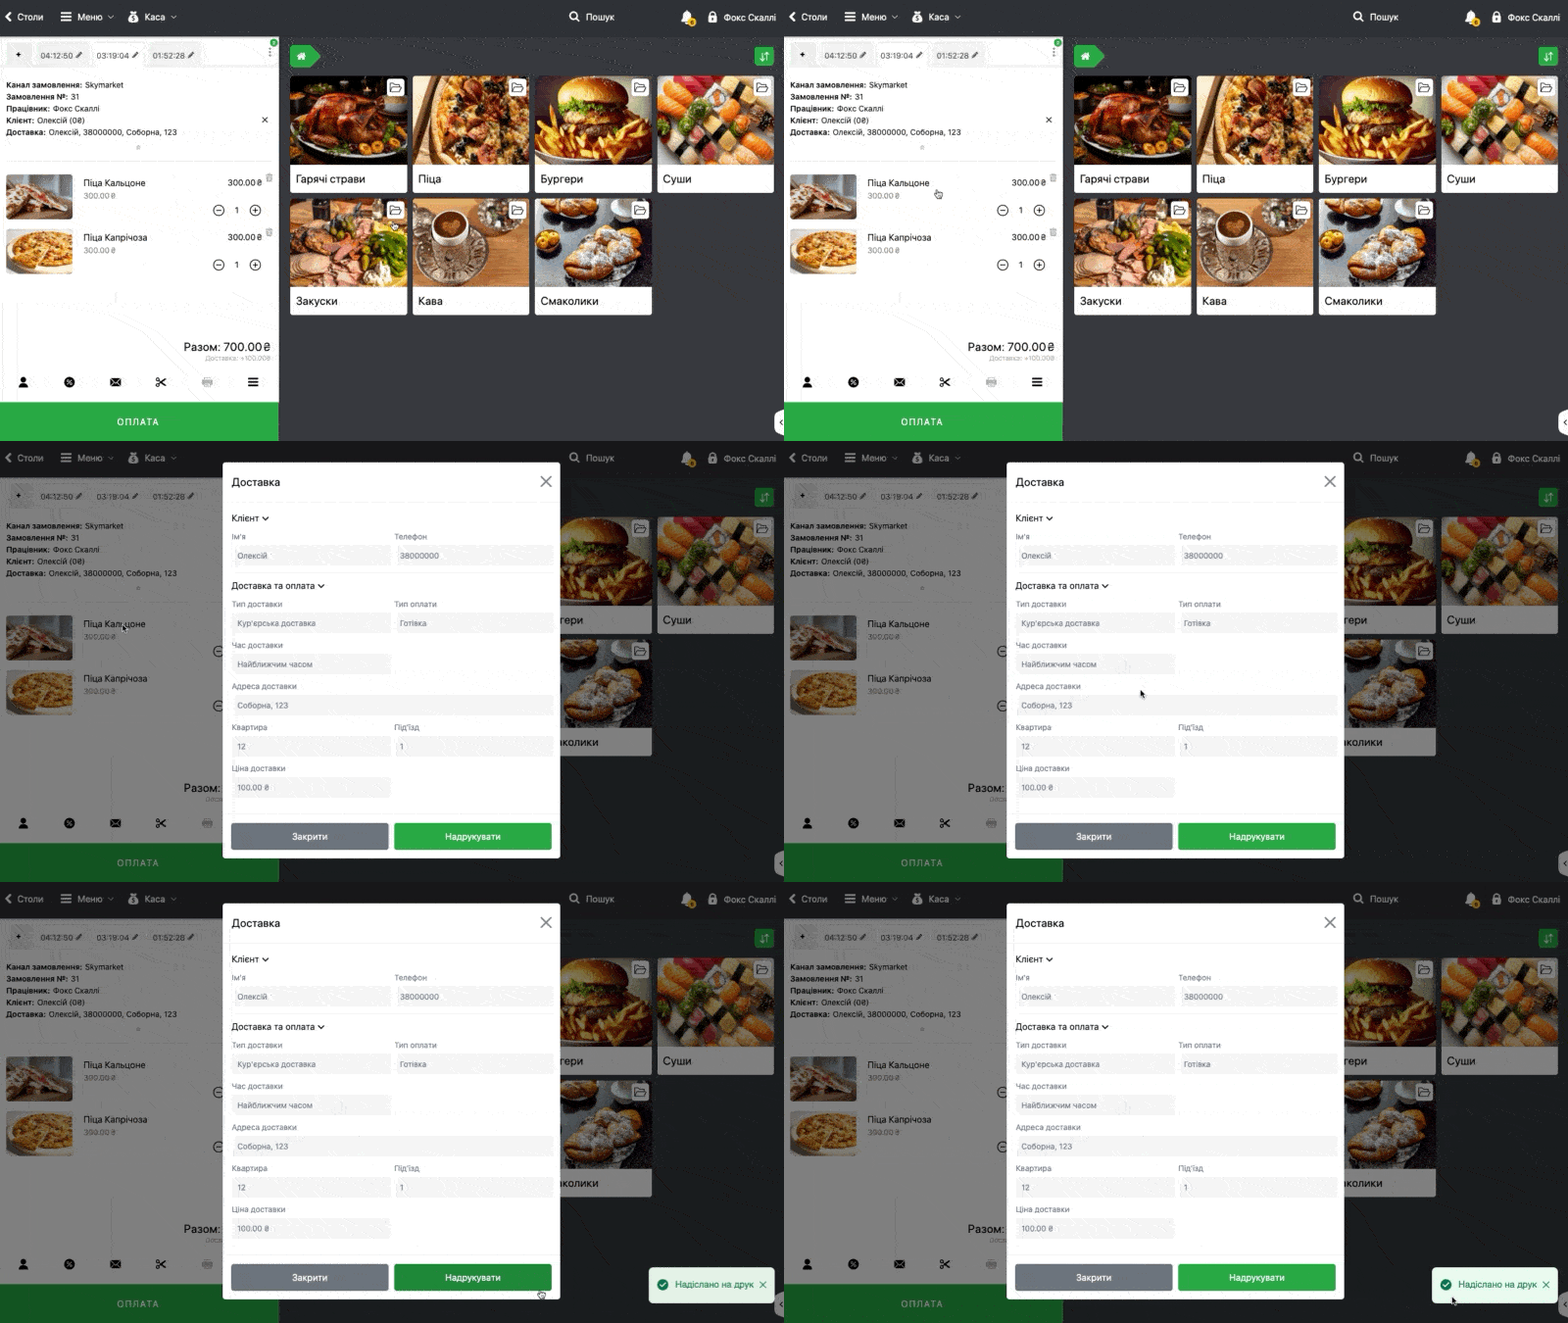
- Delivery above the check and in the next window there will be a button for printingAdditionally orders via Online payment also arrive in notifications. After accepting the order it only remains to check it and click below “
Synchronize” when it is necessary to conduct a sale☝🏻 Orders via
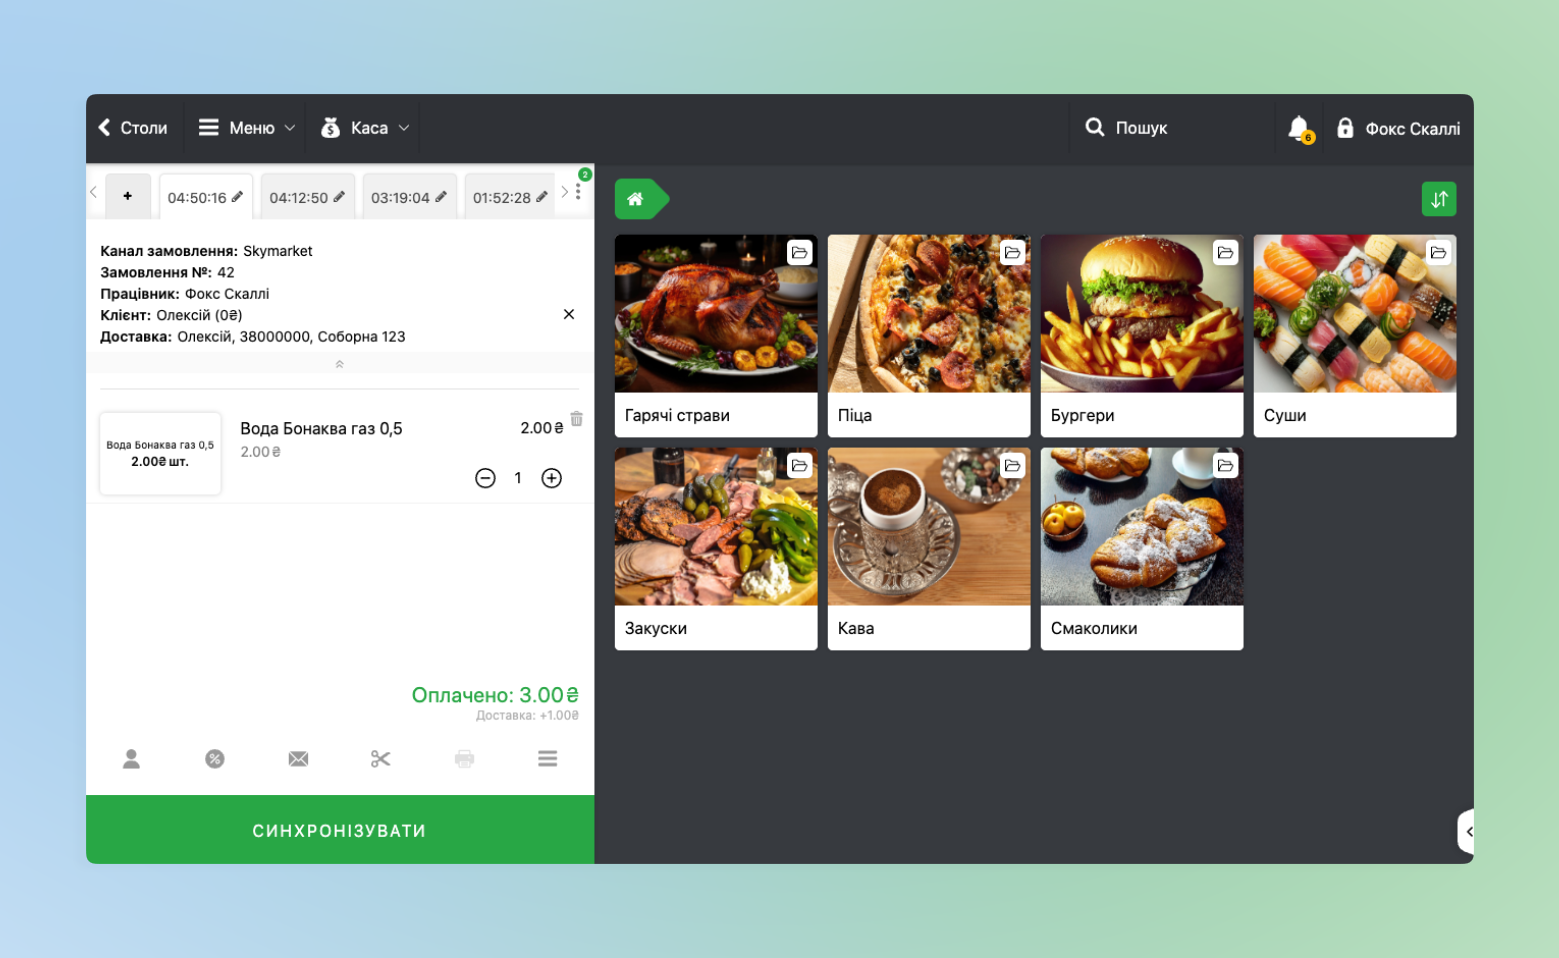
- with paid