Setup and activation in the Admin panel
Before starting
☝🏻To use the module you first need to configure Halls and Tables. These options do not need to be configured separately in the module card.
- Before activation, make sure that in the Admin panel in the section Settings:
- All Halls for the sales point/points are created
- Added Tables with specified capacity
Activation
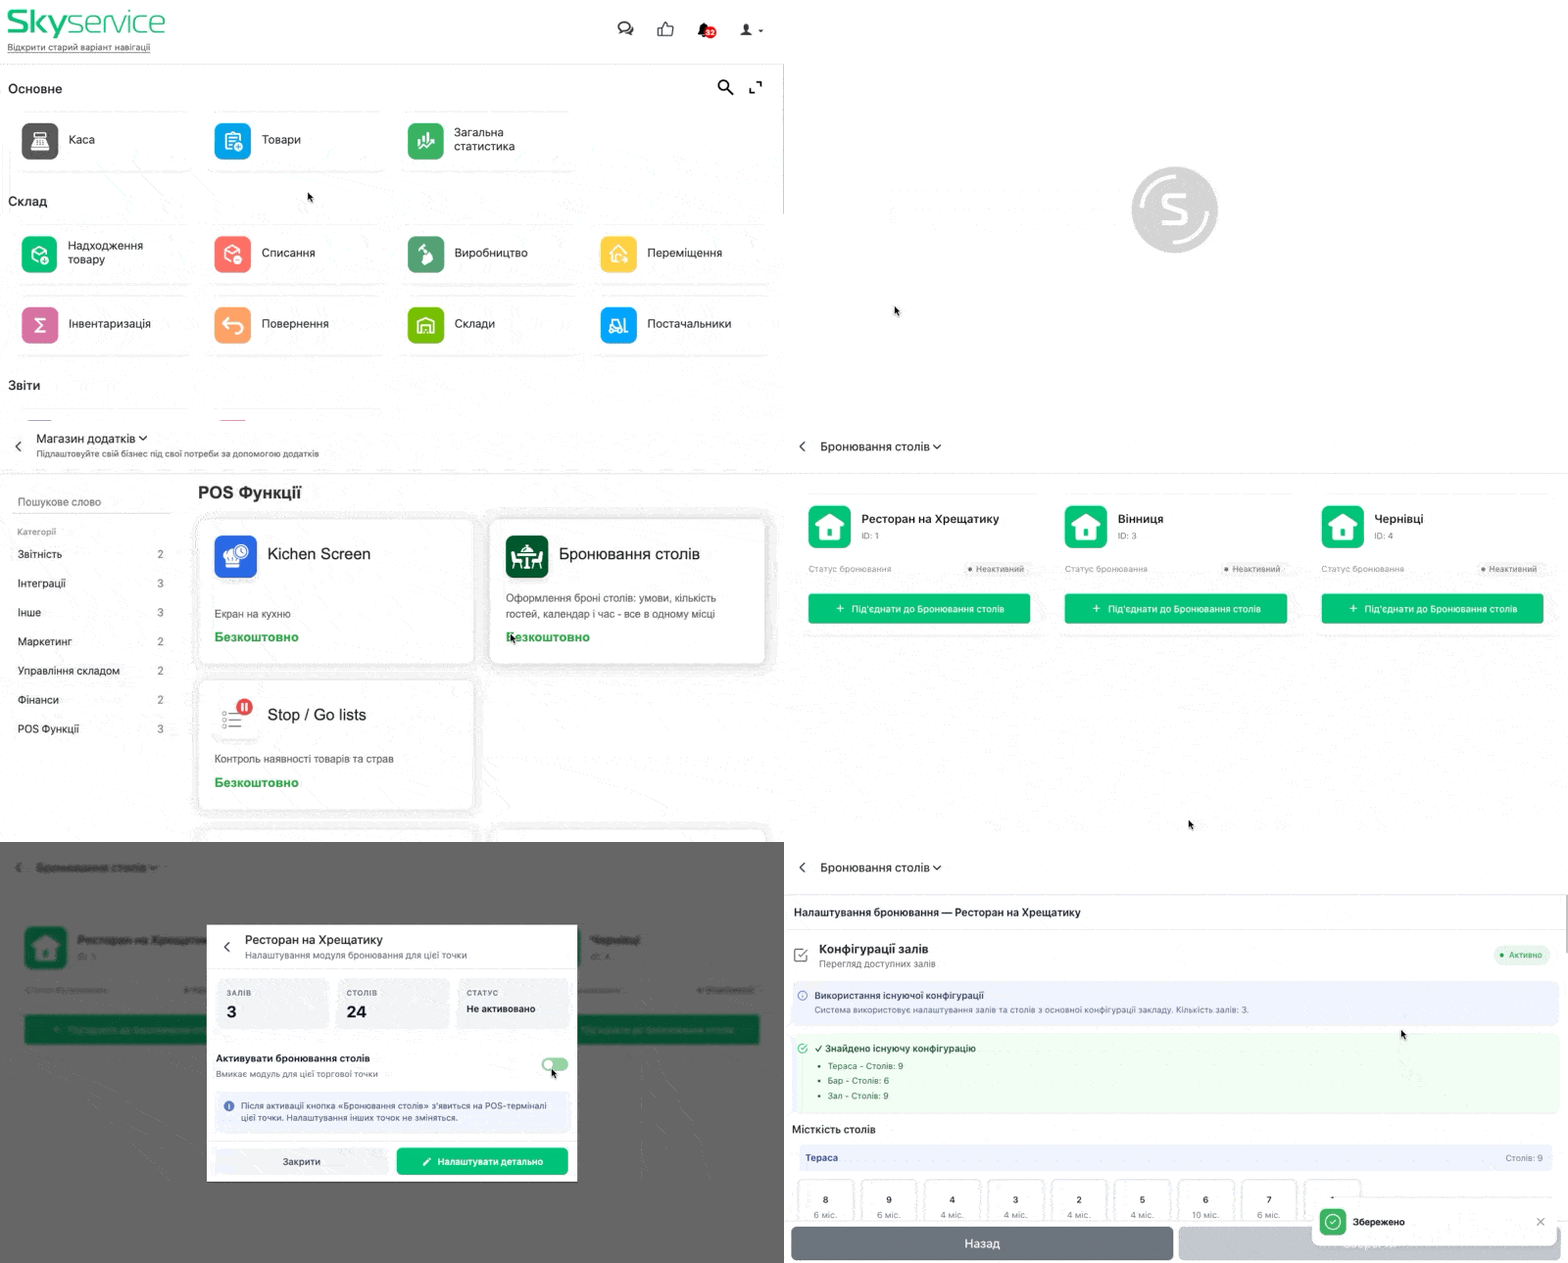
- In the Admin panel go to the section Home
- In the All apps block click Apps → View all apps → select from the list Table reservations
- In the next window you can see images of the app operation and read the description
- Click Open app
- Select the required point by clicking + Connect to Table reservations
- And then activate the switch “Activate table reservations” and set the Detailed settings
- Or in the Admin panel side navigation go to the section My apps → All apps → select from the list Table reservations
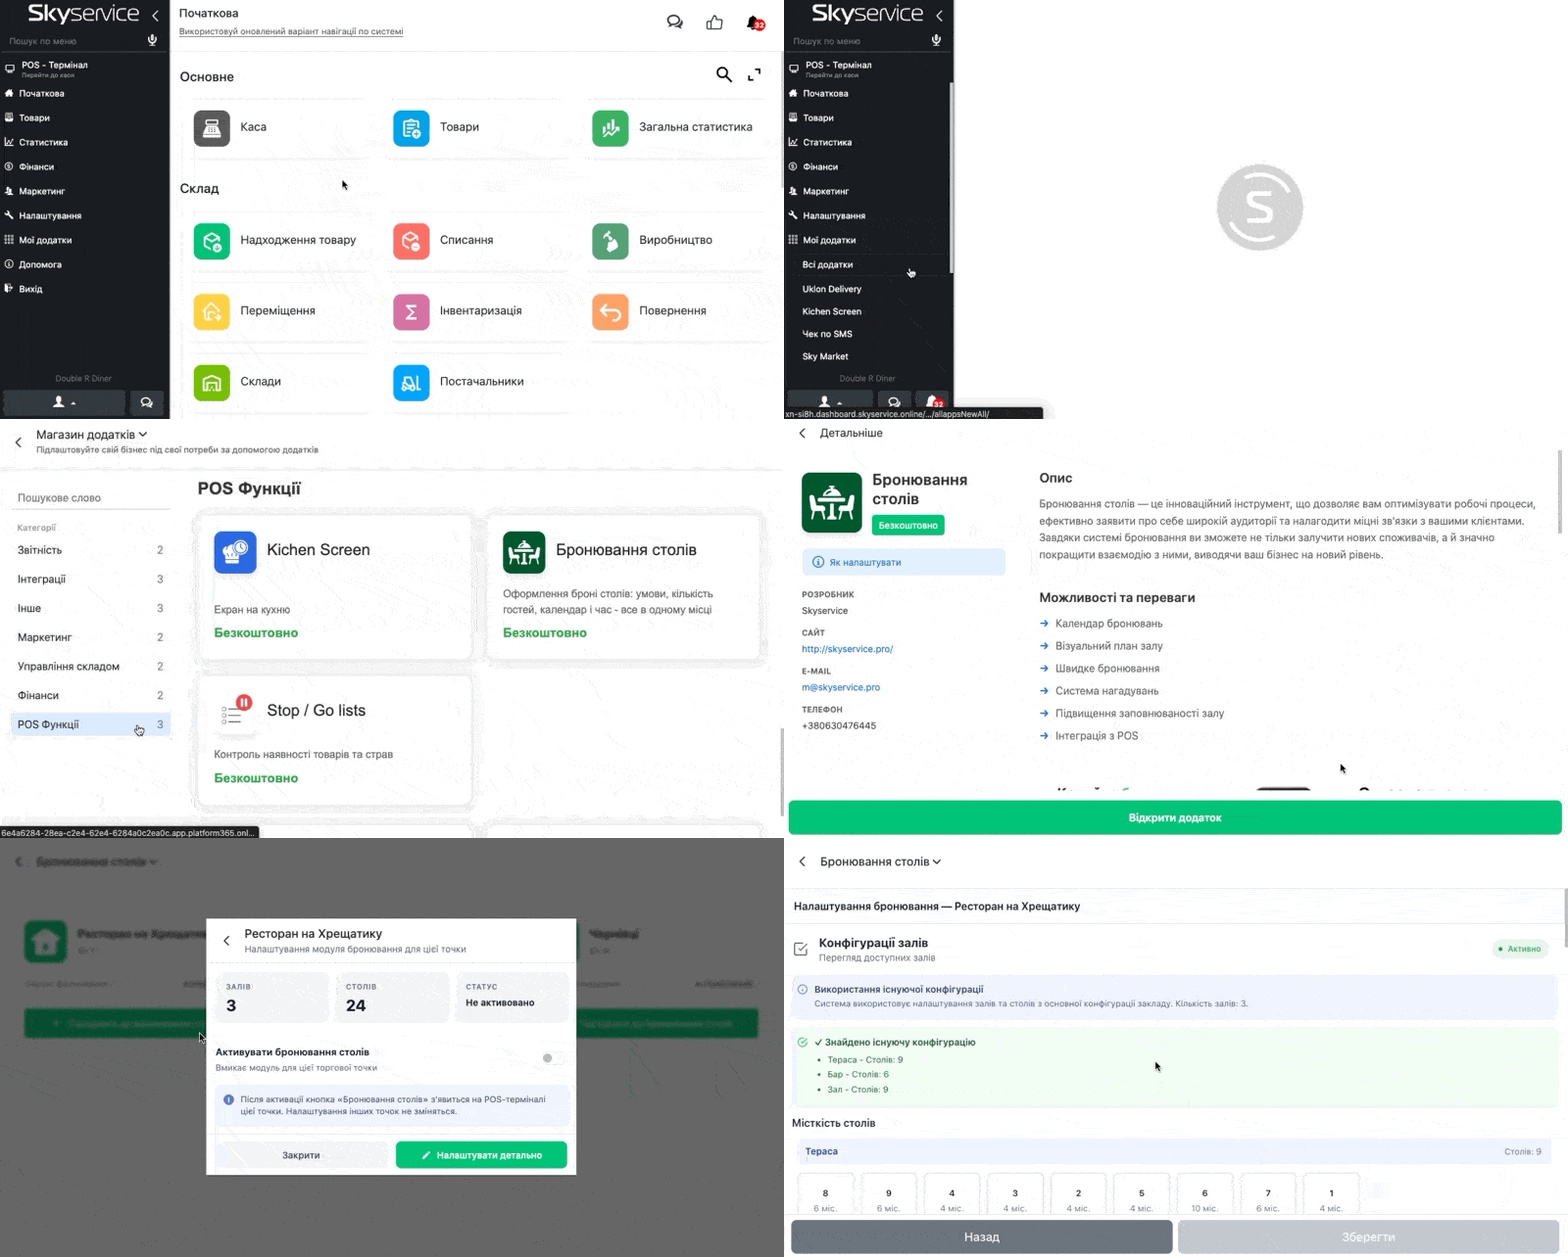
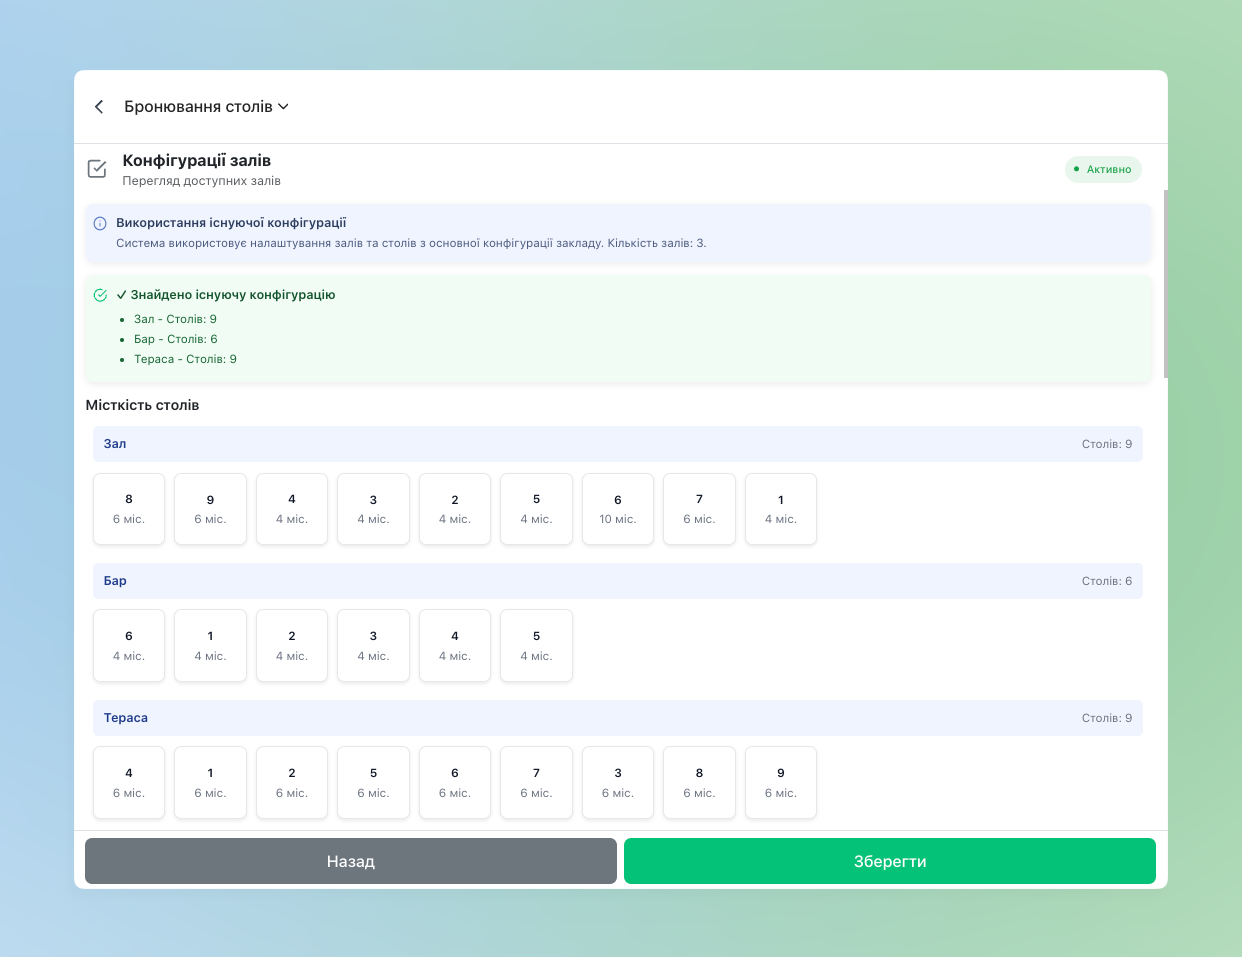
- Next in the Hall configurations block you view the available halls and tables
Reservation parameters
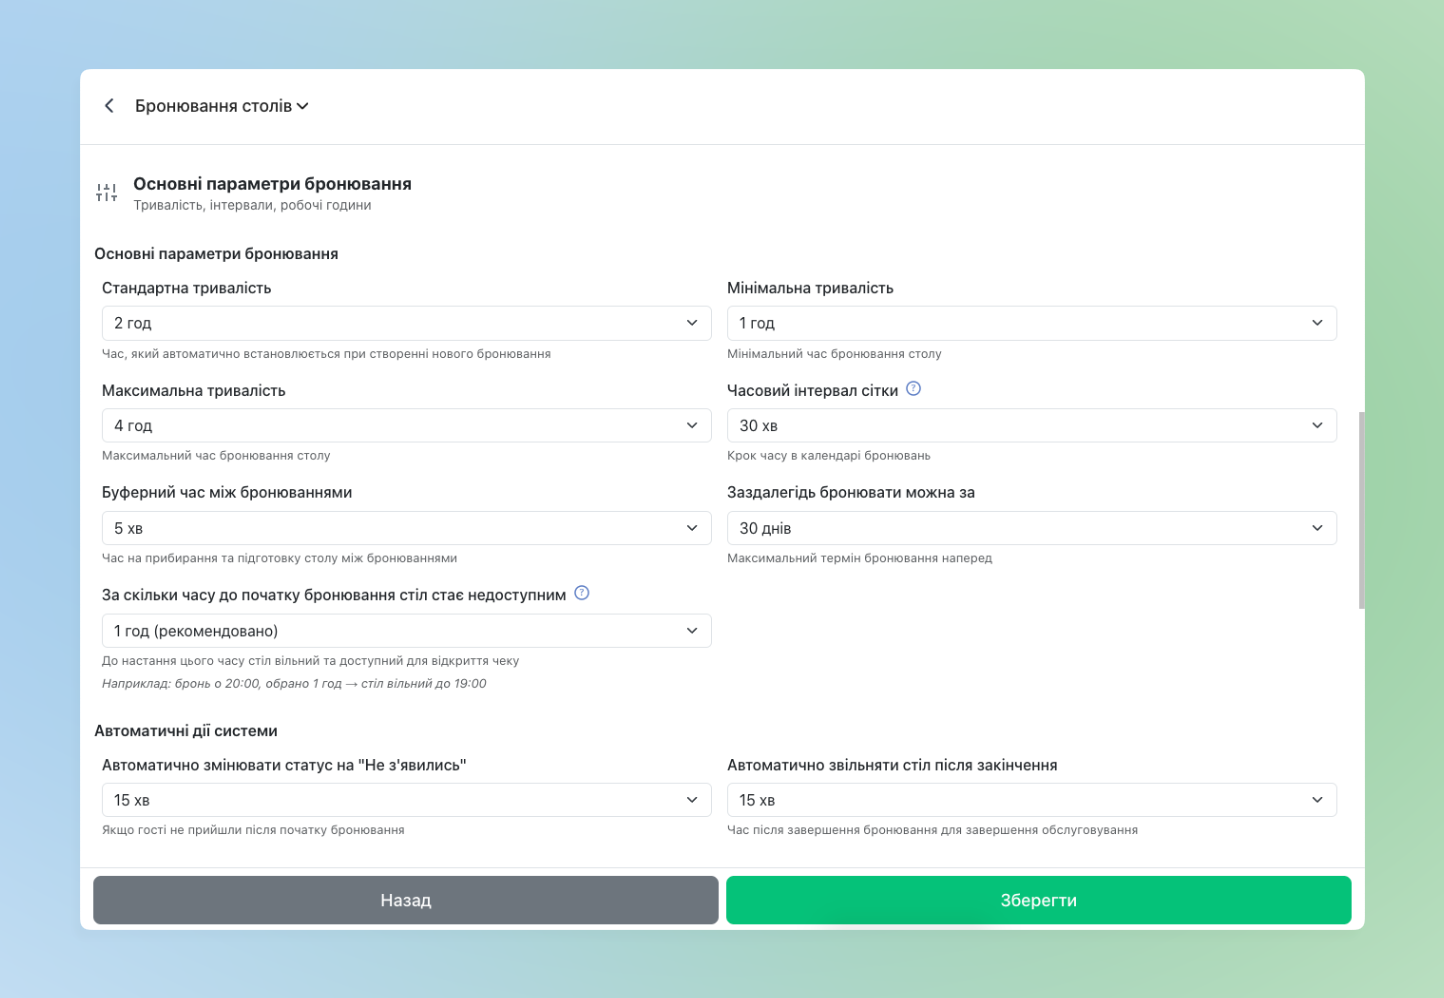
In the Basic reservation parameters block is set:
- Standard duration – the duration that will be automatically set when reserving
- Minimum duration – the duration whose reservation time cannot be less
- Maximum duration – the duration whose reservation time cannot exceed
- Grid time interval – for example if 30 min is set, then reservations can be made in steps of 12:00, 12:30, 13:00, etc.
- Reservation buffer time – time for cleaning and preparing tables between reservations. For example if 15 min is set – after the end of one reservation the next one can start 15 minutes later
- How long before the start of the reservation it becomes unavailable – for example if 1 hour is set, then when reserving at 20:00, after 19:00 the table becomes unavailable
Additionally you can configure Automatic system actions:
- Automatically change status to “No-show” – if visitors are late for the set time – the reservation status changes to No-show
- Automatically free the table after end – after what time to automatically free the table after the end of the reservation time. If the cashier does not close the reservation manually
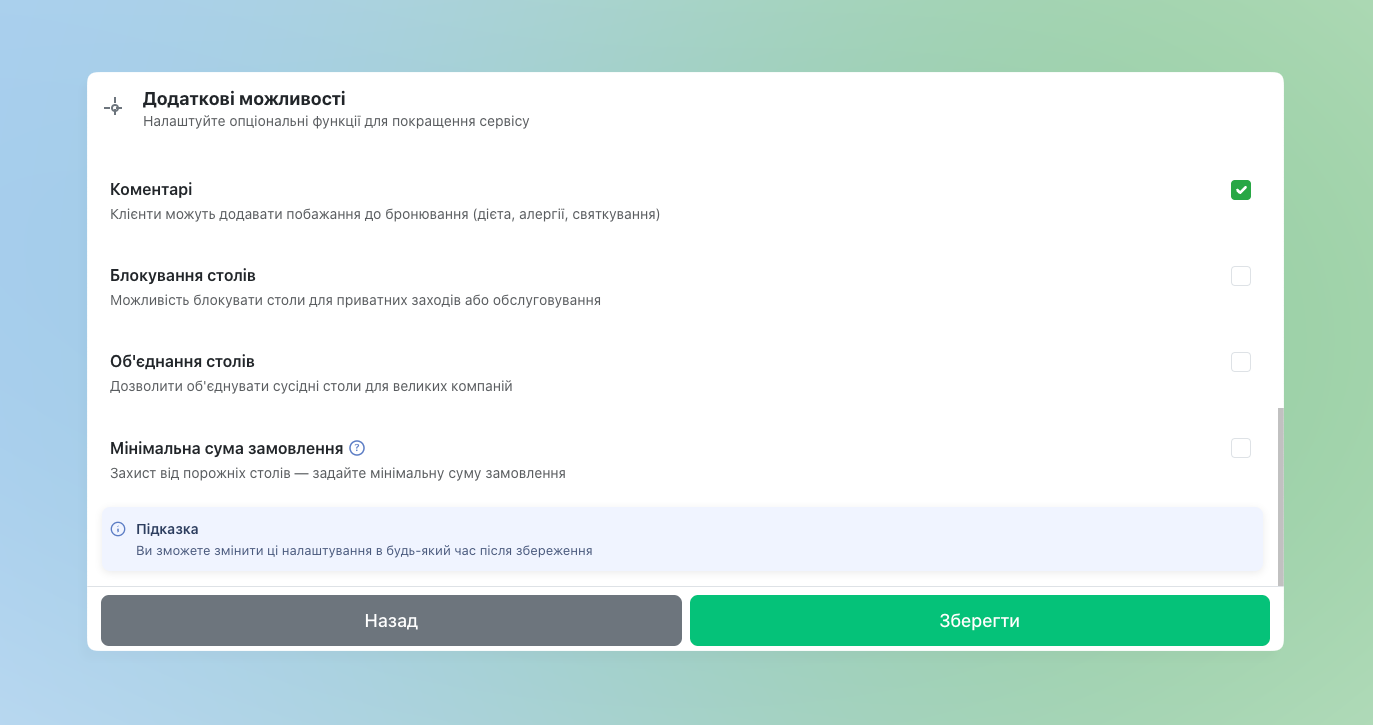
In the Additional features block you can configure:
- Comments – provides the cashier the ability to add customer wishes to the reservation in the form of comments
- Table blocking – the ability to block tables for a certain period will be available, specifying the reason: Technical works, Private event, Maintenance/repair and Other (when selecting other, you can additionally specify a Comment)
- Table merging – allows merging adjacent tables together for cases where a large number of seats is required for reservation
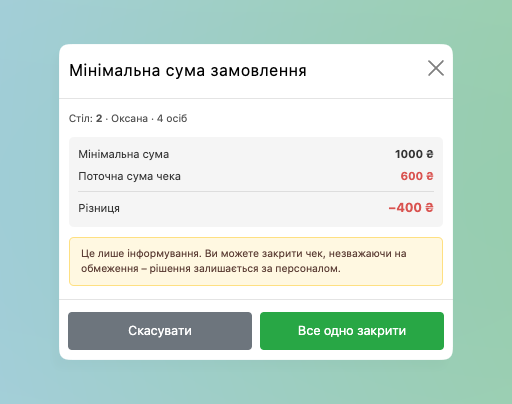
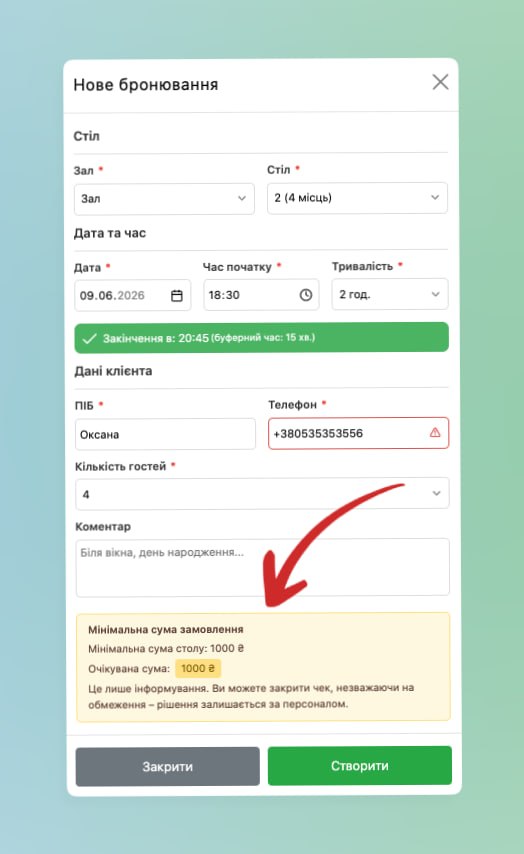
- Minimum order amount (deposit) – allows setting the minimum order amount for guests who came by reservation. If when closing the receipt the amount is less than the set one – the system will inform the cashier before closing the sale
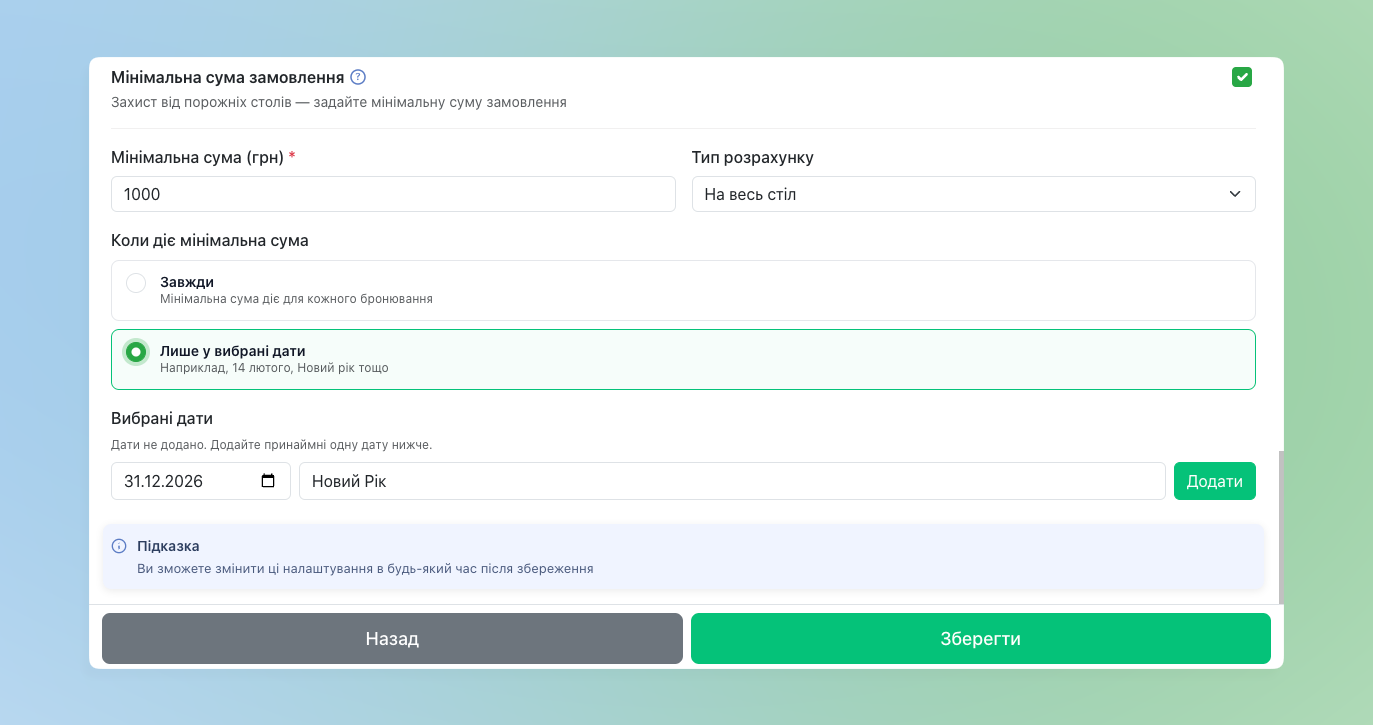
More about the deposit
After activating the option Minimum order amount configure the following parameters:
- Minimum amount (UAH) – specify the amount in UAH
- Calculation type:
- Per guest – the amount is multiplied by the number of guests. For example, 300 UAH × 4 guests = 1200 UAH
- For the entire table – fixed amount regardless of the number of guests
And set When the minimum amount applies:
- Always – on each reservation
- Only on selected dates – only on specified days (for example, 31 December). Dates are added manually with the ability to sign the event name
POS terminal
How to find the app and work with it in the POS terminal
- In the POS terminal go to the section Menu → Additional features → select Table reservations and then you will see a window with tabs Calendar and History
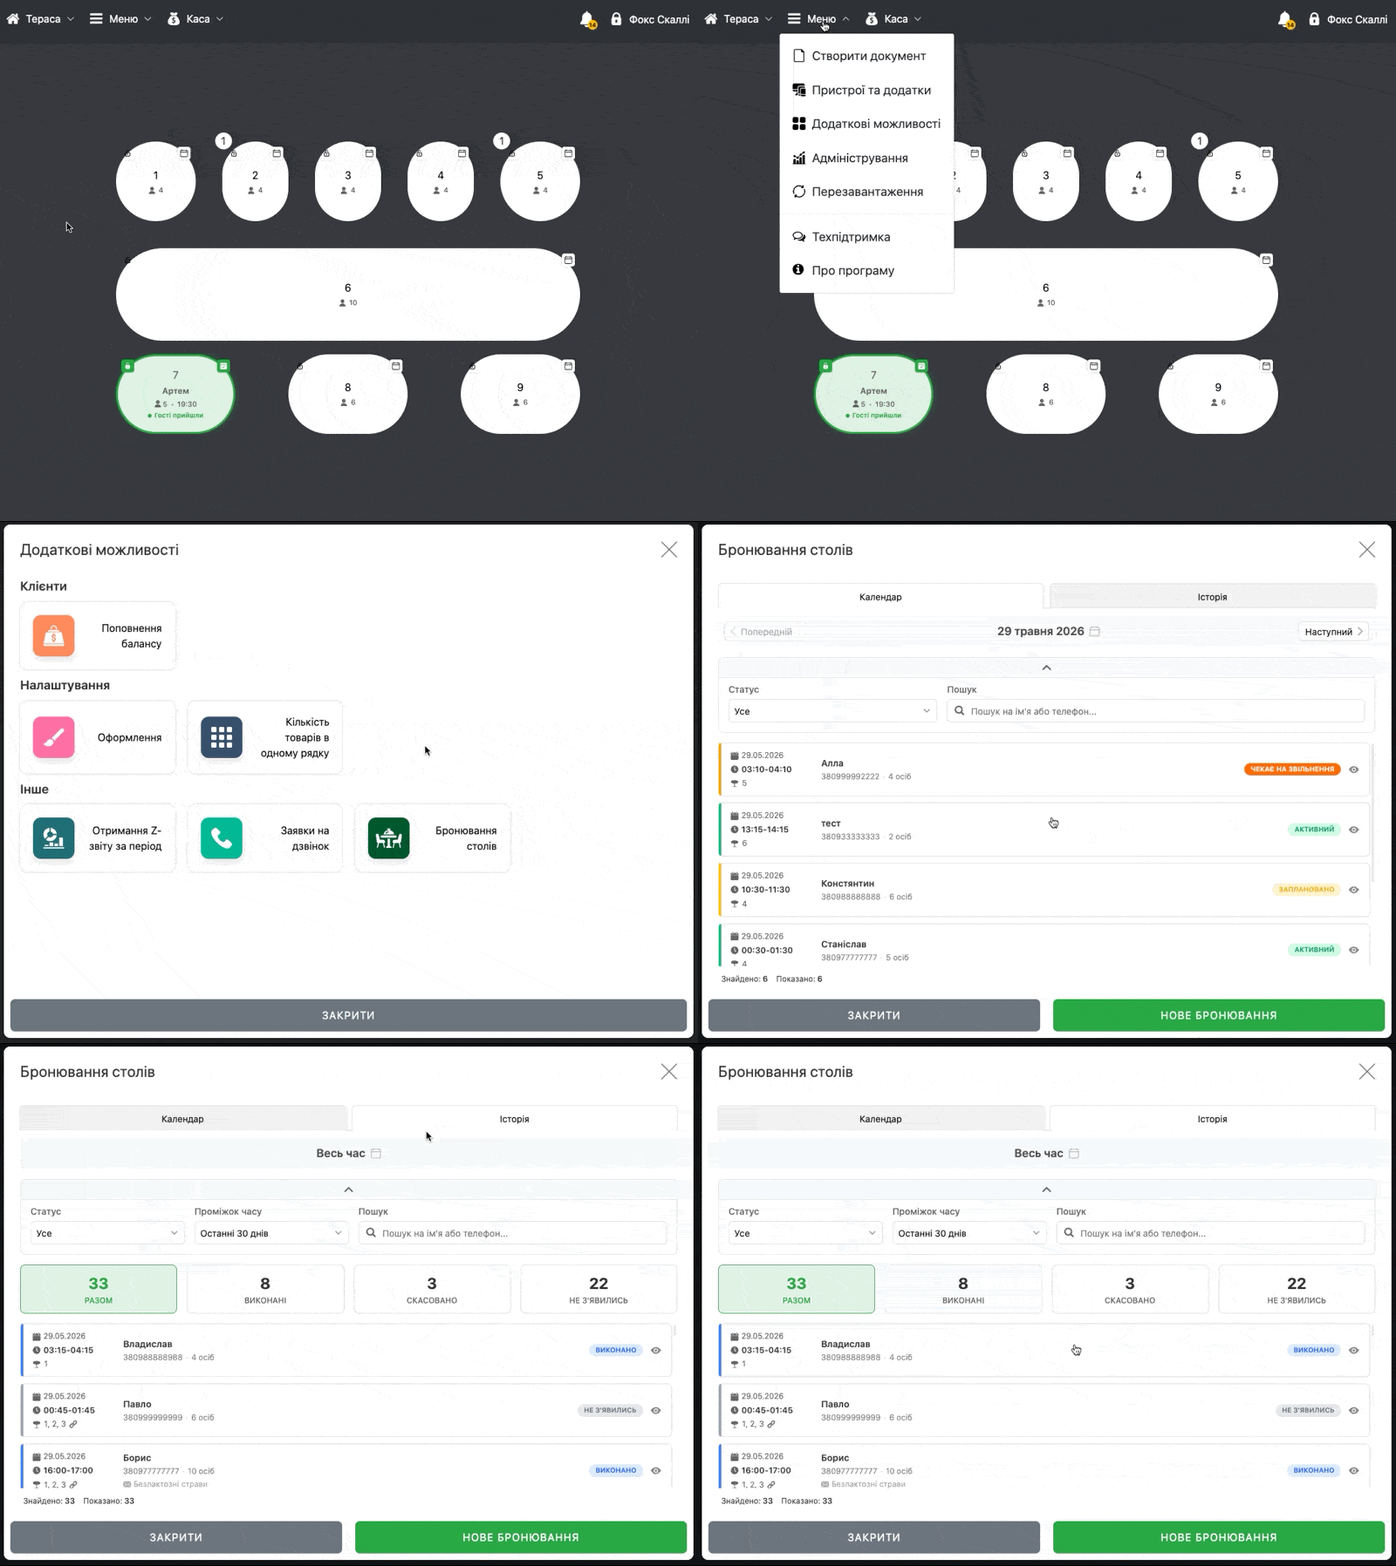
Calendar
- At the top the following filters are available:
- Status – display only reservations by a certain status: All, Active and Scheduled
- Additionally there may be the status Waiting to be freed – it indicates that the reservation started with an order added to the table. In the Hall scheme this table will be yellow with the mark “● Conflict”
- Search – find a reservation by client’s name or phone number
- Status – display only reservations by a certain status: All, Active and Scheduled
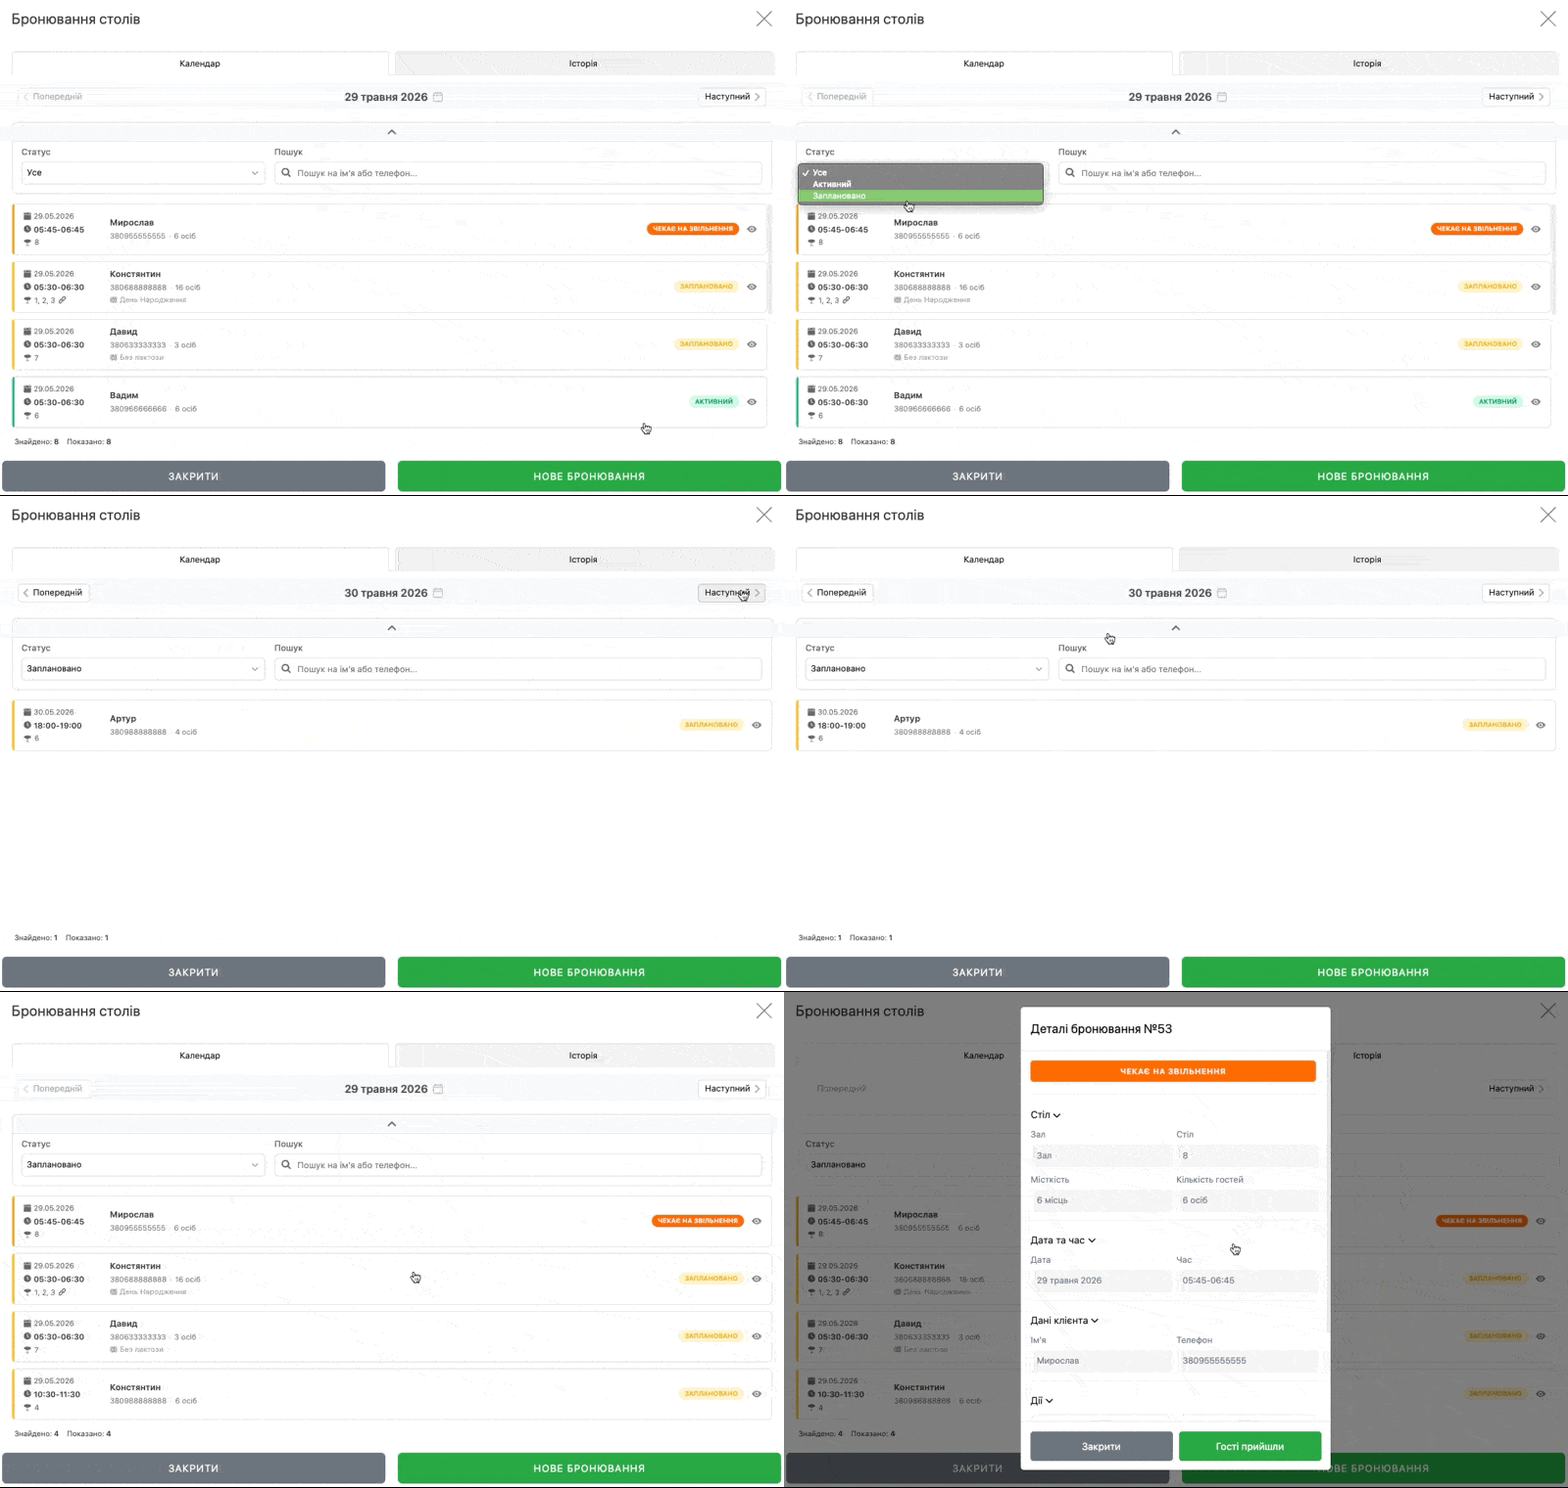
History
- In the history is displayed the archive of all past reservations. At the top – filters:
- You can also set a specific period
- Status – All, Completed, Cancelled and No-show
- Time period in which the list of reservations is displayed
- Search by name or phone number
- Under the filters – statistics as cards: total number of reservations, Completed, Cancelled and guests No-show
- Each reservation card contains date, time, table, client name, phone, number of persons and status. On the right the icon of the corresponding operation with the reservation
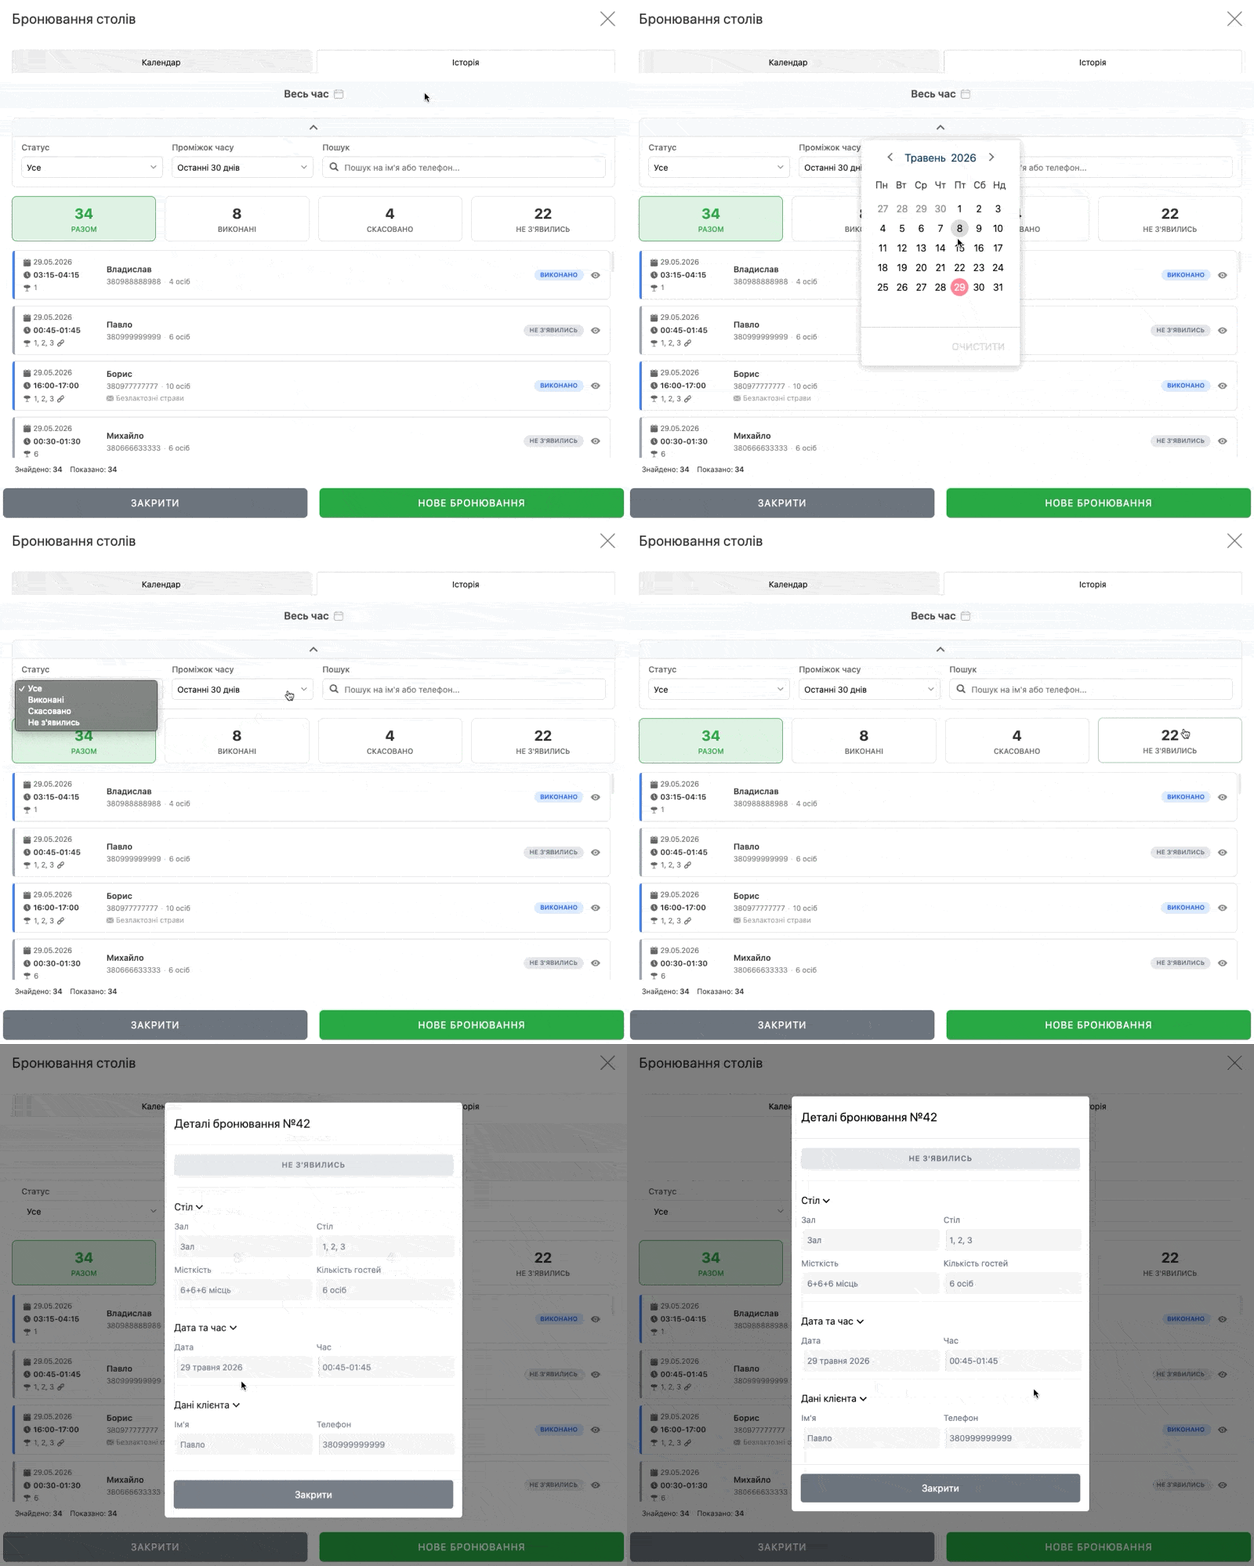
Hall scheme and table statuses
- On the main screen in the POS terminal the hall scheme is displayed. Tables are shown with additional information:
- Table number
- Capacity – icon with number of seats
- Lock icon 🔓 – blocked or available table
- Calendar icon 📅 – presence of reservations or creating a new one
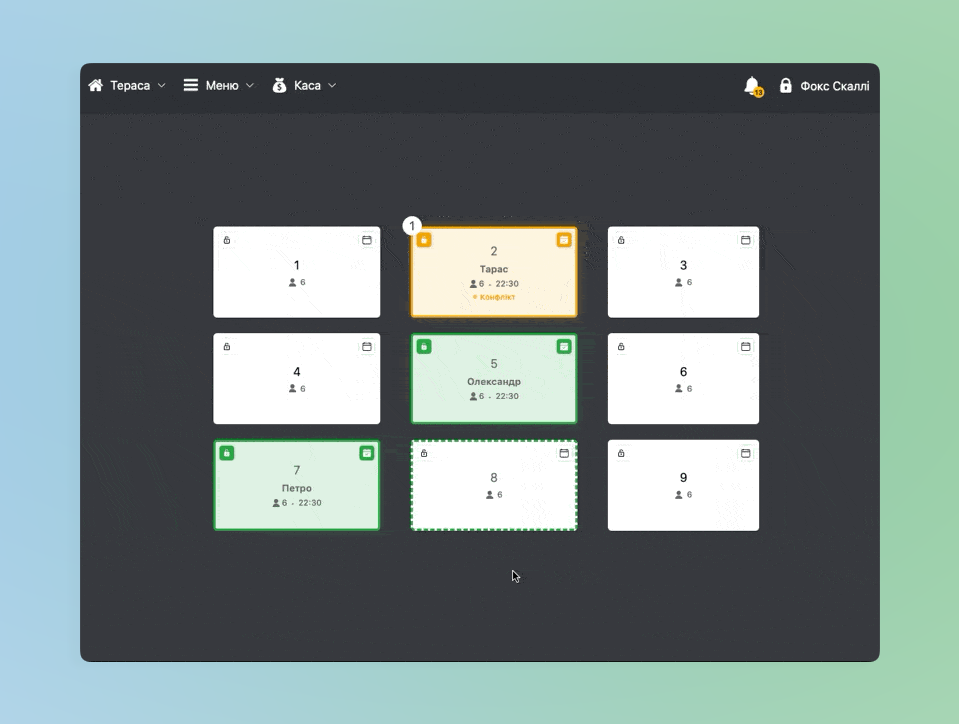
- Switch between Halls with the corresponding button at the top left
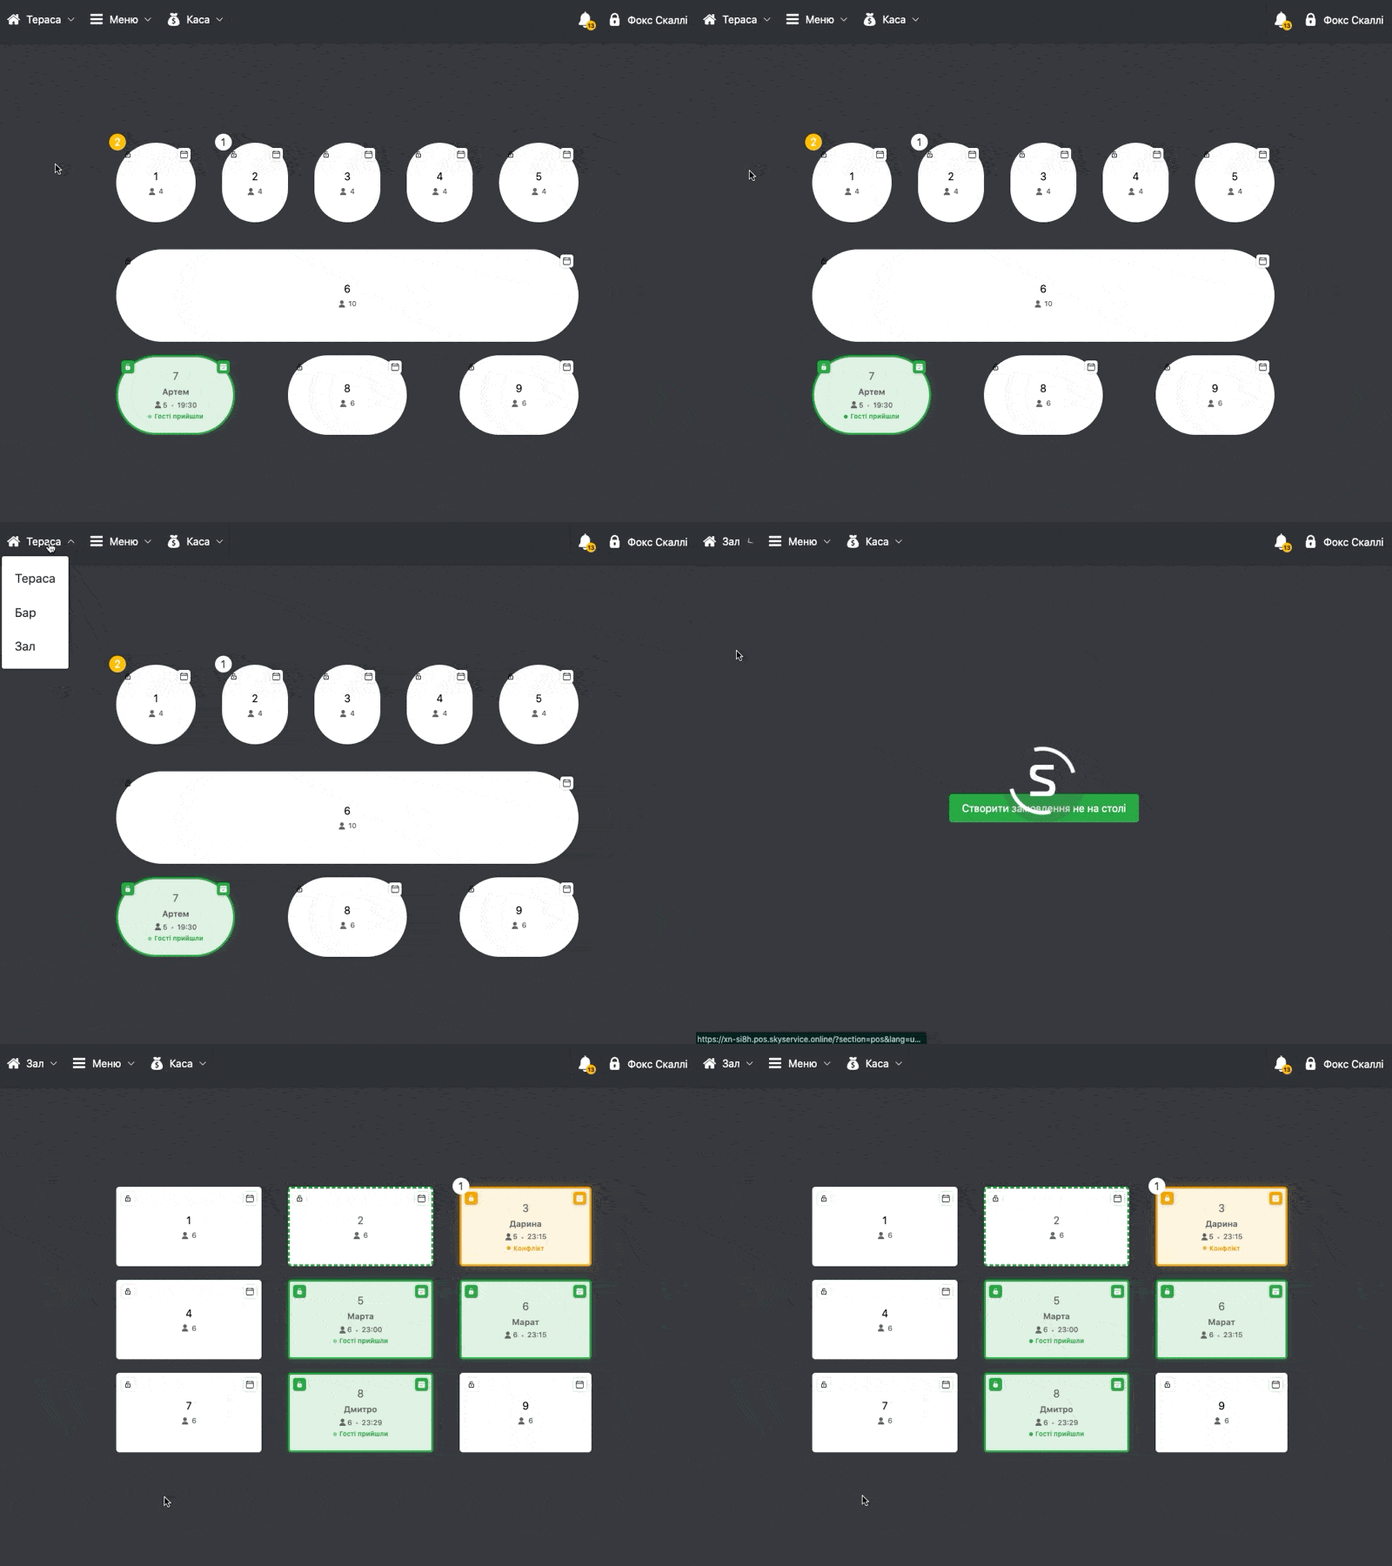
Creating, editing and completing a reservation
- To create a new reservation in the hall next to the required order click the calendar icon 📅
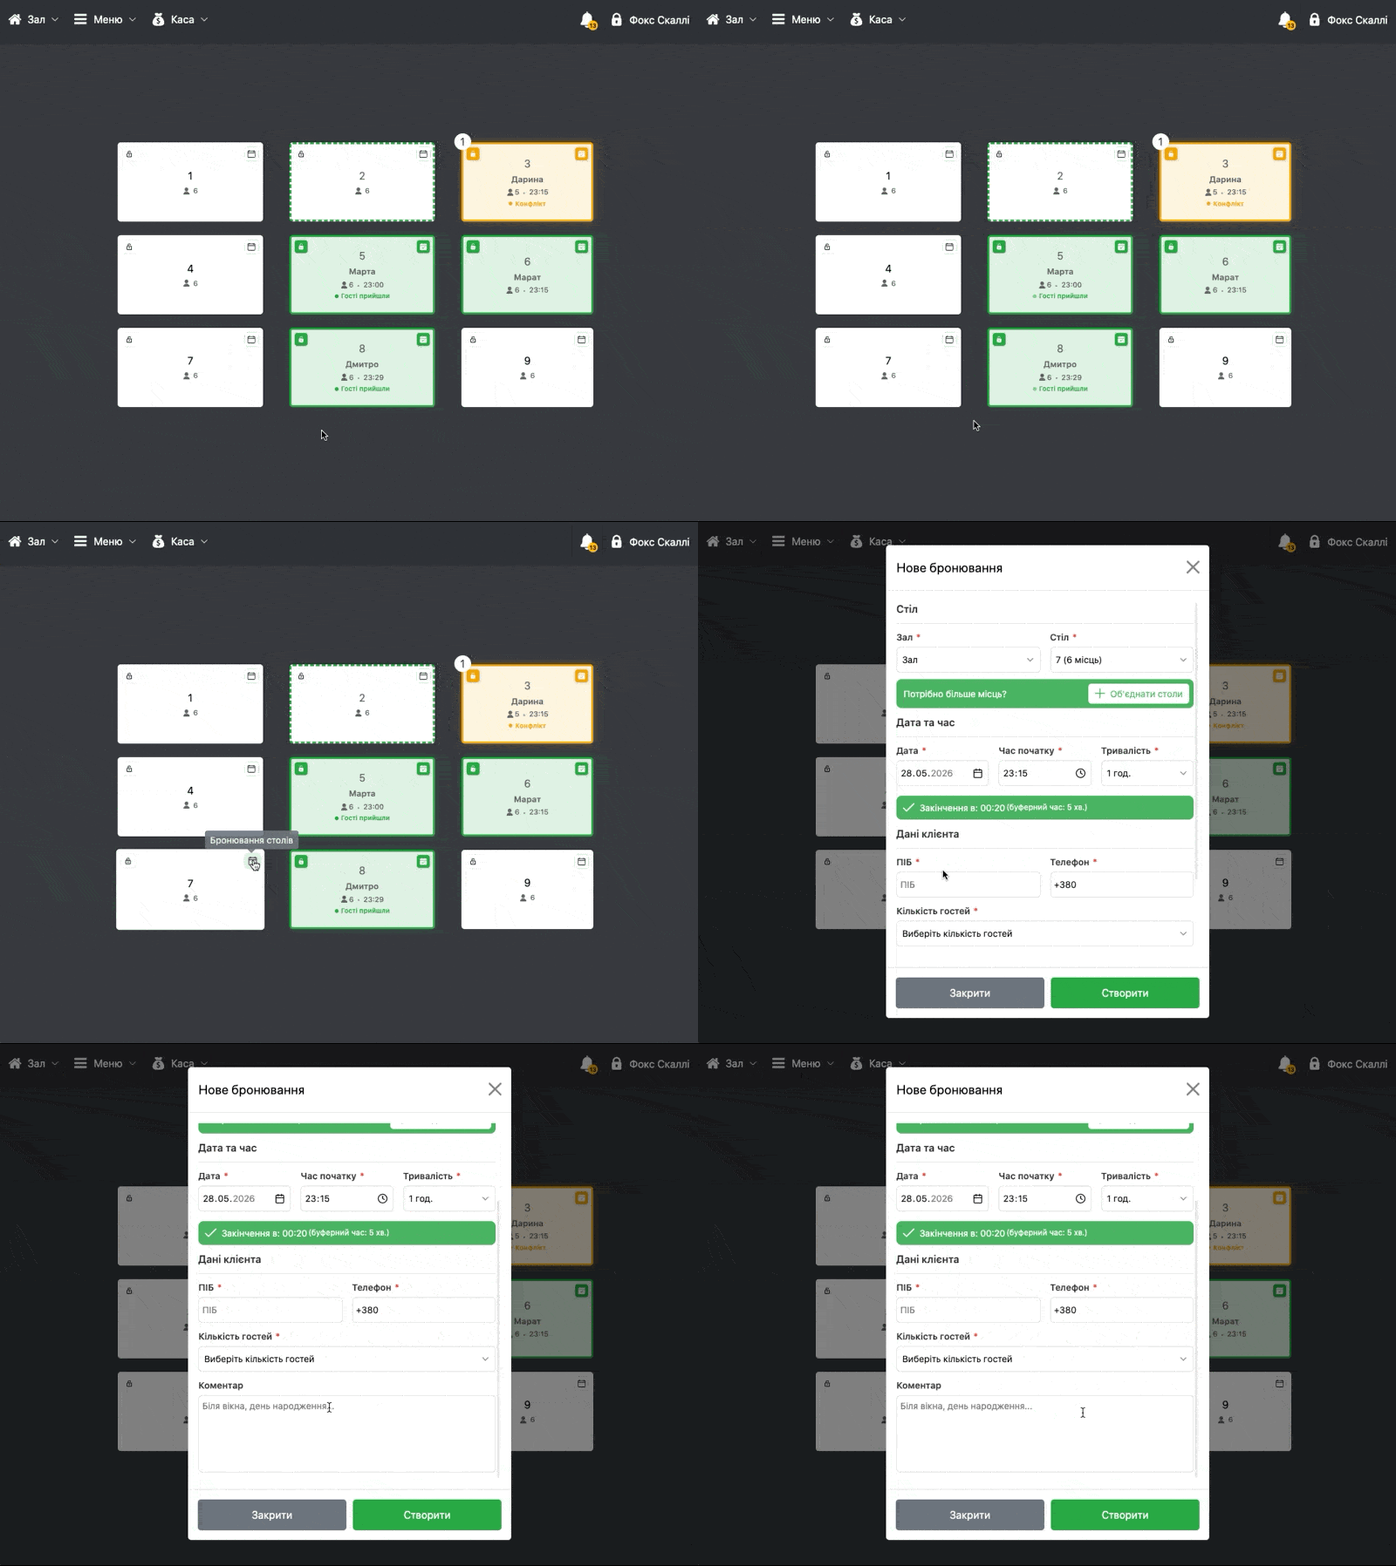
- Or in the app Table reservations → at the bottom click NEW RESERVATION
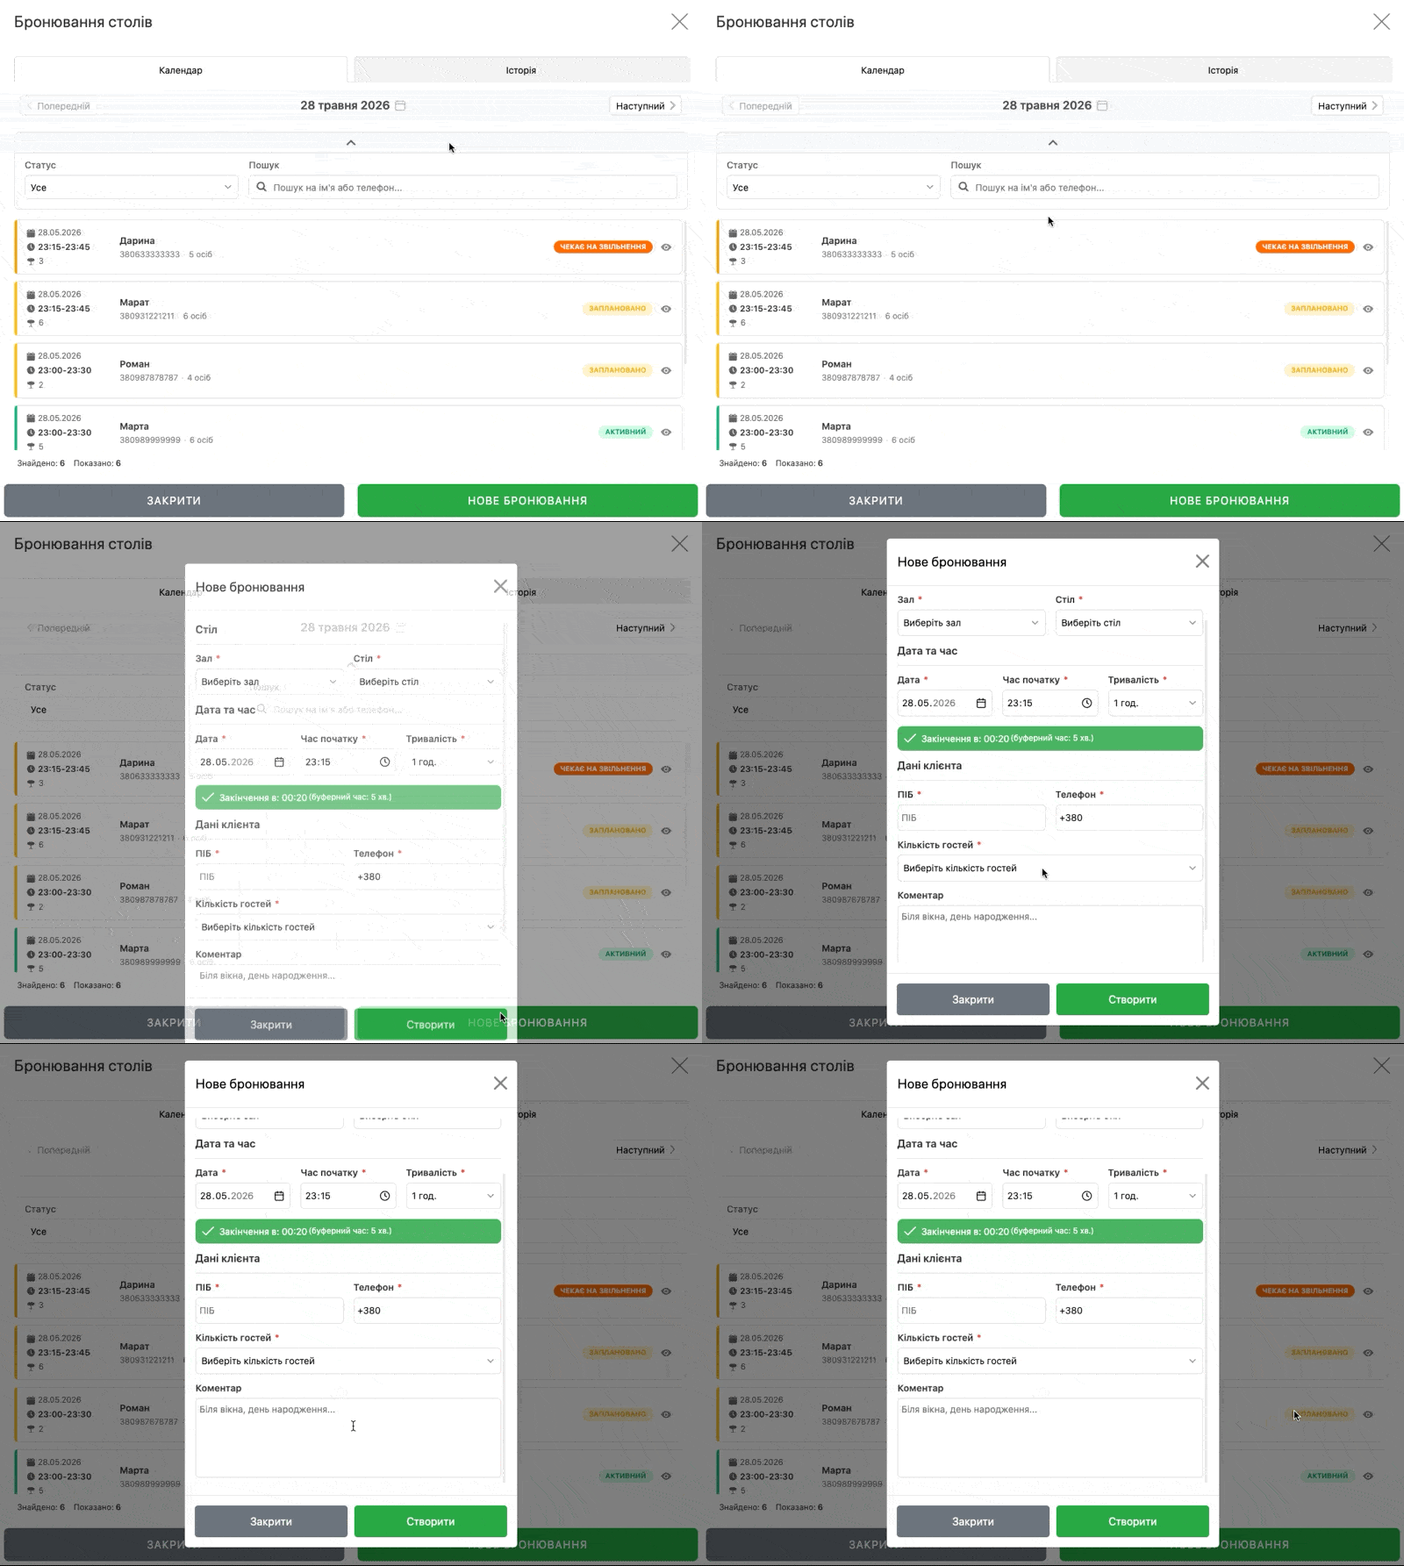
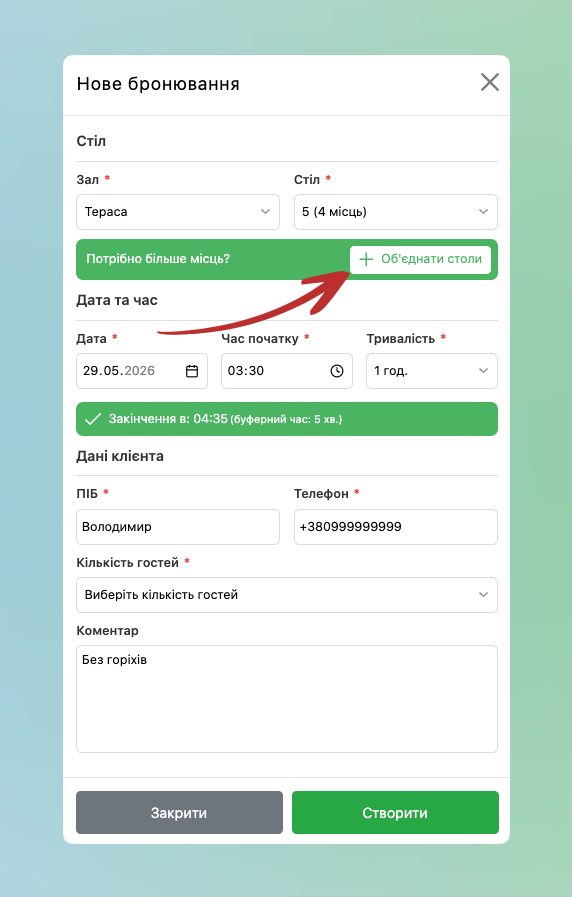
- In the next form fill in:
- If necessary set Hall and Table
- Date, Start time, Duration – after filling, a green block will appear with the calculated end time taking into account the buffer
- Full name of the client
- Phone – the phone number must be in the format +XXXXXXXXXXXX
- Set the Number of guests
- Comment – if necessary specify additional information about the reservation, filling in is not mandatory
- And then click Create
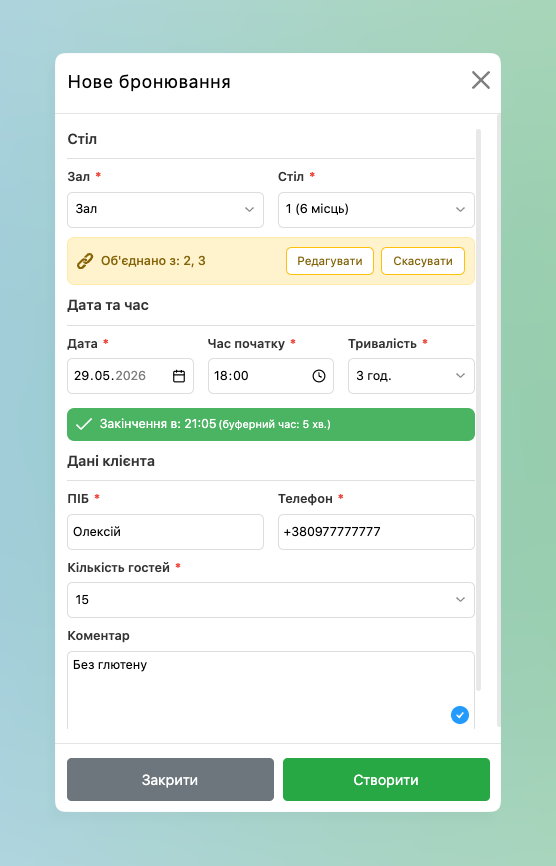
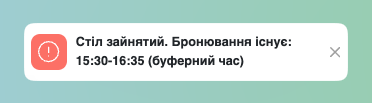
☝🏻If the table is already occupied at the specified time – the form will not allow saving the reservation.
Merging tables for large groups
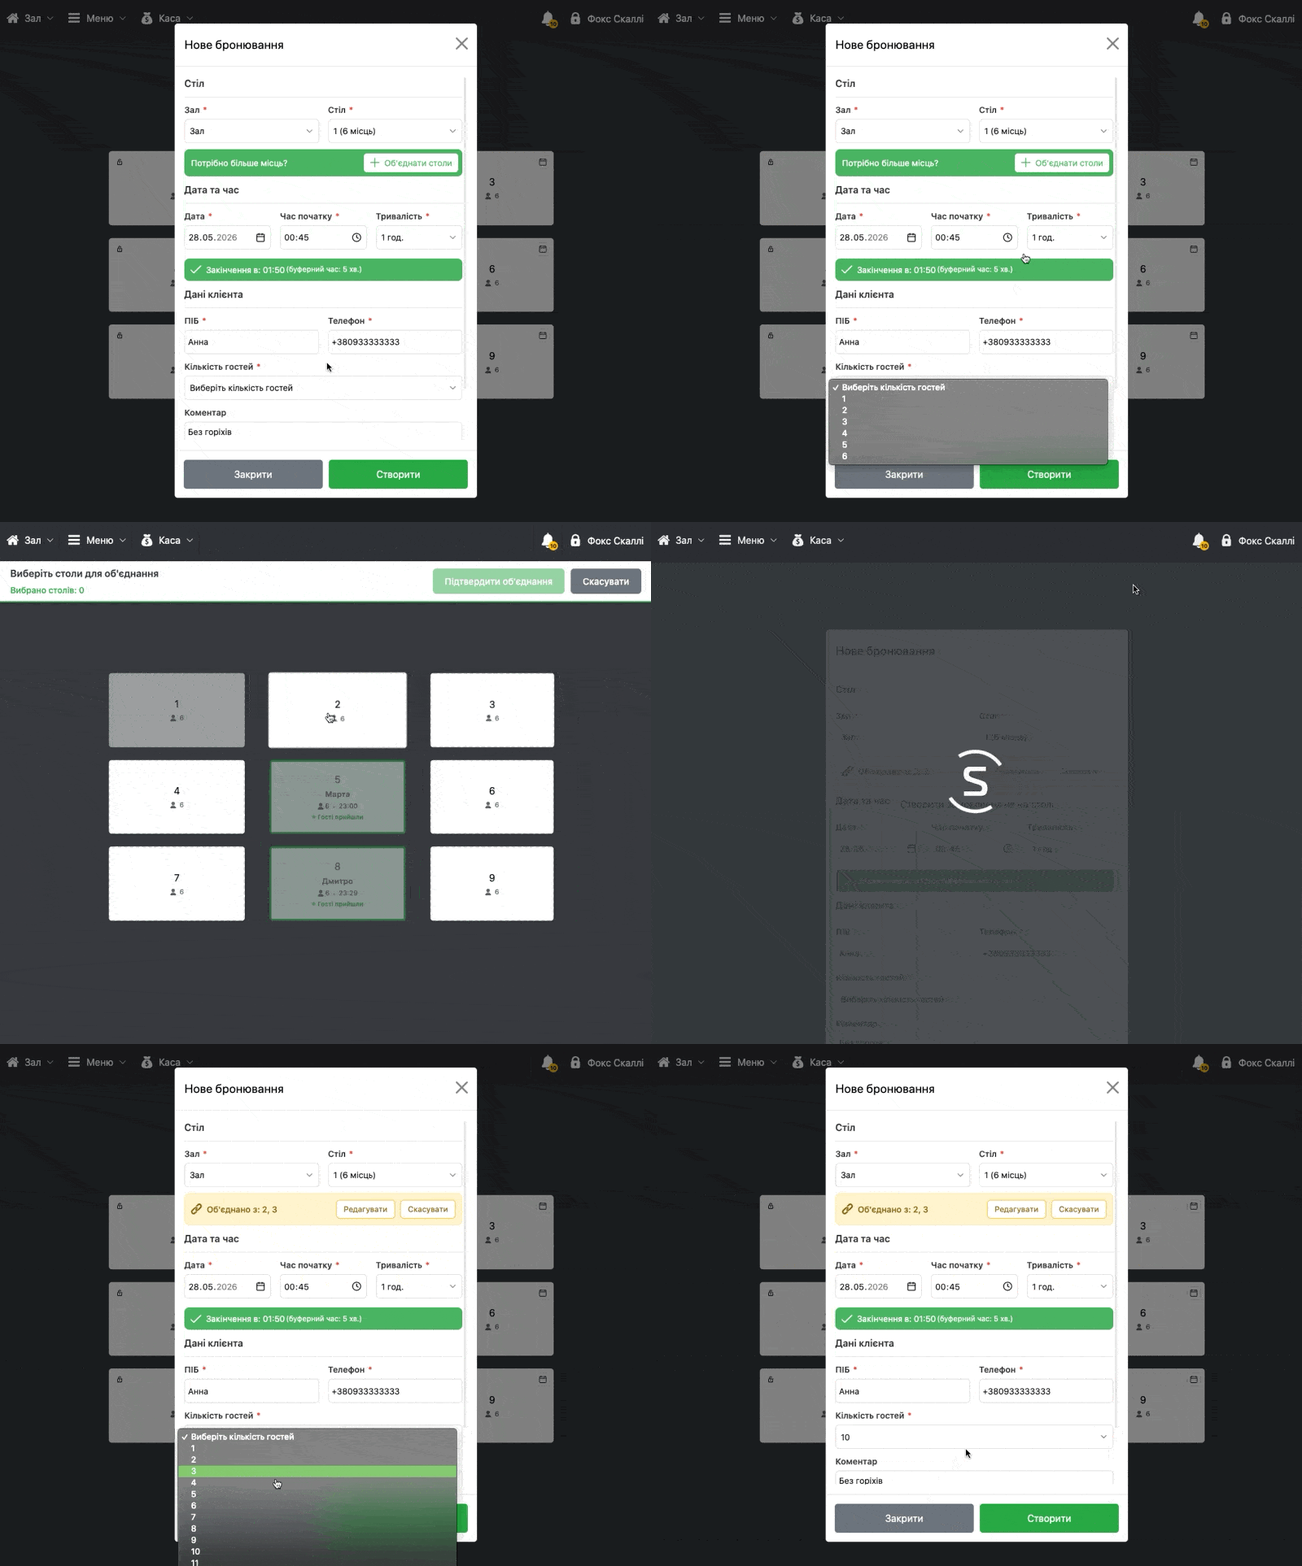
- If for the group more seats are needed than one table can accommodate:
- In the new reservation form click + Merge tables under the table selection field
- The form will close, the selection mode will open on the hall scheme with the banner Select tables to merge
- Click on the required tables – they are highlighted in turquoise
- The counter at the top shows “Tables selected: N”
- Click Confirm merging
- After confirmation you return to the reservation form. In it a yellow block appears “🔗 Merged with: Table N” with buttons Edit (change selection) and Cancel (unmerge)
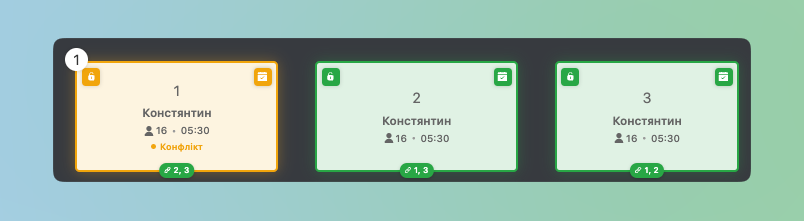
- On the Hall scheme merged tables are marked with a dashed turquoise frame, and under each of them – a badge with the number of the paired table
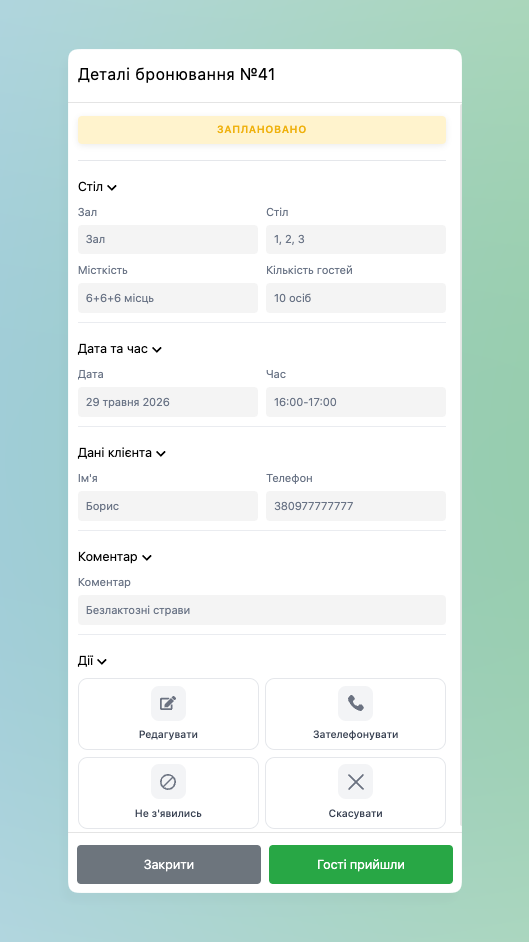
Reservation details
- In the app Table reservations you can view reservations for the entire period by clicking on it or the eye icon and detailed information will openHall scheme you can view the nearest reservations on tables for today by clicking the calendar icon
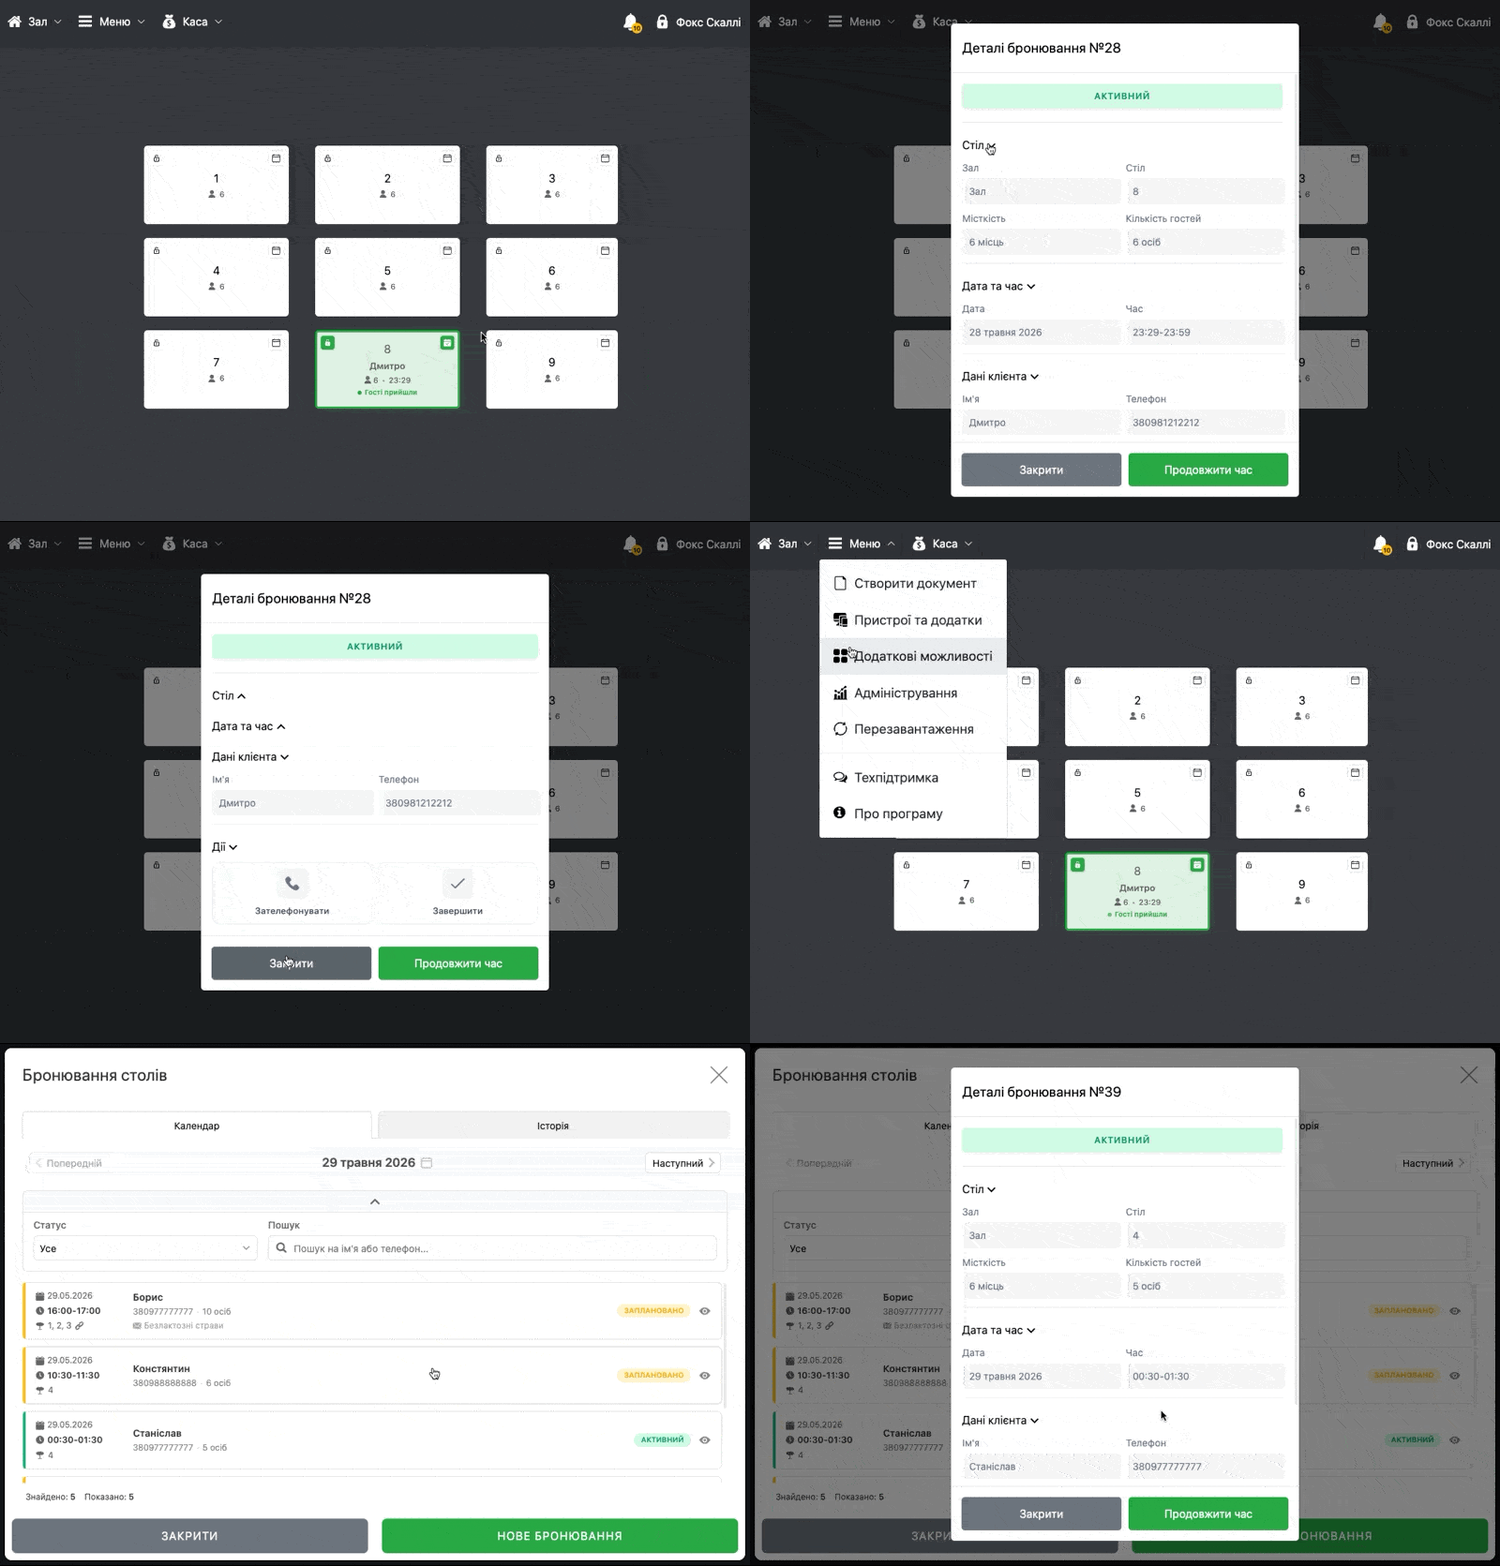
- The following blocks are displayed:
- Table – Hall, Table, Capacity of the table(s) and Number of guests
- Date and time – when the reservation was made and its period
- Client data
- Comment, if it was added
- Actions – additional buttons for managing the reservation
Actions with the reservation and its closure
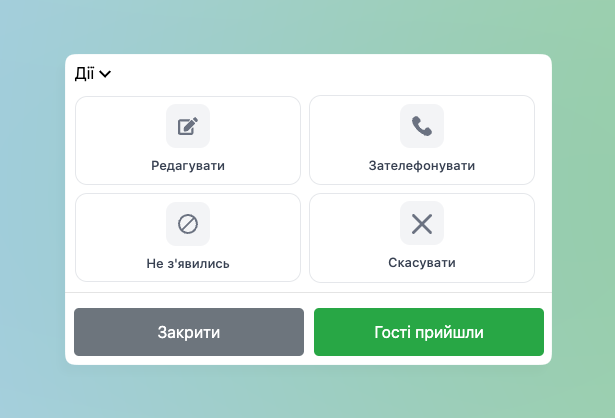
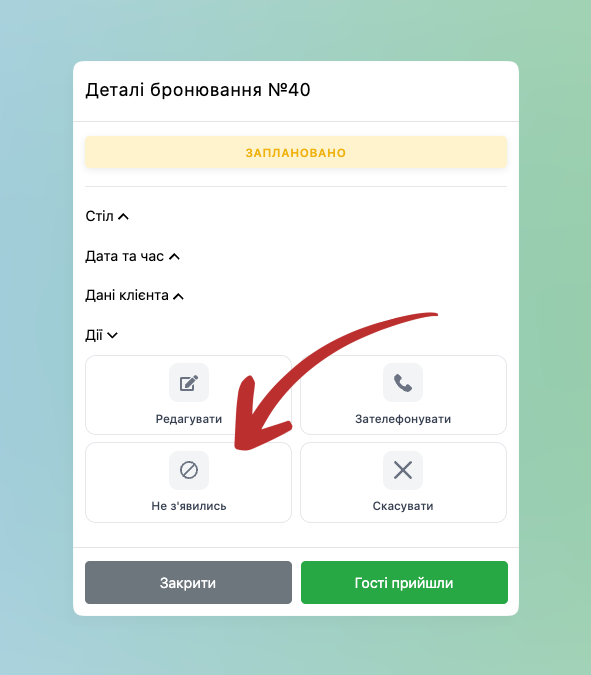
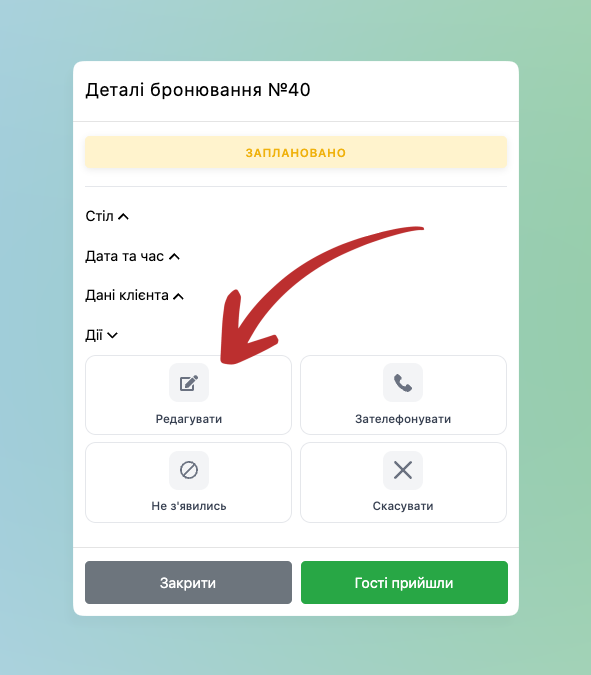
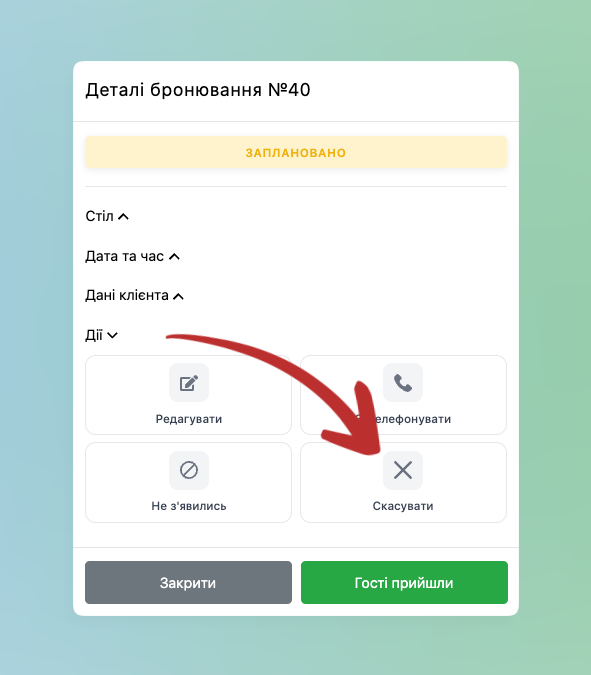
- In Scheduled reservations in the section Actions the following 4 buttons are available:
- Edit – change date, time, duration, comment or other data
- Call – quick call to the client
- No-show – mark that guests did not come. Also this status is set automatically after a certain time, which is configured in the settings Table reservations in the Admin panel in the item Automatically change status to “No-show”
- Cancel – additionally when cancelling a reservation it will be possible to specify the Reason for cancellation
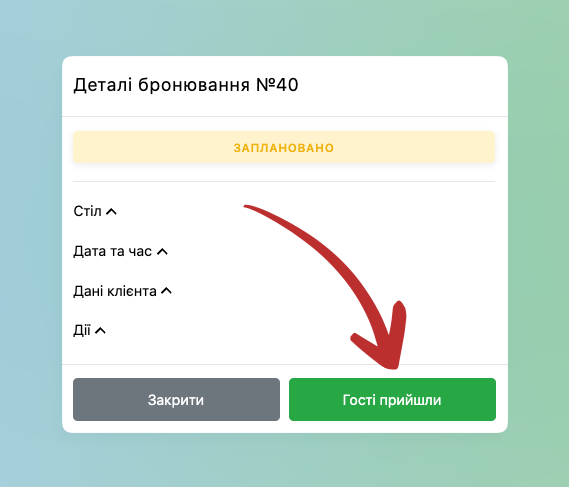
- Separately at the bottom the button Guests arrived is clicked when guests entered the venue: the reservation is activated and you can open the check
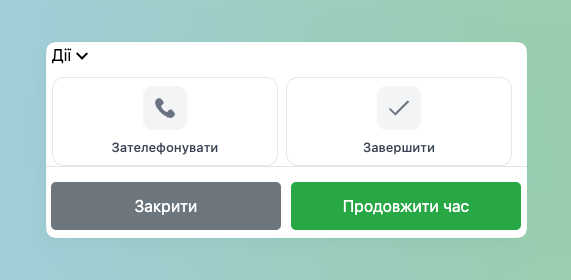
- In Active reservations in the section Actions the following 2 options are available:
- Call – quick call to the client
- Finish – finishes the active reservation
- Also at the bottom an additional button Extend time – if guests are delaying the reservation more than the planned time – clicking this button extends the reservation for the set time
- Note that if you do not extend the time – the reservation will automatically close after the reservation ends by the setting Automatically free the table after end
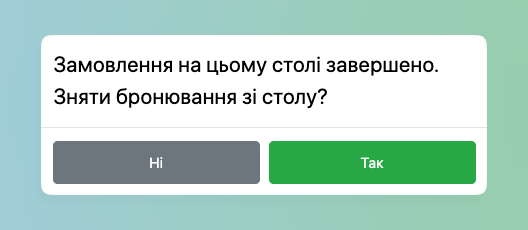
- Additionally after conducting an order (sale) it will automatically offer to remove the reservation from the table:
- Yes – closes the reservation and frees the table from guests
- No – the sale is made, but the reservation on the table continues to be active
☝🏻 With the active option Minimum order amount in case the check amount is less than the previously configured one – before closing the sale the system additionally informs the cashier about the insufficient amount. It is possible to return to the check to make additional sales or click Close anyway.
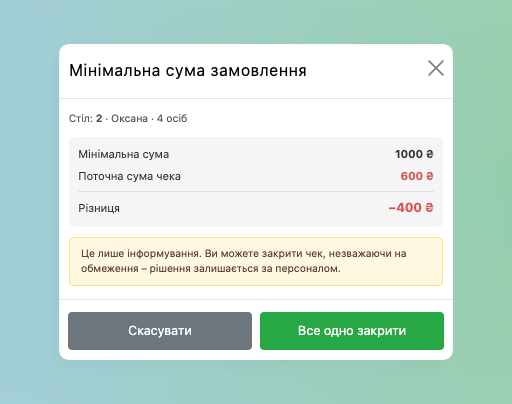
Table behavior
Before the blocking time comes
- The table works as usual – you can add visitors and conduct orders
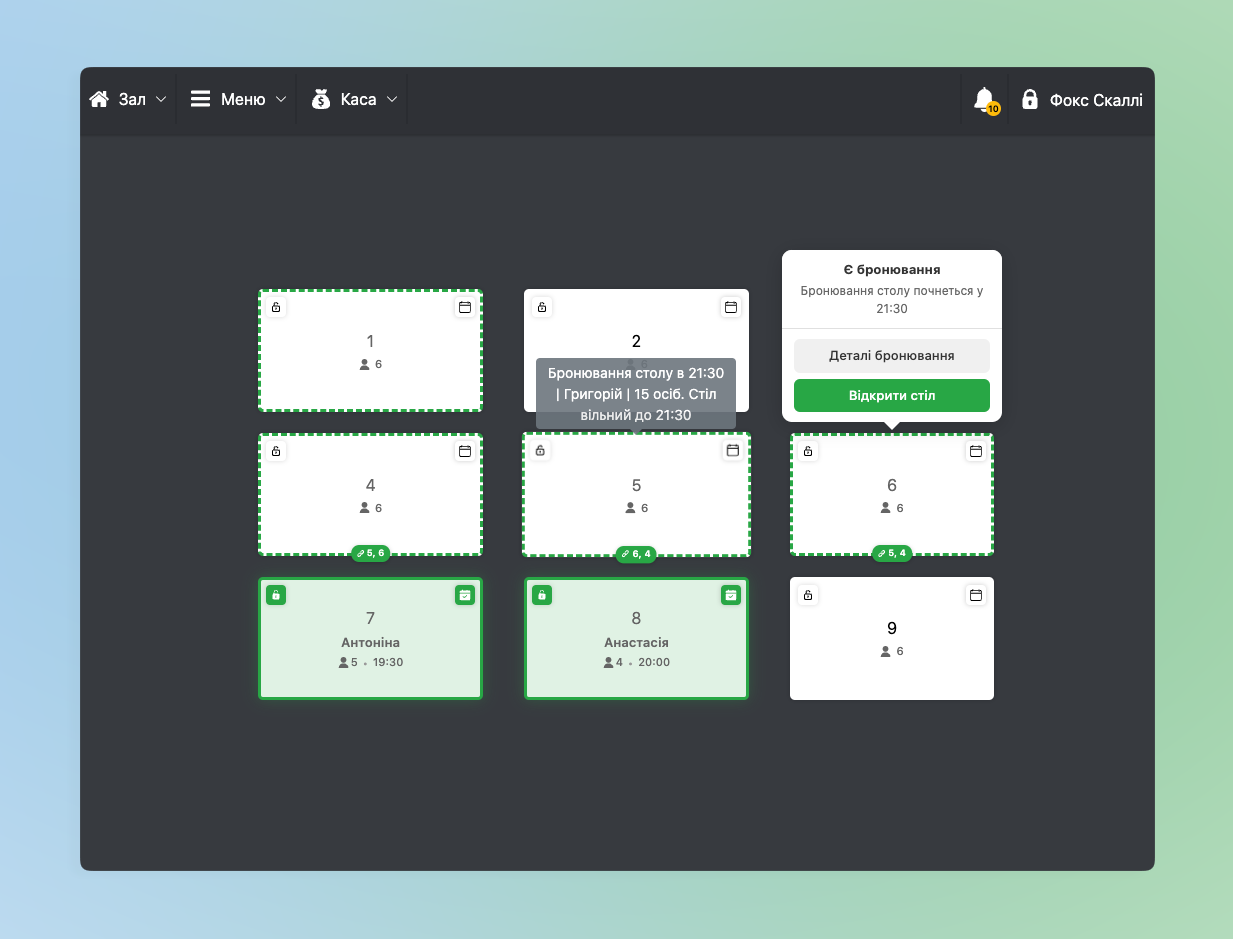
- When hovering over the table a tooltip with information about the upcoming reservation is displayed:
- Reservation of the table at 20:00 | Client’s name | Number of persons. Table free until 19:30
- When clicking on the table a small window appears There is a reservation with subtext when the reservation will start and two buttons:
- Reservation details – view the corresponding reservation
- Open table – work with the table and visitors as usual
After the blocking time comes
- The table is closed for new checks. When trying to open the table, a warning about the active reservation will appear
- When guests of the reservation arrived – click Guests arrived in the reservation details, after which the table will become available for opening a check under this group
Common scenarios
Guests arrived earlier than the agreed time. – In the reservation details click Guests arrived – the table is activated immediately.
Guests did not come. – Wait – the system will set the No-show status itself after the time set in the settings. Or mark manually in the Actions of the reservation details.
Client wants to reschedule the reservation. – Open the reservation details → Edit → change date/time → at the bottom Save.
Client cancels by phone. – Find the reservation in the “Calendar” tab or via search by phone → open the details → Cancel → if necessary you can add Reason for cancellation or cancel without it.
A large group came, more seats are needed. – Create a new reservation → click Merge tables → select several adjacent tables → confirm the merge.
Check amount is less than the minimum deposit. – The cashier will see a warning with details: minimum amount for this reservation, current check amount and the difference. It is possible to return to the check or close it despite the warning.
☝🏻The system informs the cashier but does not block their actions – staff on site better understand the situation and make decisions independently.